A Guide to Sharing Your WordPress Images with Creative Commons
Tutorials
It’s been an issue with writers on the web from the very beginning, but especially since people started blogging: you want to share your ideas, art and other creative talents with others, but still maintain control over other people’s use of your communication. Solution? The Creative Commons license.

It’s been an issue with writers on the web from the very beginning, but especially since people started blogging: you want to share your ideas, art and other creative talents with others, but still maintain control over other people’s use of your communication. Solution? The Creative Commons license.
Using a Creative Commons license, as the creator of the content you can define what’s OK for others to use and under what conditions.
In this article, you’ll learn how to identify your content with a variety of Creative Commons (CC) licenses.
Note: If you’re looking for CC-licensed images from others to use on your site, check out this roundup of plugins to do just that.
What is Creative Commons?
I know, copyright law is dull and complex, so I’ll try to get through this quickly. It’s important to understand how this all works. If you know what this is, feel free to scan down to the next section.
Any creative product: blog posts, magazine articles, lyrics, music, photographs, artwork, software code, and video is subject to copyright. Unless other arrangements are made, in the US the creative product belongs to the person who created it from the moment it exists in “fixed media.” That includes a computer hard drive.
Exceptions include when your creative product is paid for by someone else (work-for-hire), but that’s not relevant for your own blog content.
When you open most printed books, you’ll see a copyright notice like this © with the phrase “All rights reserved.” Creative Commons recognizes that web content is easily copied, saved, and pasted from one computer to another, so traditional copyright is hard to enforce. The choice creators have with these licenses is to offer “some rights reserved.”
Choosing a Creative Commons License
To simplify the Creative Commons licensing process, visit creativecommons.org/choose.
There’s a hand form on the site that asks all the critical questions to help you identify which license to use with your specific content.
Creative Commons assumes that if you’re on this page, you want to share your content but want others to credit you when they use it. That’s the baseline CC Attribution, or BY, license.
Do you want to share your work with others, and allow the others to remix or otherwise produce derivative works from it?
If you say no, that’s the Attribution-NoDerivatives license (BY-ND).
If you say yes, that’s still the BY license. Essentially, you’re allowing people to use your work, make changes and do any other wonderful thing (you hope) with your content, as long as they credit you.
You can also answer this question “Yes, as long as others share alike.” This restricts the other person to make changes, but under the same condition that you shared. This is the Attribution-ShareAlike license (BY-SA).
Last question: Can people use your content to make money?
Yes: Others can use your content to sell things, or include your content in a derivative work that they can sell.
No: This adds a NonCommercial (NC) tag to the license.
Creative Commons provides a great graphic that describes the spectrum of licenses:

Free Cultural Works
The less-restrictive licenses in the green zone are classified as Free Culture licenses. This means they’re designed for maximum sharing and mixing up. Consider allowing anyone who sees an image you created to change its colors and create an entirely new work from it. Or a recording that creates a new work from a pile of samples.
In the Understanding Free Cultural Works FAQ, these works are described as “the ones that can be most readily used, shared, and remixed by others, and go furthest toward creating a commons of freely reusable materials.”
“Creative Commons exists not just to create copyright licenses, but also to encourage the creation of a thriving commons through sharing knowledge.”
By the way, that CC0 license at the top of the scale? That’s the equivalent of a public domain license.
Adding Metadata to Your Content
You might think that the development community as committed to openness and sharing would make it fairly easy for users to identify media as shareable through Creative Commons. Yet there is no way to upload a photo, image, or video and attach a CC license to it in the WordPress Media Library.
You can, however, add a CC license as metadata included with your media file before uploading. Some image editors support CC licenses directly, others let you add generic metadata where you can place the CC License.
After you’ve decided what license to apply to your image, you can use the same page to create some standardized metadata to apply to the image.
Let’s say you took a photo of the Chicago skyline from the Willis Tower (which locals still call the Sears Tower) with your phone.

Click the link under “Help others attribute you.” You can fill out this form like this:
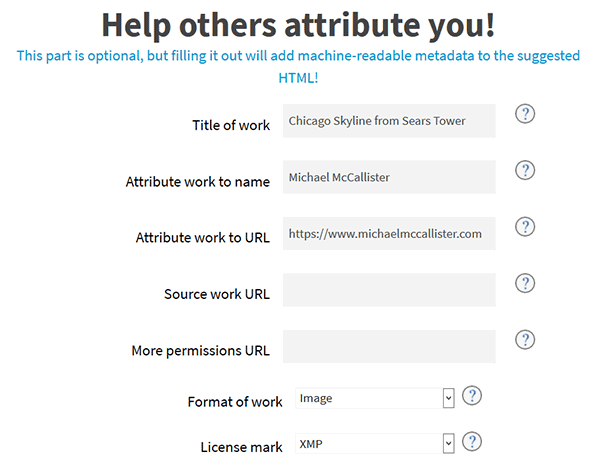
Give your image a title, give your name and website, so others can properly credit you. If you used someone else’s work to create yours, fill in the Source work URL. If you’re willing to negotiate permissions to use your work in some other way than described in your license (for example, if you included a NonCommercial tag, but would give permission for some compensation), fill in the More Permissions URL. That could be a pointer to a contact form on your site, or a mailto: address (if you’ve got a good spam filter).
You can apply CC licenses to any or all these data or media formats, as indicated in the Format of Work drop-down menu:
- Audio
- Video
- Image
- Text
- Dataset
- Interactive
To apply this metadata to a standard image editor like Adobe Photoshop, or the GIMP, choose the XMP option under License Mark. This is the Extensible Metadata Platform, originally created by Adobe. Download metadata.xmp to your computer, so you can apply it to the image.
Applying the Metadata to the Image
If you’re using an Adobe product like Photoshop, Lightroom, Illustrator, or Acrobat (PDF) you need to copy the XMP file to this Windows folder: C:\Users\\AppData\Roaming\Adobe\XMP\Metadata Templates (in Windows 10; for earlier Windows versions, use the Application Data\Adobe folder).
In Mac, save to /Users//Library/Application Support/Adobe/XMP/Metadata Templates
Once you’ve transferred that image to your computer, open it up in Adobe Photoshop.
Go to File > File Info. If you installed the template in the right folder, you should see a drop-down menu with the CC license types in the lower-right corner, next to the Preferences button. Make sure the right one is selected. You may also want to change the Copyright Status.
If your image is in a PDF, go to File > Properties. In the Description tab, select Additional Metadata. This time, the CC menu is in the upper-right corner.
In the open source GIMP photo editor, it’s a lot easier: Go to File > Properties. Click Import XMP. Locate the XMP file, click Open.
To confirm the import, go to the Advanced tab in Image Properties. Expand both XMP Rights Management and http://creativecommons.org/ns# sections. They should be populated with the information you included in the CC Choose a License form.
Use the Description tab to add more metadata to your image.
You can then safely upload your CC-licensed content to the WordPress Media Library.
Enforcing Your License
Gotta be honest, it’s hard to ensure that other people will comply with your wishes, even if you only reserve some rights. It’s too easy to right-click a picture on the web and Save Image As.
The popular NextGEN Gallery plugin lets you add a watermark to any image. With their premium Plus package, you get an Image Protection extension, which prevents downloading an image.
You can also paste a CC license notice in a text widget, for a general declaration. Shaming is a good way to remind people that your generosity does have bounds.
In this article, you’ve learned a bit about the range of Creative Commons licenses and how to generate licensing metadata for images, PDFs and other media files with the Creative Commons license choice tool. With some perseverance, you can add that metadata to your images and ensure your images are appropriately licensed and made available for others to use.
All the good WordPress stuff, once every two weeks
Subscribe
Create your free account to post your comment
Login to post your comment