Improve the WordPress Visual Editor With These Cool Hacks
Tutorials
WordPress 3.9 will feature the updated TinyMCE version 4 in core when it’s shipped next month.
Version 4 looks real nice. It’s got a completely new GUI, simple and faster dialogs, and new and improved APIs and default plugins and better code quality.
It’s also minimalistic. Buttons have been dumped for WordPress, such as the paste from Microsoft Word button (who uses that, anyway?). There are just 14 buttons.
What a lot of WordPress users don’t realize, though, is that there’s more to the WordPress Visual Editor – and its backend, TinyMCE – than meets the eye.
In this post, I’ll go over some quick improvements you can make to the Visual Editor as well as some handy plugins for even more functionality.
Enable Hidden Buttons
The Visual Editor is sparse. Yeah, minimalism is good and all that, but sometimes I just want more buttons!
There are a bunch of buttons included in TinyMCE that are disabled in WordPress. Luckily, it’s easy to enable them.
For example, to add a horizontal rule button to the first row of the visual editor, add the following code to your functions.php file:
{code=php}function add_more_buttons($buttons) {
$buttons[] = ‘charmap’;
return $buttons;
}
add_filter(“mce_buttons”, “add_more_buttons”);
If you want to add the horizontal rule button to display in the second row, use this filter hook instead:
{code=php}add_filter(“mce_buttons_2”, “enable_more_buttons”);
You can add as many buttons as you like, just repeat the buttons you want to return, for example:
{code=php}$buttons[] = ‘cut’;
$buttons[] = ‘copy’;
$buttons[] = ‘paste’;
Disabled buttons that you can enable include:
- Cut
- Copy
- Paste
- Formatselect
- Fontselect
- Fontsizeselect
- Styleselect
- Forecolor
- Backcolorpicker
- Charmap
- Visualaid
- Newdocument
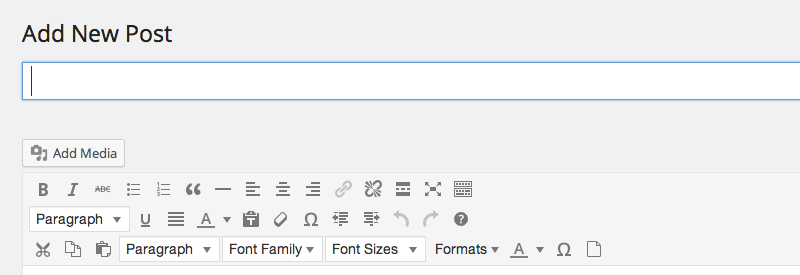
And this is what the visual editor looks like when all of the hidden buttons are enabled on a third row:

Front-End Editing… Almost
When you’re writing articles in the backend of WordPress, previewing posts can become tedious each time you want to see what your work looks like after adding an image or formatting text.
While the distraction free writing mode takes away the clutter of the visual editor, it doesn’t emulate what your post will look like on the front-end.
Fortunately, there are a couple of simple hacks you can make – changing the width of the editor and matching your theme style – to style the visual editor to resemble your theme’s style.
Add the following code to your functions.php file:
{code=php}add_action( ‘after_setup_theme’, ‘wptuts_theme_setup’ );
function wptuts_theme_setup() {
set_user_setting( ‘dfw_width’, 1000 );
add_editor_style( array( ‘css/style1.css’, ‘css/style2.css’ ) );
}
In this example, the full width is 1000px, but you can change this value to whatever suits your theme.
The path to the CSS files is relative to your theme’s root folder, so if your WordPress site is in the root of your domain, the path would like be something like: wp-content/themes/your-theme/css/your-css-file.css
Some themes, like Twenty Fourteen and Twenty Thirteen, already use add_editor_style to style the visual editor to emulate the front-end, so check your theme doesn’t already have this feature turned on before trying it out.

While there text replicates what’s shown on the front-end, the headline remains the same:

Nevertheless, this method is a great way to see what your post will look like once published.
Thanks to the clever folks at WPTuts+ for this awesome snippet.
Advanced Editing With a Plugin
If you would rather not mess around with your theme files, there are a few great plugins that add advanced TinyMCE functionality to the visual editor.
TinyMCE Advanced

Add, remove, and arrange the buttons in the visual editor with TinyMCE Advanced. It includes 16 plugins for TinyMCE that are automatically enabled or disabled depending on what buttons are chosen.
Some of this plugin’s features include:
- Support for creating and editing tables
- Search and replace in the editor
- Editing inline CSS styles
- Adding and removing HTML tag attributes
TinyMCE Advanced is compatible with the latest version of WordPress (3.8.1).
In case you’re wondering: Due to the fact WordPress 3.9 will be released soon, this tutorial features images from the upcoming release.
All the good WordPress stuff, once every two weeks
Subscribe
Create your free account to post your comment
Login to post your comment