11. Client Tools – Settings
The Client Tools area is where you’ll find everything you need to effectively manage client activity in your Hub or in any client portal that you set up on your own site with the Hub Client plugin.
The tools available here enable you to:
- Manually add clients or import existing customers from Stripe.
- Link clients to websites, domains and Pro Email accounts so they can manage things themselves in your client portal if you so wish.
- Limit client access to only the client portal features that you want.
- Create & sell product and service packages..
- Resell WPMU DEV hosting and domain products.
- Manage all aspects of your billing process with Stripe.
- Collaborate with team members to resolve client support tickets.
11.1 Getting Started
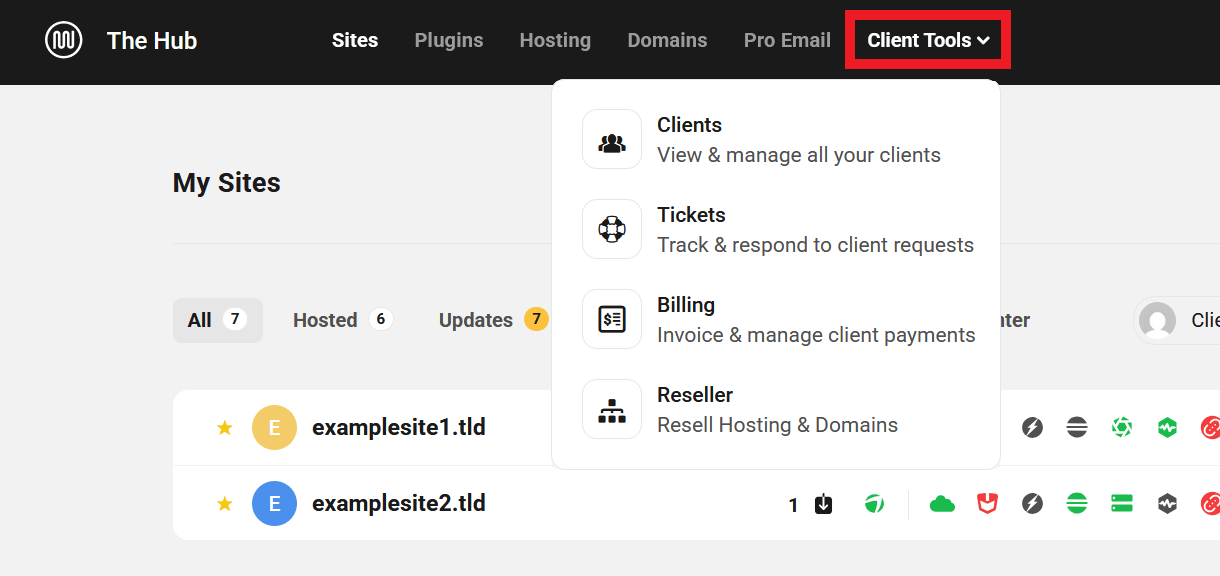
Copy chapter anchor to clipboardYou can access all the available client tools under Client Tools in the Hub main menu.
If you can’t see or access this feature in your Hub, please be sure the Client Tools option is set to Visible under your Hub Preferences menu. See My Sites Overview > Getting Started for more information.
This document covers all the options found under the Settings tab in the Client Tools area, where you’ll find everything you need to configure default settings for the various features of your client tools.
Simply click any option in the Client Tools main menu to pop open the Tools sidebar where you’ll find all the settings.

For detailed information about the specific Client Tools and their features, please refer to their dedicated documents, as follows:
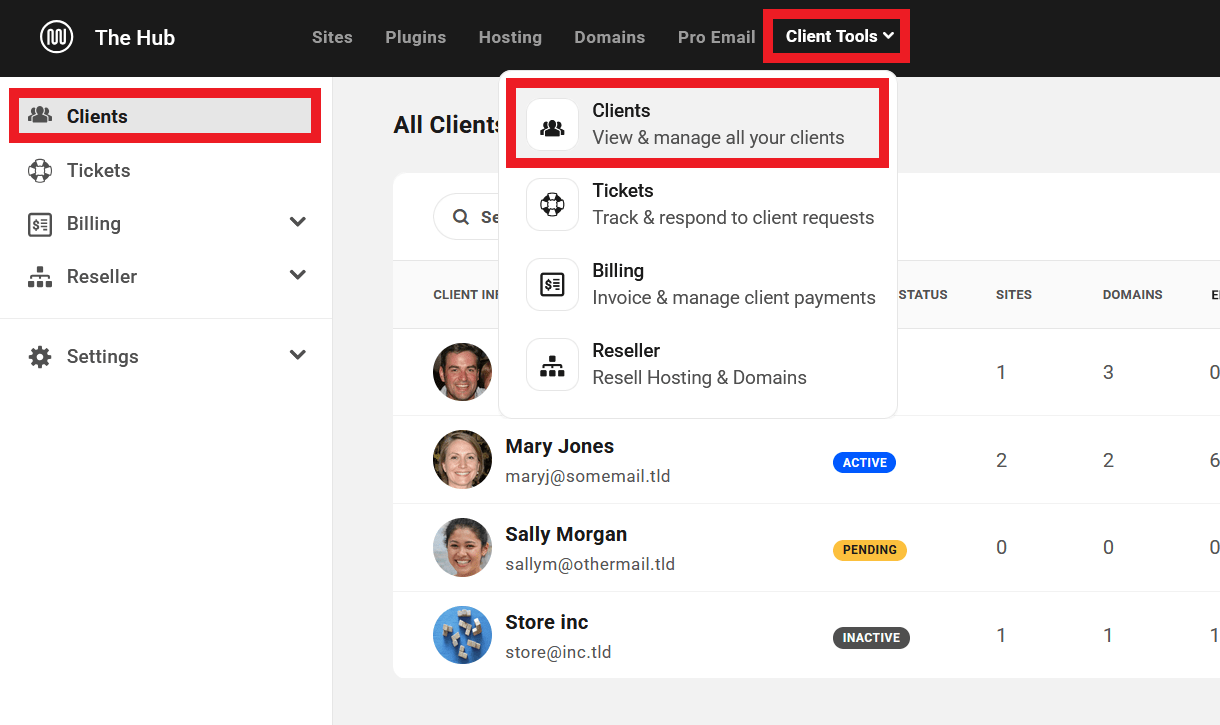
Clients
The Clients section is where you can review and manage everything specifically related to your clients, whether you added them manually or imported them from Stripe.
See the Clients documentation for details.
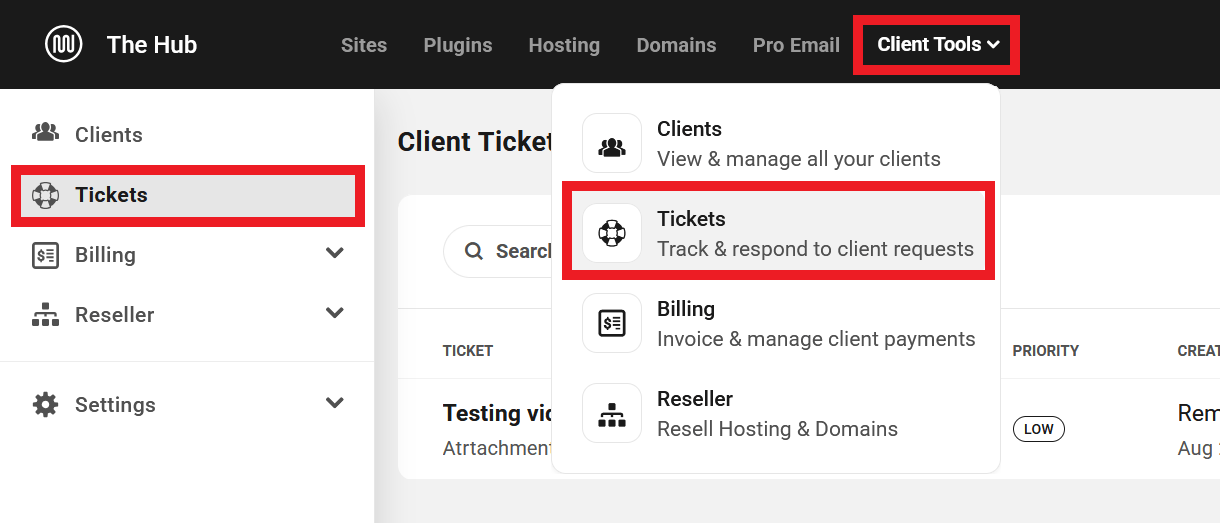
Tickets
The Tickets section is where you and/or your team members can collaborate to resolve issues in support tickets created by or for your clients.
See the Tickets documentation for details.
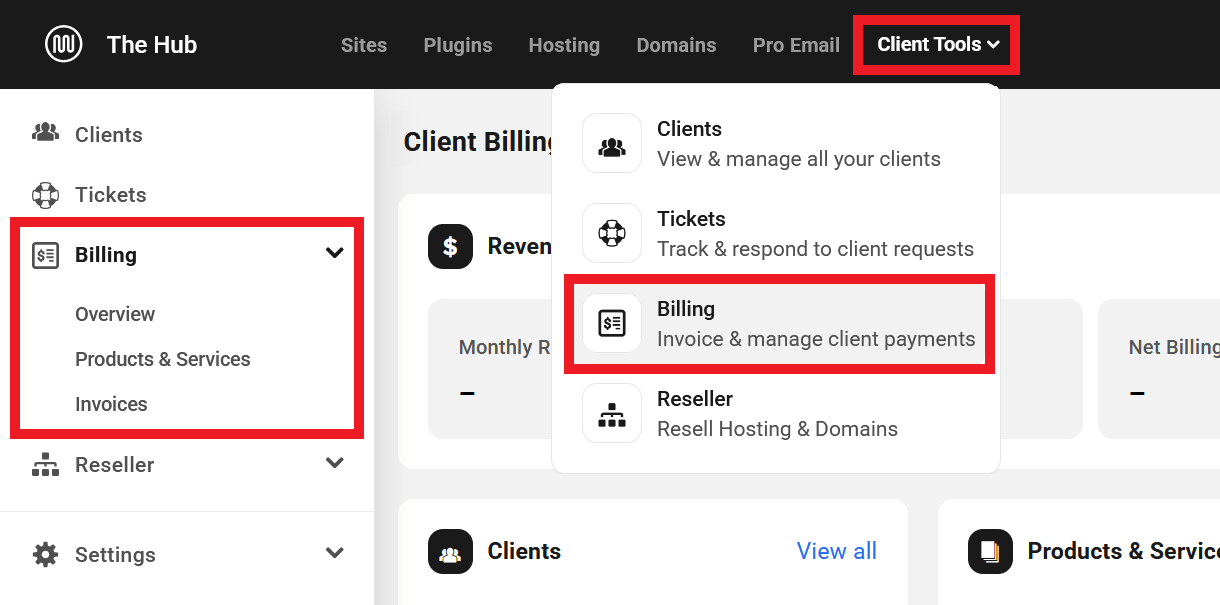
Billing
The Billing section is where you can create the product and service packages that you want to sell to your clients, and manage all aspects of your billing process with Stripe.
See the Billing documentation for details.
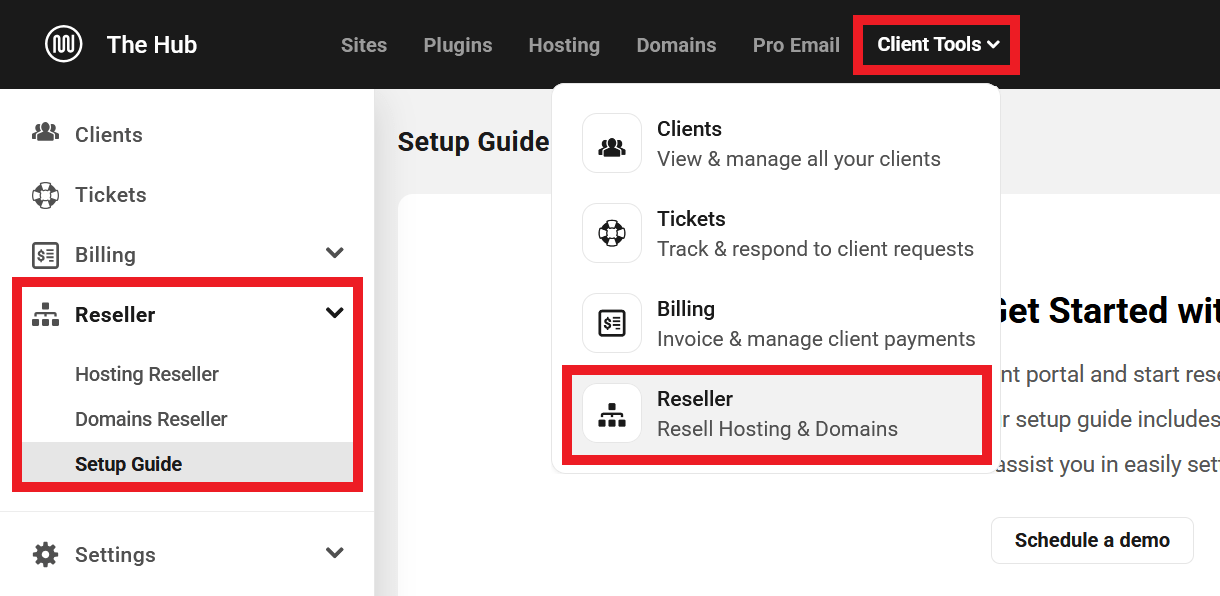
Reseller
The Reseller section is where you can create your own WPMU DEV hosting and domain products to resell to your clients.
See the Reseller documentation for details.
11.2 General Settings
Copy chapter anchor to clipboardThe settings in this section enable you to set up your business branding, create custom fields that you can include in your business and/or client profiles, customize email notifications, as well as configure custom client roles.
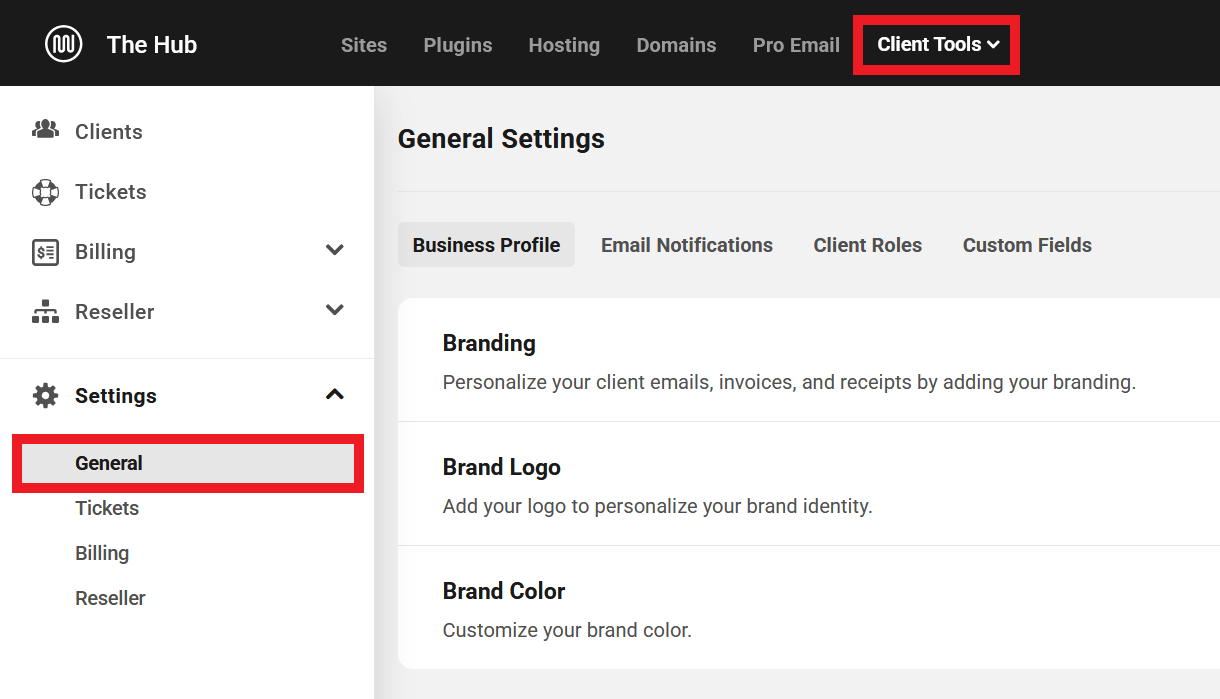
11.2.1 Business Profile
Link to chapter 2Here is where you can manage the business information that appears in your invoices, emails, and receipts.

Branding
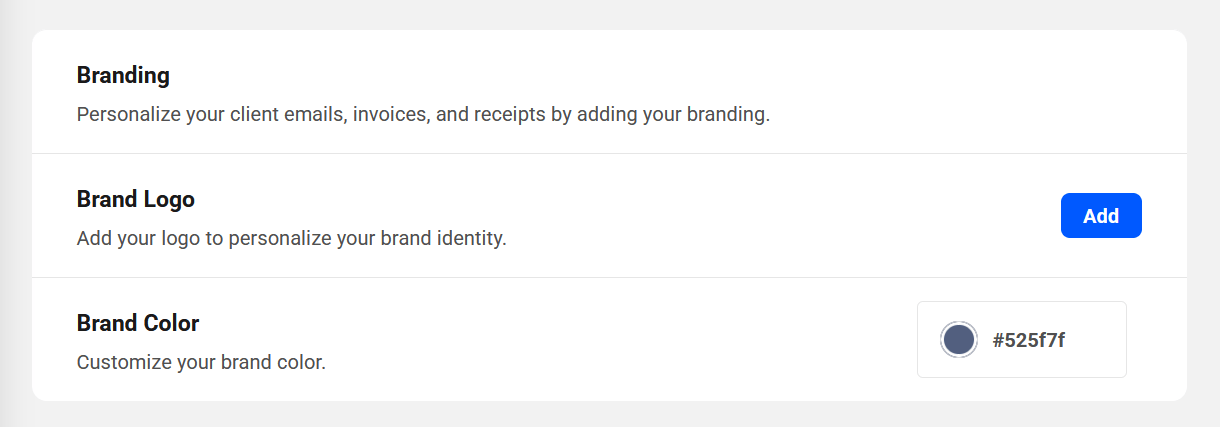
Brand Logo
Click the Add button to upload the logo you wish to use for your client billing.
This logo will also appear in your clients’ profile menu (at top-right) if they log in to your Hub here at WPMU DEV. If a client is logged-in to your client portal on your own site, this logo will also appear instead of the WPMU DEV branding in the header.
Note that this setting does not affect the logo set in your Hub Client that is displayed to Team Members; they will continue to see the branding you set in your Hub Client.
Brand Color
Click the current color displayed to change to a color better suited to your brand.
Business Info
The Business Info section on this screen displays your business name, contact email & number, website and mailing address. This information can be used in your clients’ statements, invoices, receipts, etc.
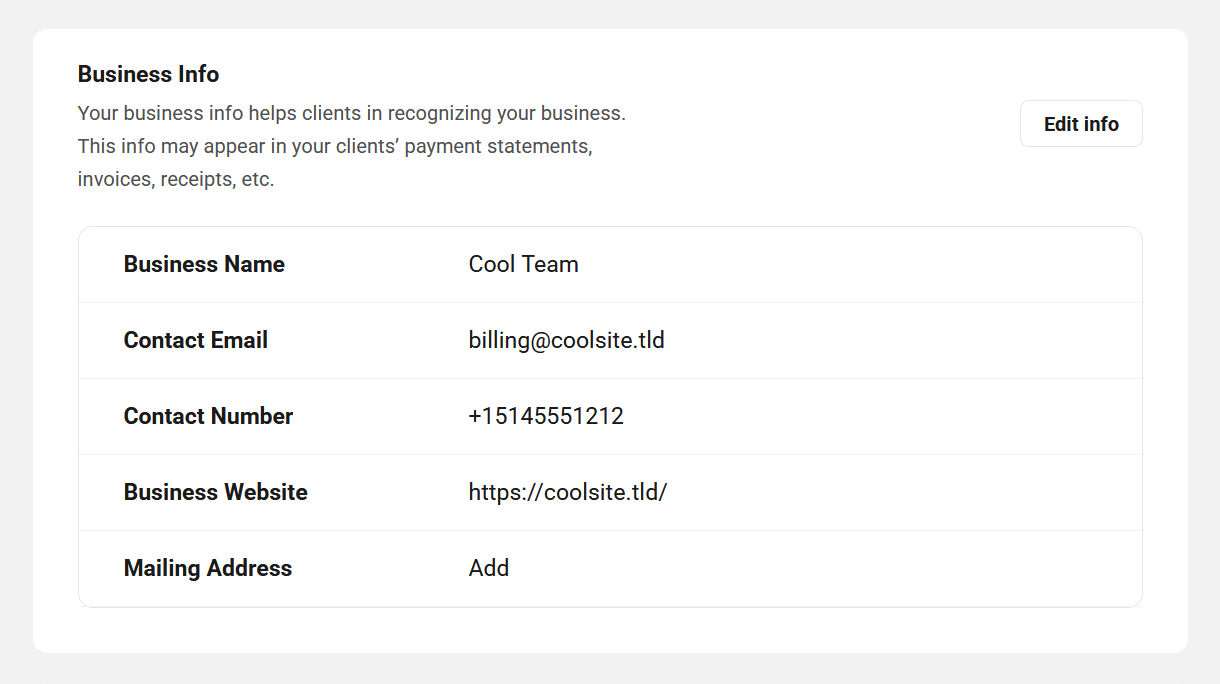
If any of this information is already set up in your Stripe account, it will be imported and automatically displayed here. Click the Add/Edit info button to pop open a modal window where you can edit all the information.
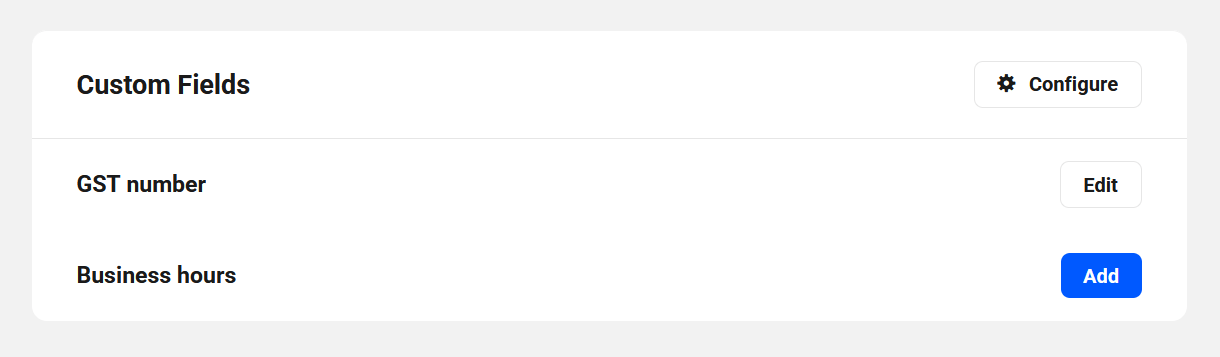
Custom Fields
This section displays the custom fields that you have created for your Business Profile under the Custom Fields tab. Click the Configure button to go to that screen where you can add or edit your custom fields. Click the Add or Edit button for any field to adjust the information for that field.
11.2.2 Email Notifications
Link to chapter 2Options in this section enable you to include or exclude certain information from your billing emails.
See the Email Examples chapter in our client Billing documentation to see examples of all the emails sent by your client portal.

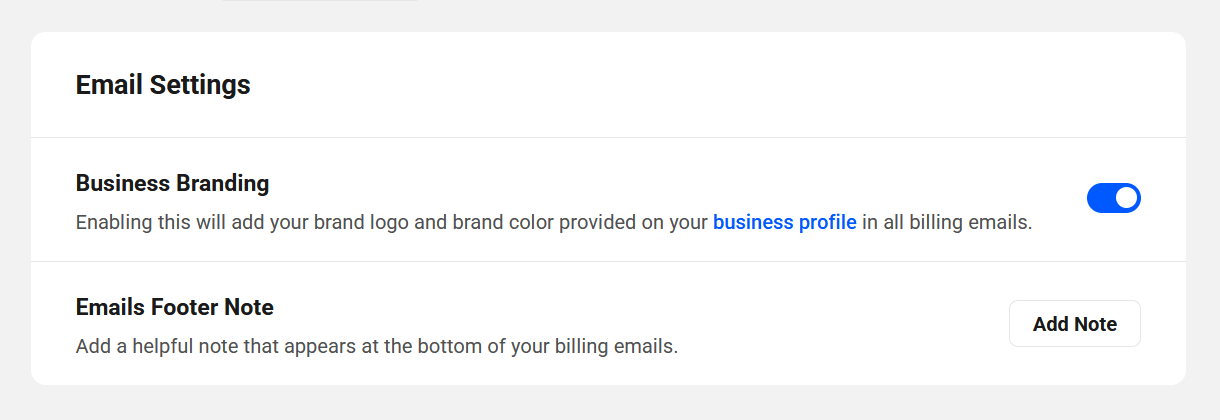
Business Branding
Toggle on this option to include your logo and brand color from your Business Profile in all email notifications.
Emails Footer Note
Click the Add note button to include a custom message at the bottom of all emails.
11.2.3 Client Roles
Link to chapter 2This is where you can create and manage the user roles that you assign to your clients. The user role you assign to each client is what determines exactly which areas & features the client can access in your Hub or client portal.

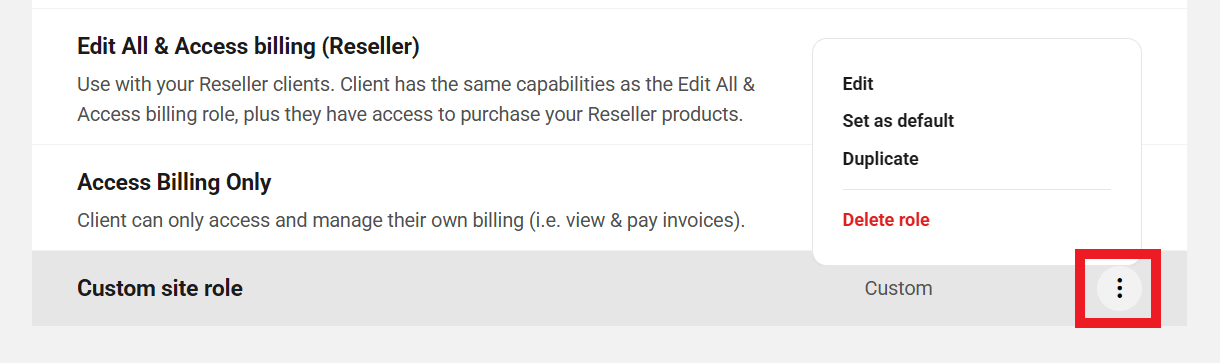
There are several system roles that cannot be edited. The View All & Access Billing role is assigned by default to all new clients, but you can change the default role if needed by clicking the ellipsis icon next to the one you want and clicking the Set as default option.
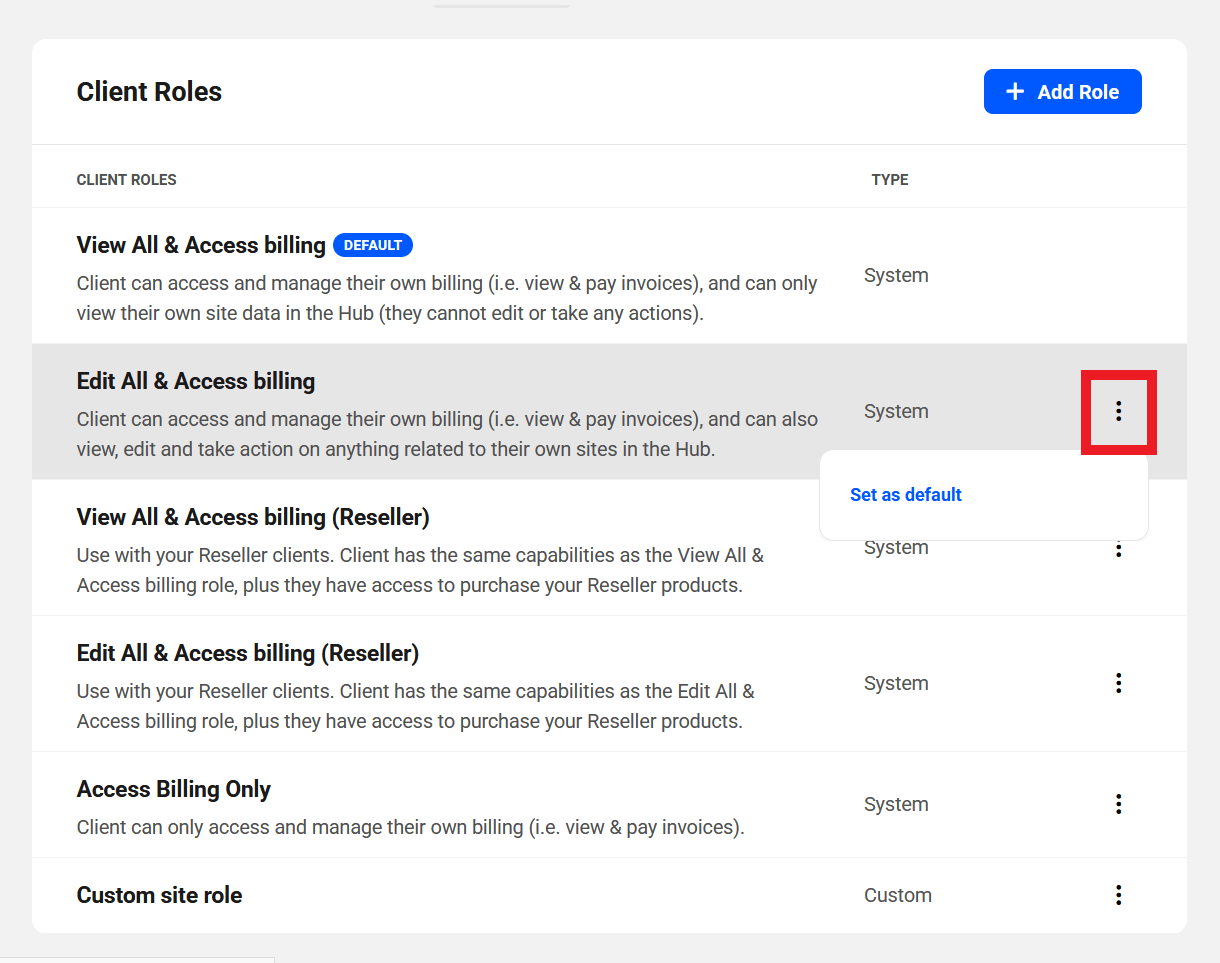
Here is a brief description of each of the system roles and the access each gives to your clients. See the Default System Roles chapter in the Team & Client Roles Customization document for a full breakdown of all capabilities included in the default roles.
- View All & Access Billing – Granting this system role to the client gives them access to everything related to any site they’ve been added to in your Hub, but they can only view the data displayed; they cannot edit or take action on anything. They do however have full management access to their own billing area to view and pay invoices, etc.
- Edit All & Access Billing – Granting this system role to the client gives them access to everything related to any site they’ve been added to in your Hub, and they can edit and take action on anything they have access to. They also have full management access to their own billing area to view and pay invoices, etc.
- Access Billing Only – Granting this system role to the client gives them full management access to their own billing area to view and pay invoices, etc, but they have no access to anything else in your Hub.
- View All & Access Billing (Reseller) – Granting this system role to the client gives them the same access capabilities as the View All & Access Billing role above, plus they have access to purchase your Reseller products. Use with your Reseller clients.
- Edit All & Access Billing (Reseller) – Granting this system role to the client gives them the same access capabilities as the Edit All & Access Billing role above, plus they have access to purchase your Reseller products. Use with your Reseller clients.
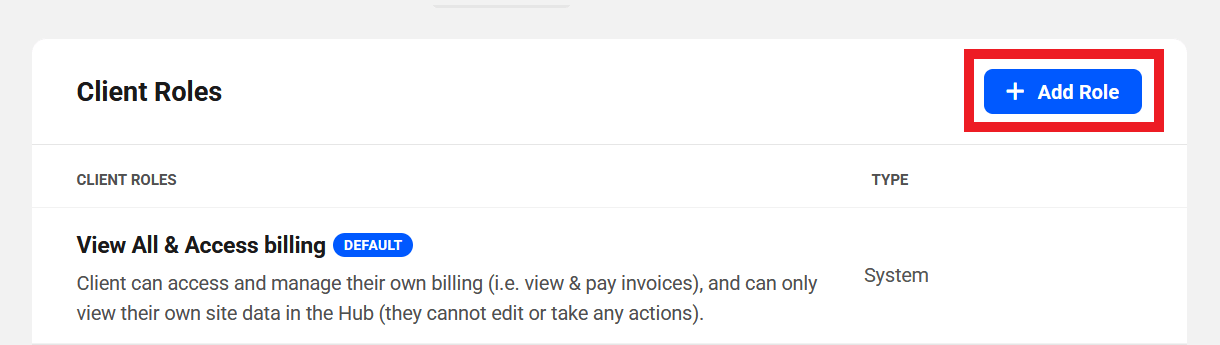
Creating Custom Client Roles
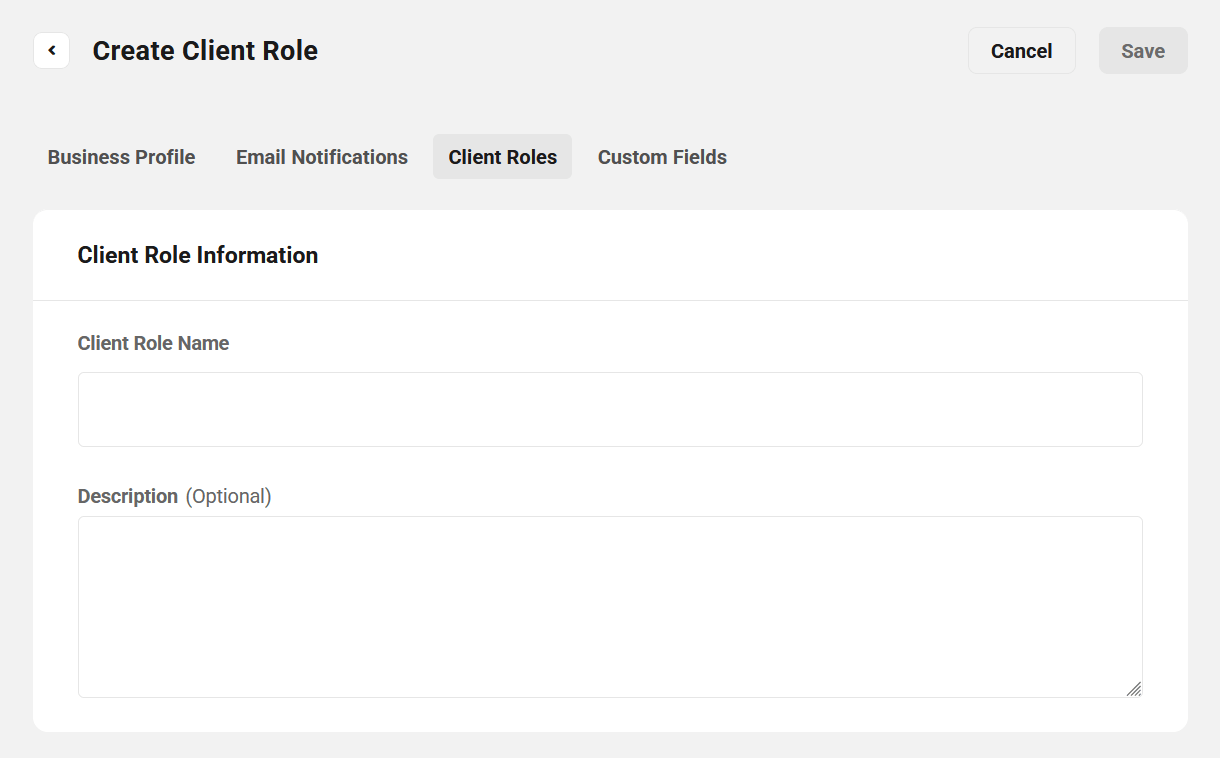
If none of the system roles meet your requirements and you need more fine-grained control over what your clients can access in your Hub, you can create one or more custom roles with exactly the access permissions you want them to have. To do that, click the + Add Role button at the top-right of this screen.
On the next screen, you’ll give your custom role a Name and an optional Description.
You’ll then see several Hub areas & features that you can enable, and for which you can customize access in your custom client role.
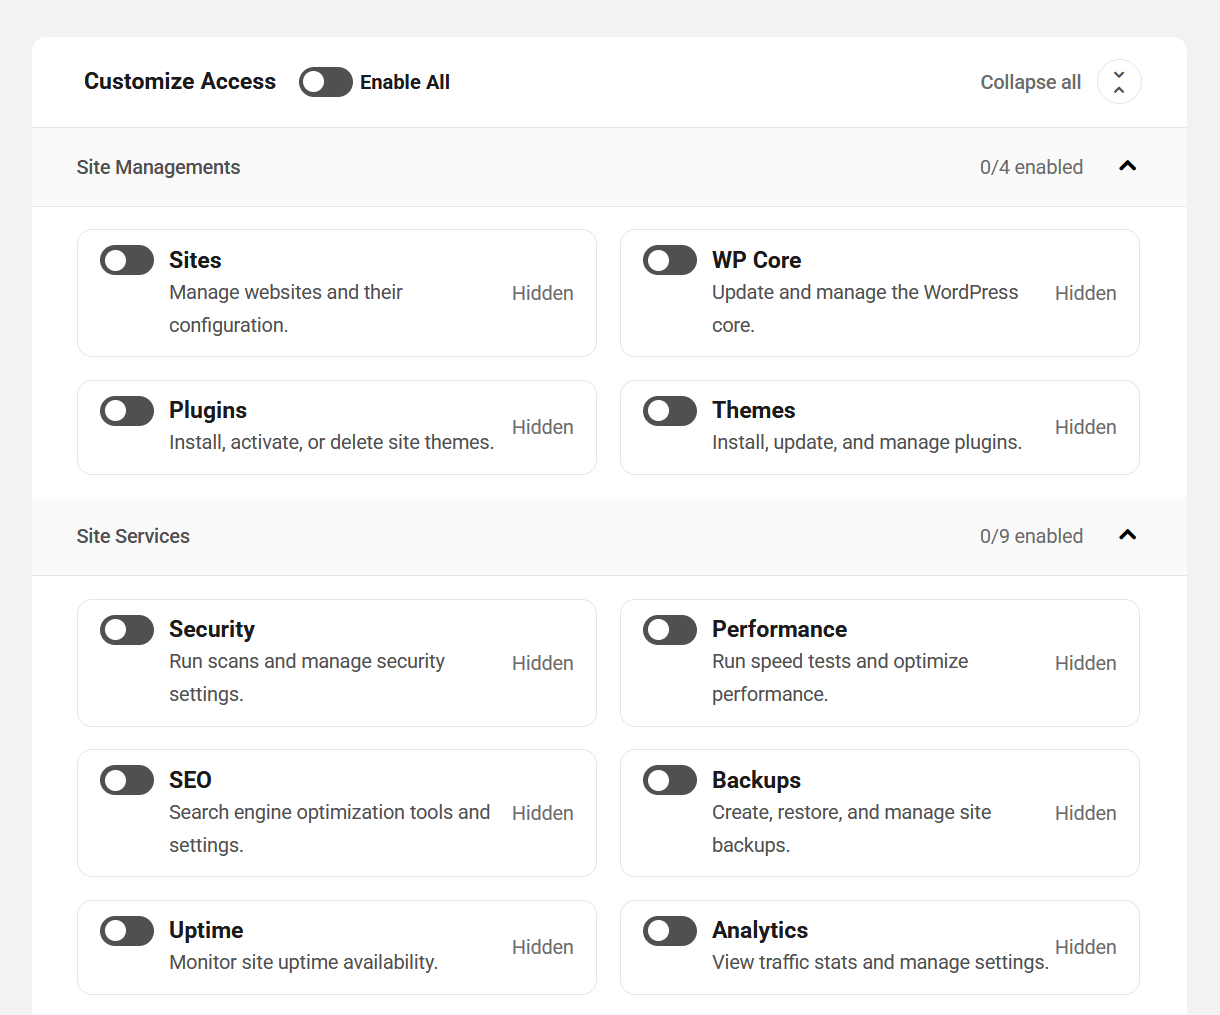
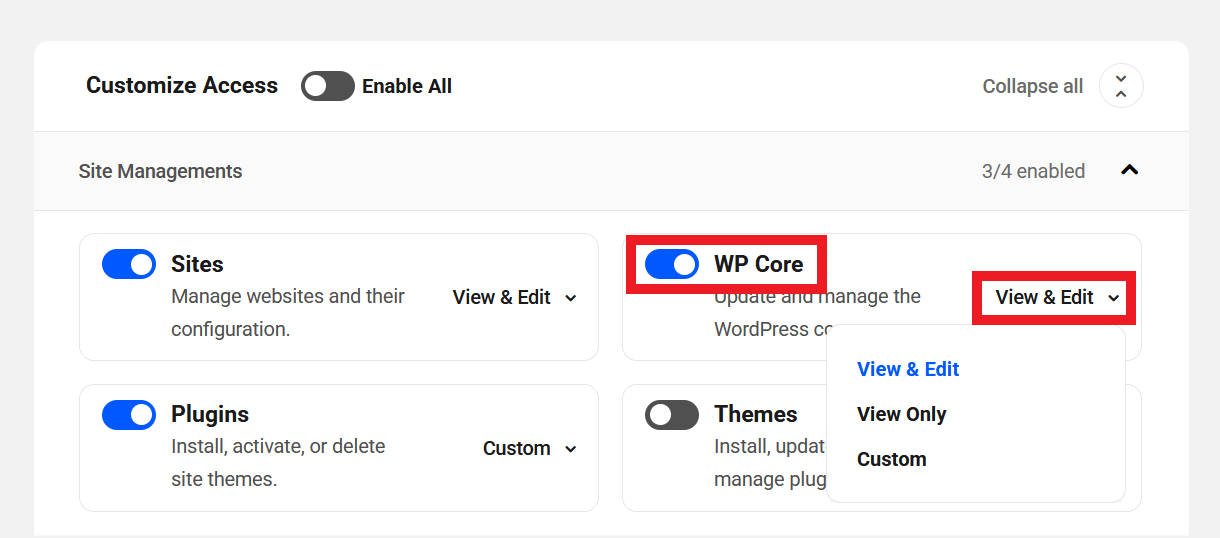
By default, all Hub areas & features you see here are set to Hidden, which means your custom client role does not grant any access to that area or feature. To enable and fine-tune any that you wish to add, click the toggle next to the feature name to enable it. Then click the View & Edit link that appears there to customize the access if needed.
- View & Edit – Selecting this option means the client will be able to view and edit anything this feature grants them access to in your Hub.
- View Only – Selecting this option means the client will only be able to view whatever this feature grants them access to.
- Custom – Selecting this option enables you to fine-tune exactly what the client can view or edit.
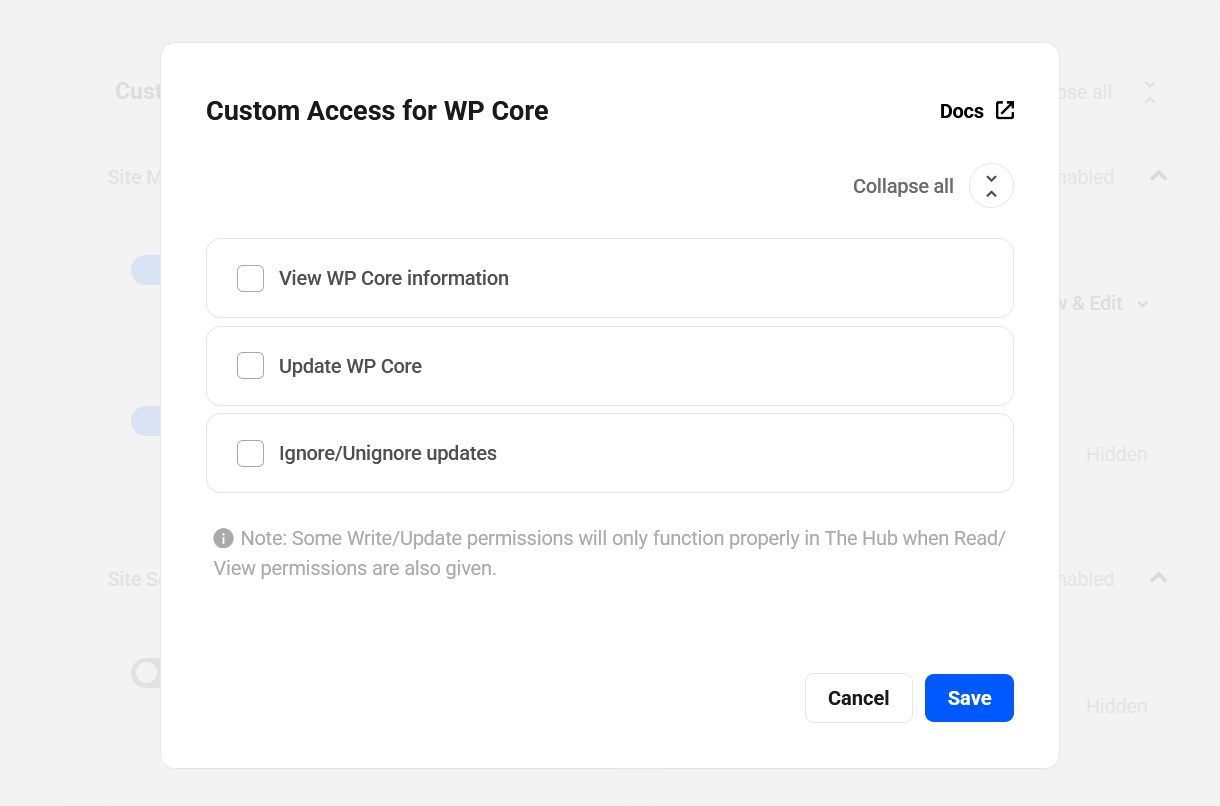
If you select the Custom option, a modal window will pop open where you can enable only the specific elements you want for this feature. For example, if you select Custom for the WP Core feature, you’ll see the following capabilities can be enabled/disabled for clients to whom you grant this custom role.
For more information on how to fine-tune every feature in your custom client role, see our Team & Client Role Customization documentation.
Custom Client Role Options
For any custom role you create, you’ll find the following management options under the ellipsis icon.
- Edit – Click to open the role editor where you can adjust anything you need in your custom role. Any edits made immediately affect the client portal access of any client to whom this role is assigned.
- Set as default – Set a custom role as the default role for all new clients.
- Duplicate – Create an exact copy of a role that you can then adjust as needed.
- Delete – Delete the custom role. You’ll be prompted to confirm the action.
11.2.4 Custom Fields
Link to chapter 2This section enables you to create as many custom fields as you need or want to include in your Business Profile and/or Client Profiles.
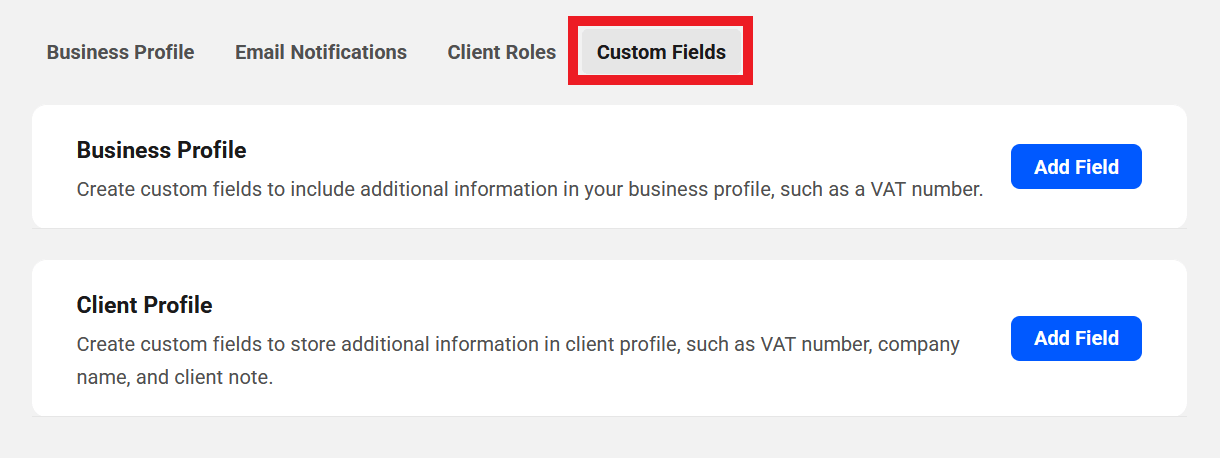
Custom field information added in either profile type can be included in your invoices in the Billing Settings.
Custom fields can be created as single or multi-line text fields, depending on the type of information you want to include in them. As both field types are simple text fields, they do not accept HTML. However, the multiline type does respect line-breaks, so you can make lists or paragraphs that way if needed.
Note that once a field is created, it is not possible to switch from single-line text to multi-line text, or vice-versa. So if you need to do that, you would need to first delete the existing field and create a new one to replace it.
Business Profile
To add a new custom field to your Business Profile, click the Add Field button in that section to pop open a modal window.
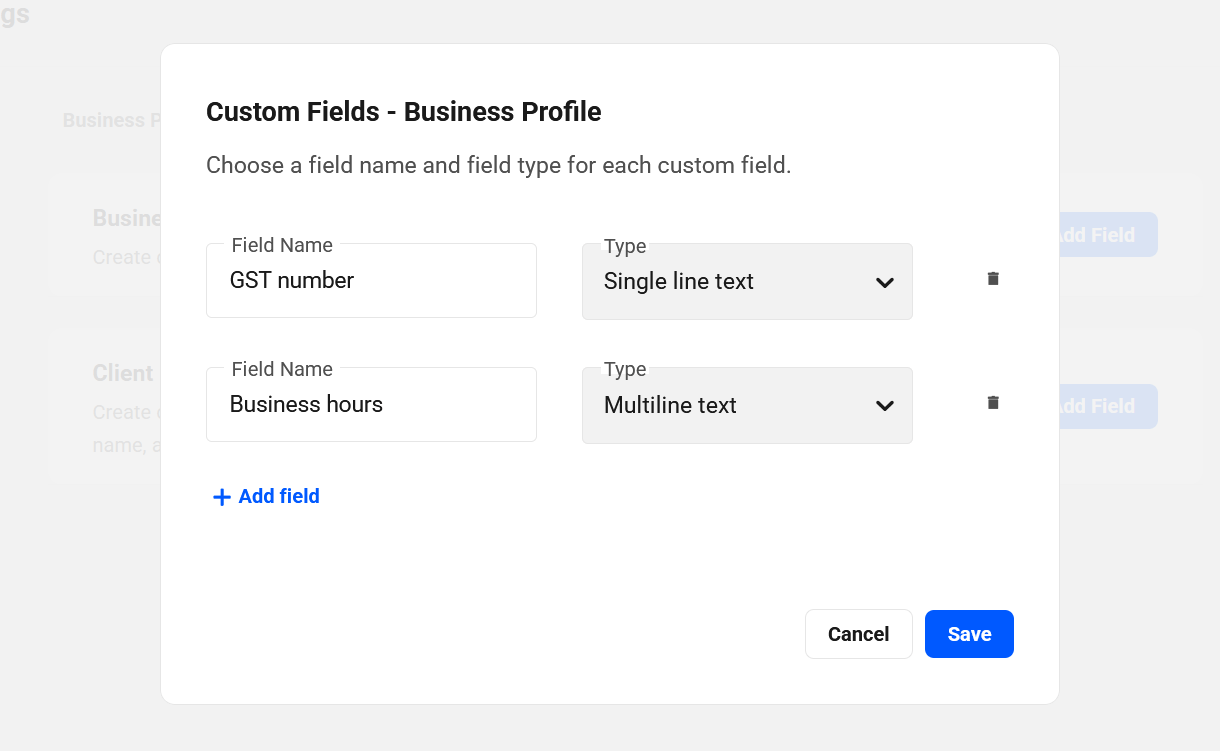
Enter the Field Name you wish to be displayed for the new field, then select whether the field Type should be Single or Multiline Text.
Click the + Add Field link for each new field you want to add. Click the trash icon to remove any custom field you don’t need. Click the Save button to save your fields, or click Cancel to exit without saving.
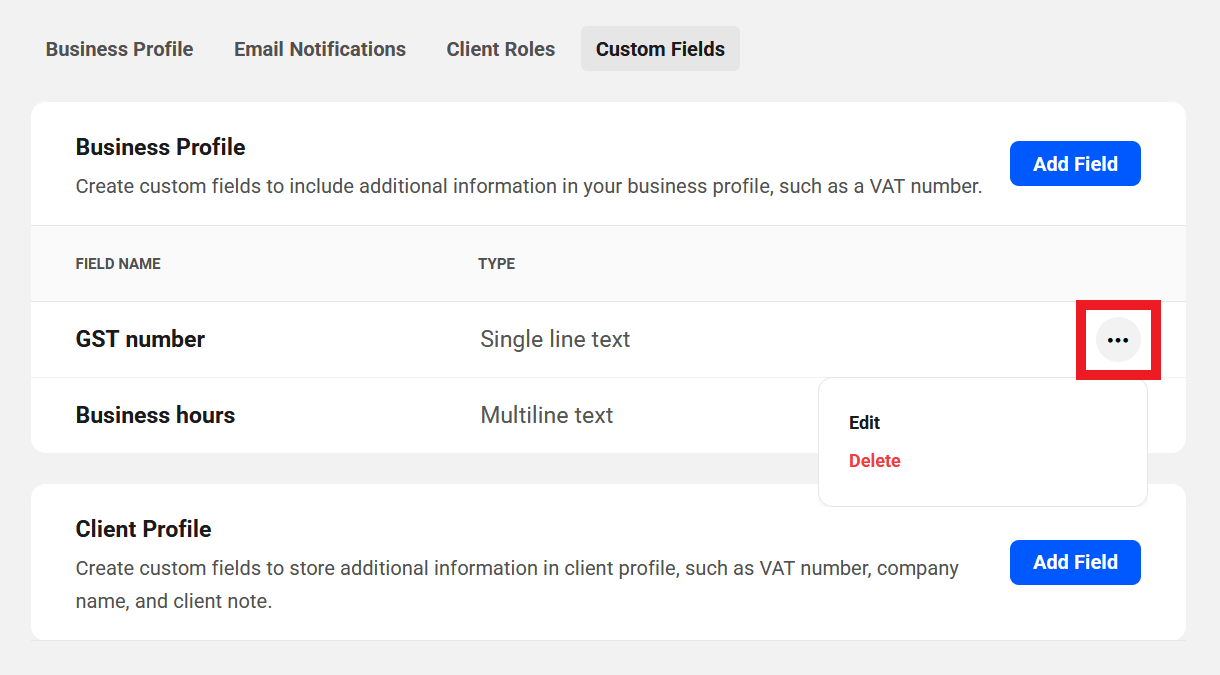
Custom fields you have created for your Business Profile will then be listed under this tab where you can edit the label, or delete them, as needed, by clicking the ellipsis icon and selecting the corresponding option.
Any Business Profile fields you create here will then be available to you in the Custom Fields section of your Business Profile where you can add any needed values to them.
Client Profile
To add a new custom field that can be used in Client Profiles, click the Add Field button in that section to pop open a modal window.
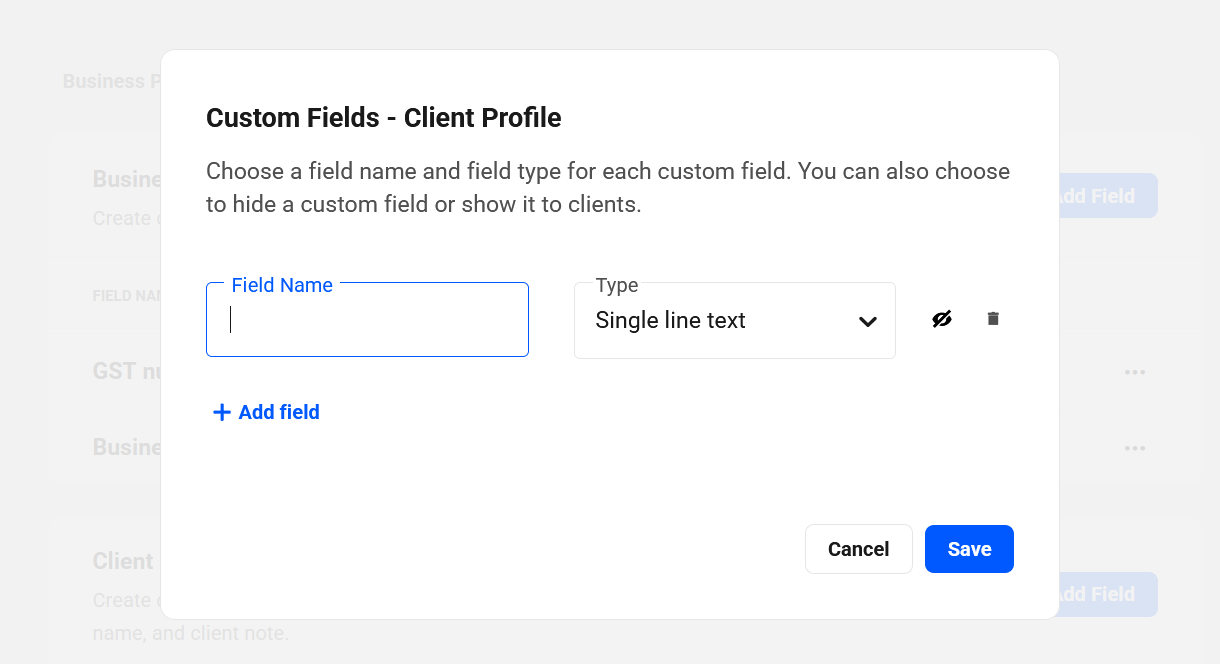
Enter the Field Name you wish to be displayed for the new field, then select whether the field Type should be Single or Multiline Text.
Client Profile custom fields have an additional option where you can select whether the field should be visible to clients under the Billing Info tab in their Hub where they can add or edit the information in the field.
To make a custom field available to your clients to edit, click the eye icon to toggle it on or off. An eye icon with a slash through it means it’s not visible to your clients, and you can use it as an internal note field. Without the slash in the icon means it’s visible to clients and they can add their information in that field.
You can also use the Client Notes feature to add notes using a rich text editor. Clients cannot access client notes at all, and you can set capabilities for your team members to view and edit them if needed.
Click the + Add Field link for each new field you want to add. Click the trash icon to remove any custom field you don’t need. Click the Save button to save your fields, or click Cancel to exit without saving.
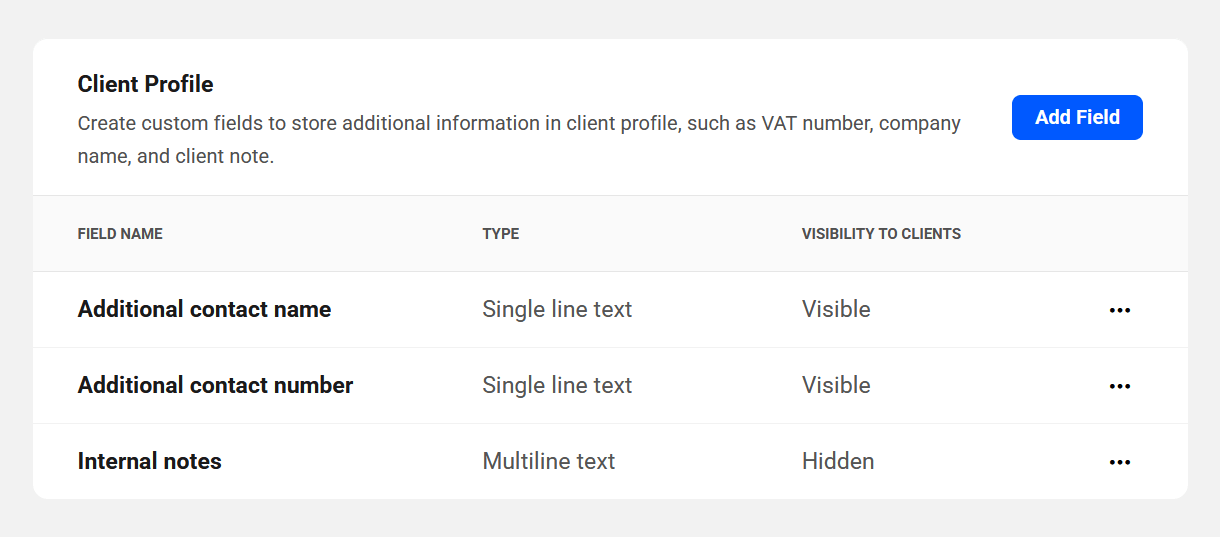
The example image below shows a couple of custom fields that have been made available for clients to edit in the Billing Details section of their client profile, and one that is set to hidden and can be used as an internal note field for your use only.
Just like the Business Profile fields above, custom fields that you have created for your Client Profiles will then be listed under this tab where you can edit the label, or delete them, as needed, by clicking the ellipsis icon and selecting the corresponding option.
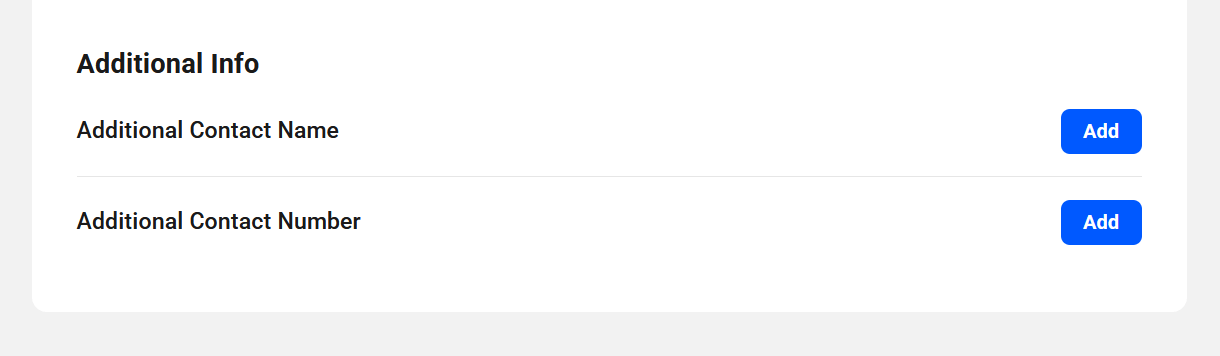
Any Client Profile fields you create here will then be available to you in the Custom Fields section of every Client Profile. Any fields that you have made available to clients can be edited by them in the Additional Info section under the Billing Details tab in their Hub.
When a client views the Additional Info section on their Billing Details page in their Hub, they would only see the custom fields that you have made available to them, as seen in the example image below.
11.3 Tickets Settings
Copy chapter anchor to clipboardThis is where you can configure default options for all client support Tickets.
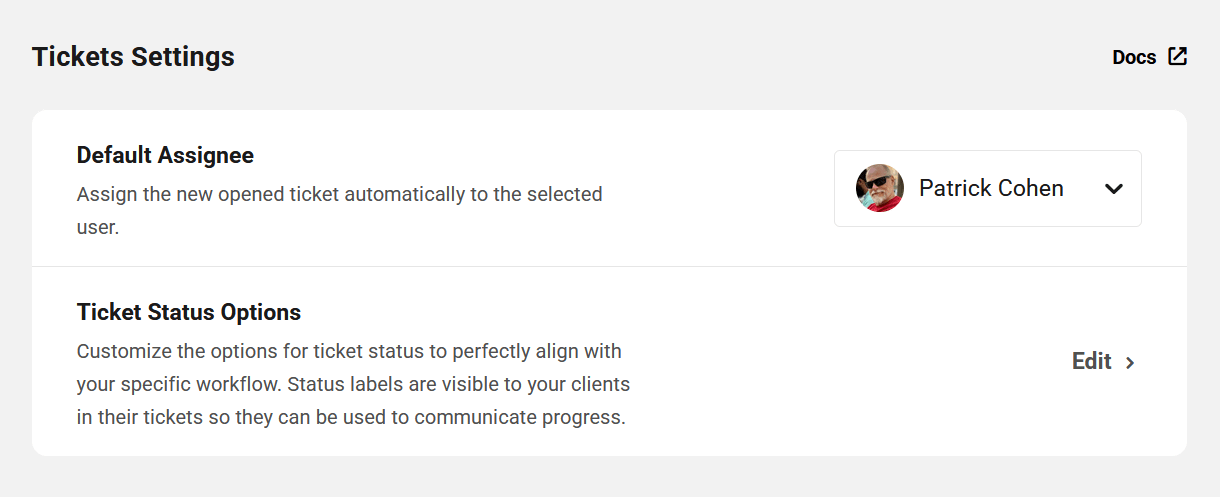
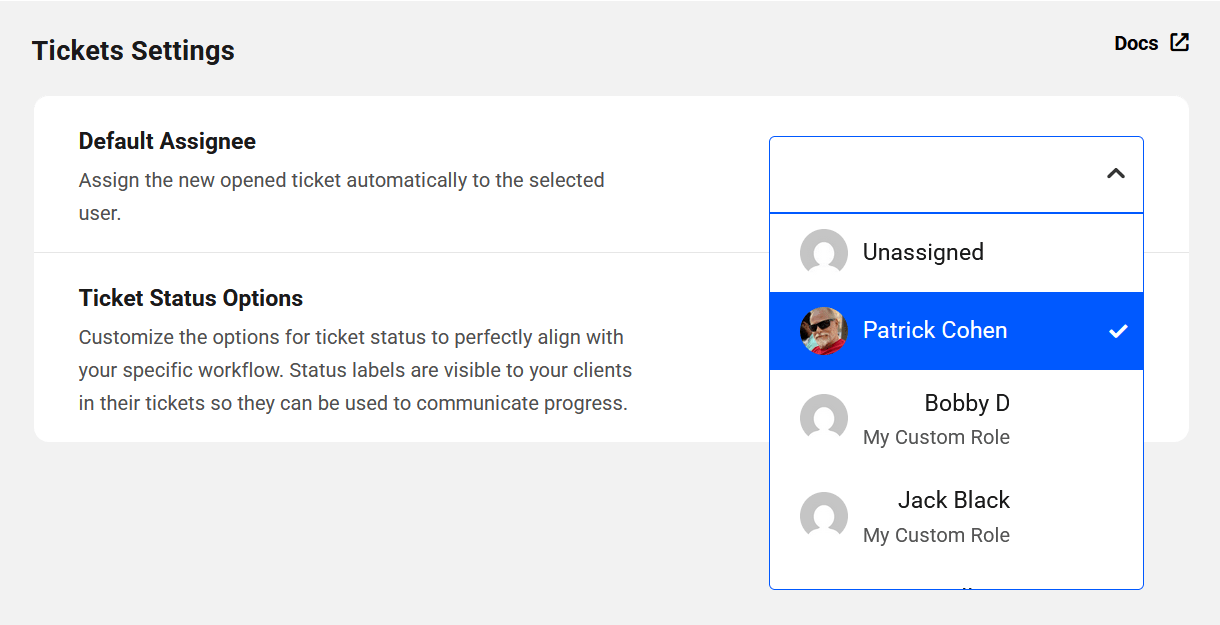
Default Assignee
Click the name of the currently assigned Default Assignee to select a new one from your available support team members. Only those team members who have the required capabilities enabled in their team role will be available for selection here. Of course, as the WPMU DEV account owner, you can assign yourself, or set the default to Unassigned.
Ticket Status Options
Click the Edit link to pop open a modal window where you can customize the Status options according to your specific support workflow.
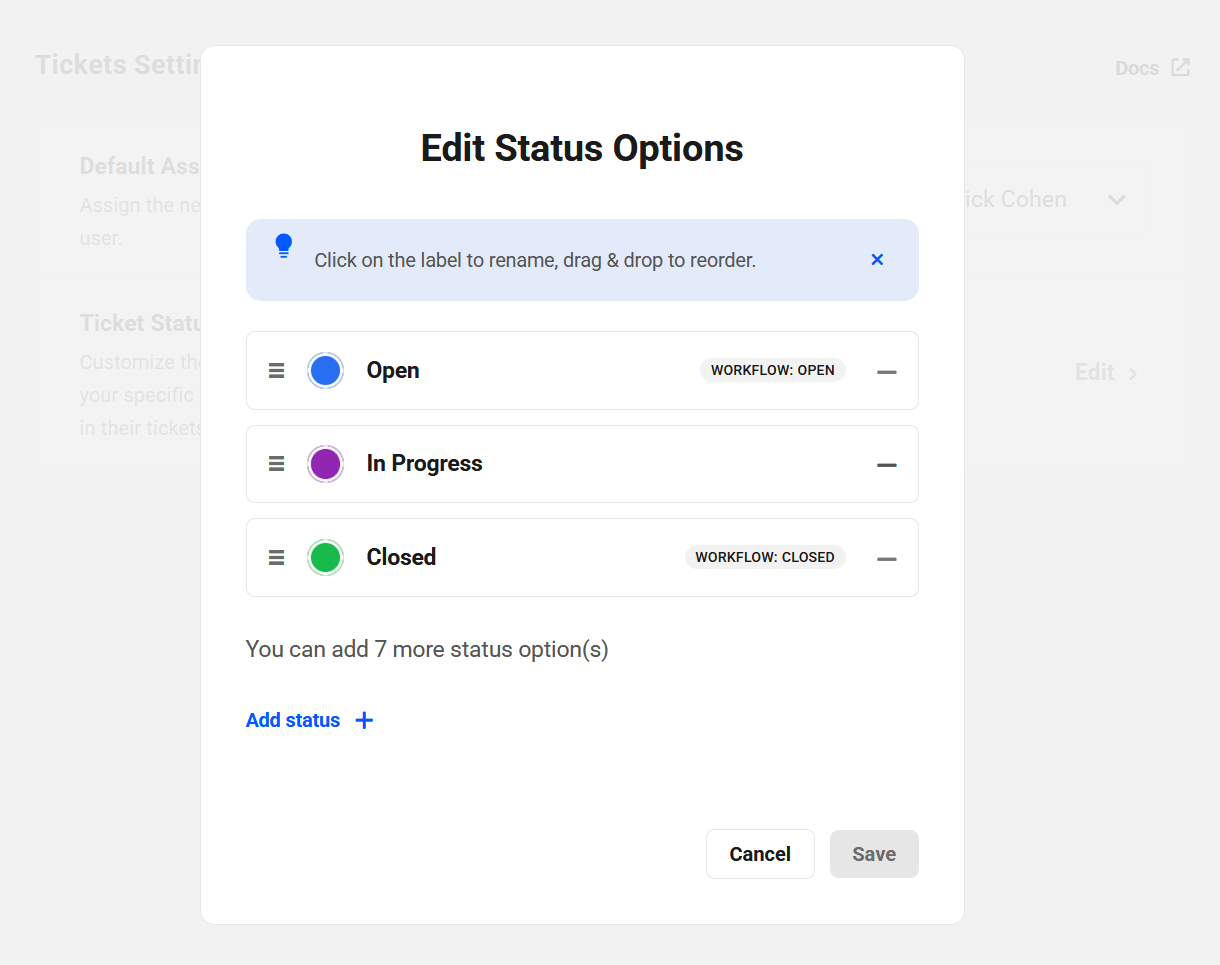
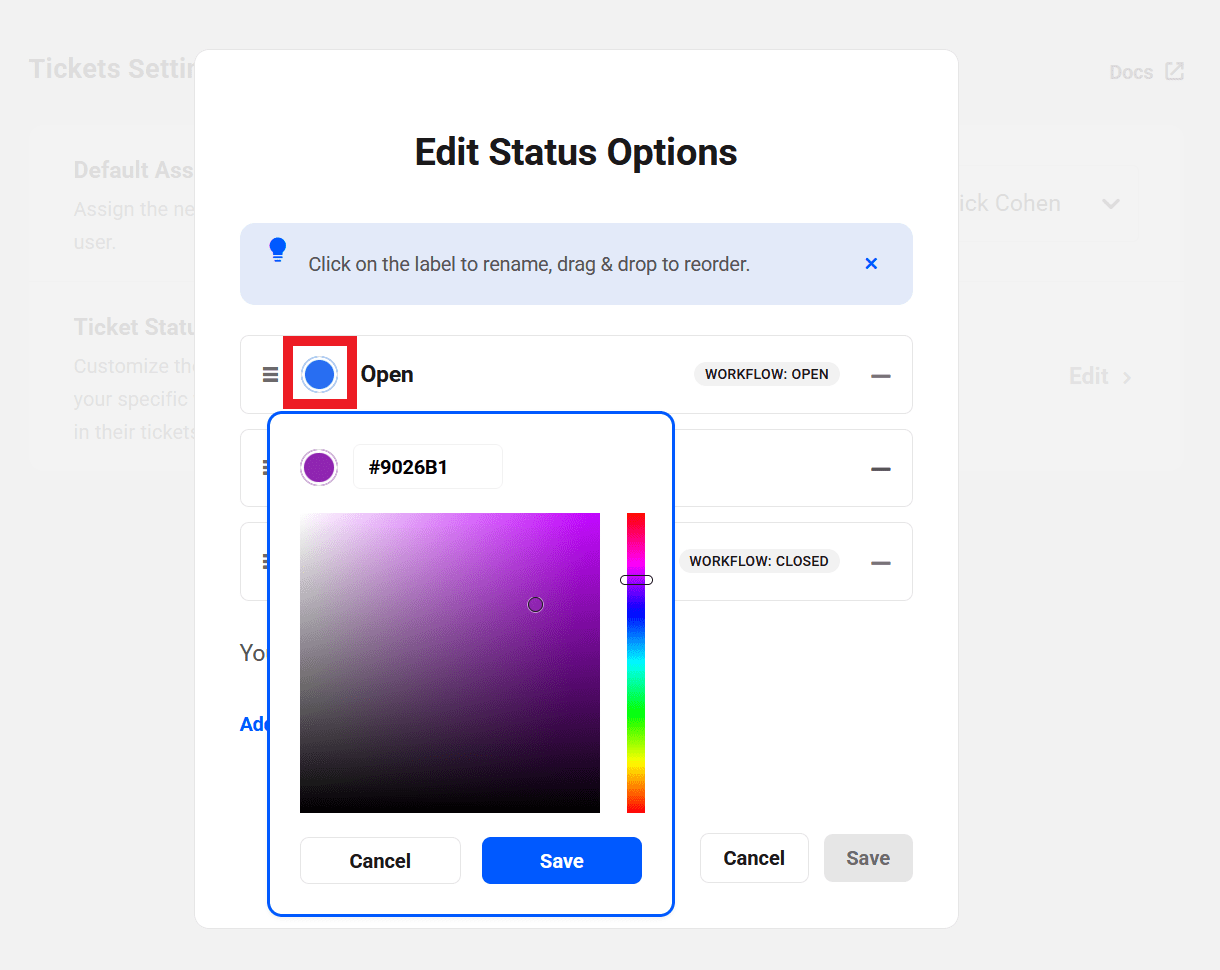
You can edit any status label by clicking the label name and entering a new one. The labels of the default Open and Closed status can be edited, but they cannot be removed. You can add as many custom status as needed for a total of 10 including the 2 system defaults. Customize the status color by clicking the current color and selecting a new one.
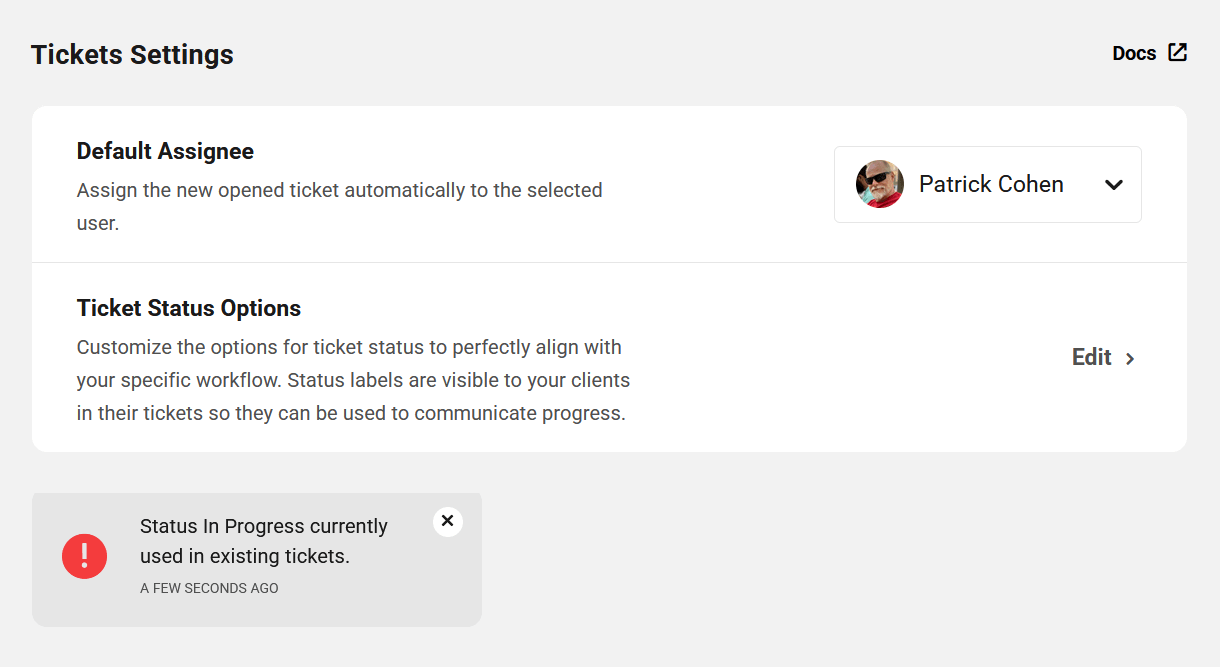
Click & hold the hamburger icon on the left and drag to move a status position up or down in the list. Click the – icon on the right to remove a status. Note that you cannot remove a status that is currently in use in one or more tickets; a notice will appear in your Hub to inform you of the situation if you try.
11.4 Billing Settings
Copy chapter anchor to clipboardThis section contains all the tools you need to manage the Stripe account connected to your client Billing tool, customize elements of your business profile, taxes and invoices, as well as import existing products and customers from Stripe..
If you haven’t yet activated Billing and connected your Stripe account, you’ll be prompted to do that first.
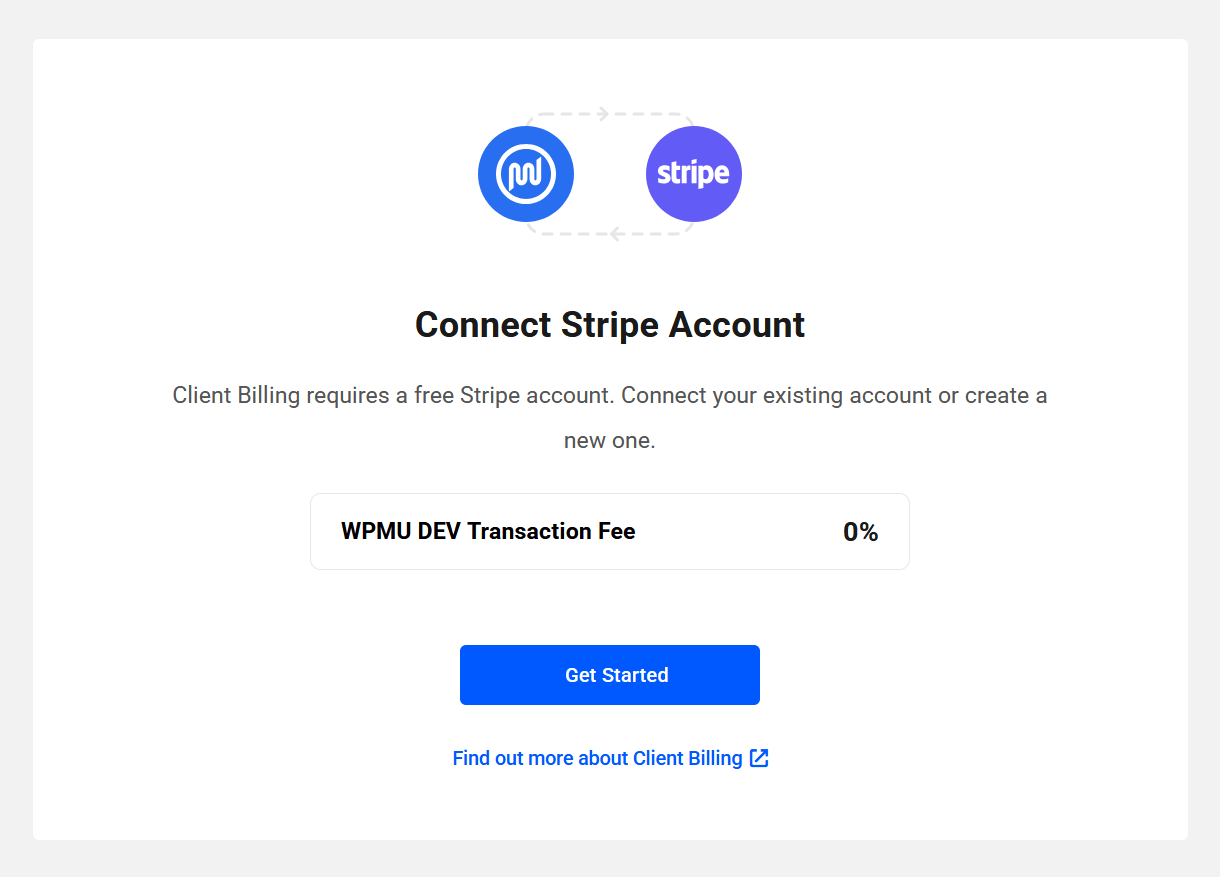
Once that’s done, you’ll be directed here to configure your billing settings. You can return here at any time to make adjustments as needed.
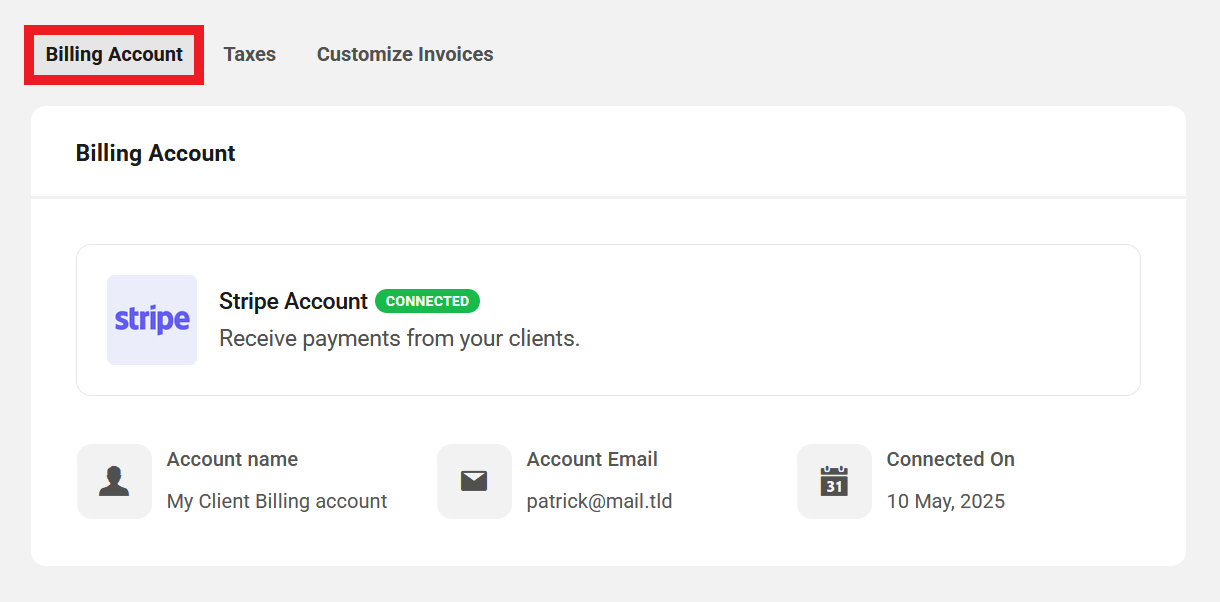
11.4.1 Billing Account
Link to chapter 4The top-most part of this configuration screen displays information associated with the Stripe account you’ve Connected in your Hub. This includes the name and email address of the account, as well as the date you connected it. Irrespective of who activates the client Billing tool, the email displayed here is the email associated with the connected Stripe account.
Payment Preferences
This section contains a reminder of the Billing Currency you’ve set for this integration, along with an option to configure the Statement Descriptor.
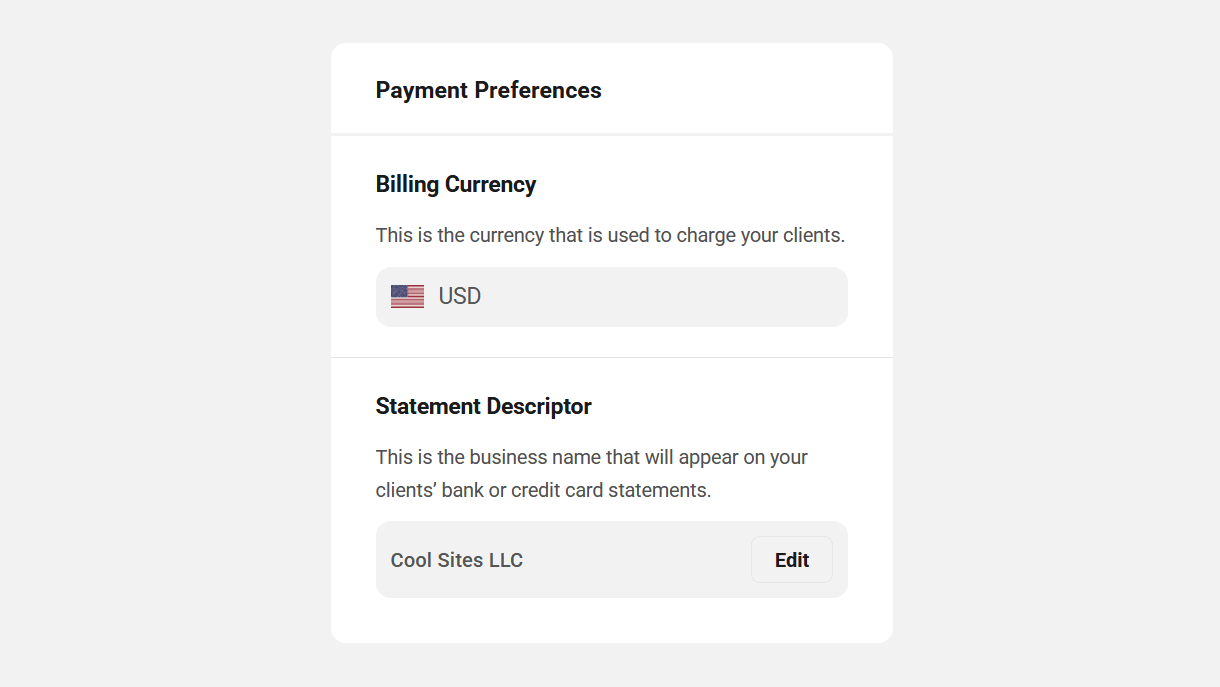
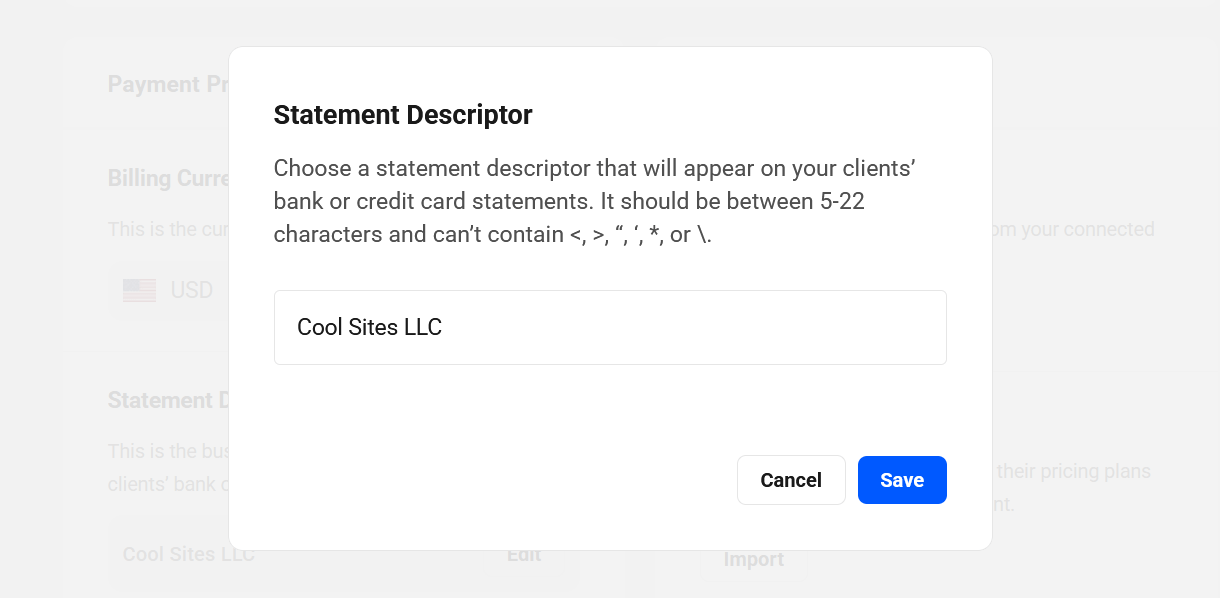
Statement Descriptor
The Statement Descriptor is what appears on your clients’ bank or credit card statements. If you need to modify that, click on the Edit button on the far-right of that line. In the modal window that pops open, enter a business name between 5 and 22 characters that you wish to be displayed, and click Save.
Additional Tools
Import Customers
This option enables you to import one or more existing customers from your connected Stripe account.
Click the Import button there to pop open a modal window where you can select the clients you wish to import.
Select the individual clients you wish to import by checking the box next to their email address. If you wish to import them all, check the box at top-left, just above the Email Address column. Click the Import button to proceed.
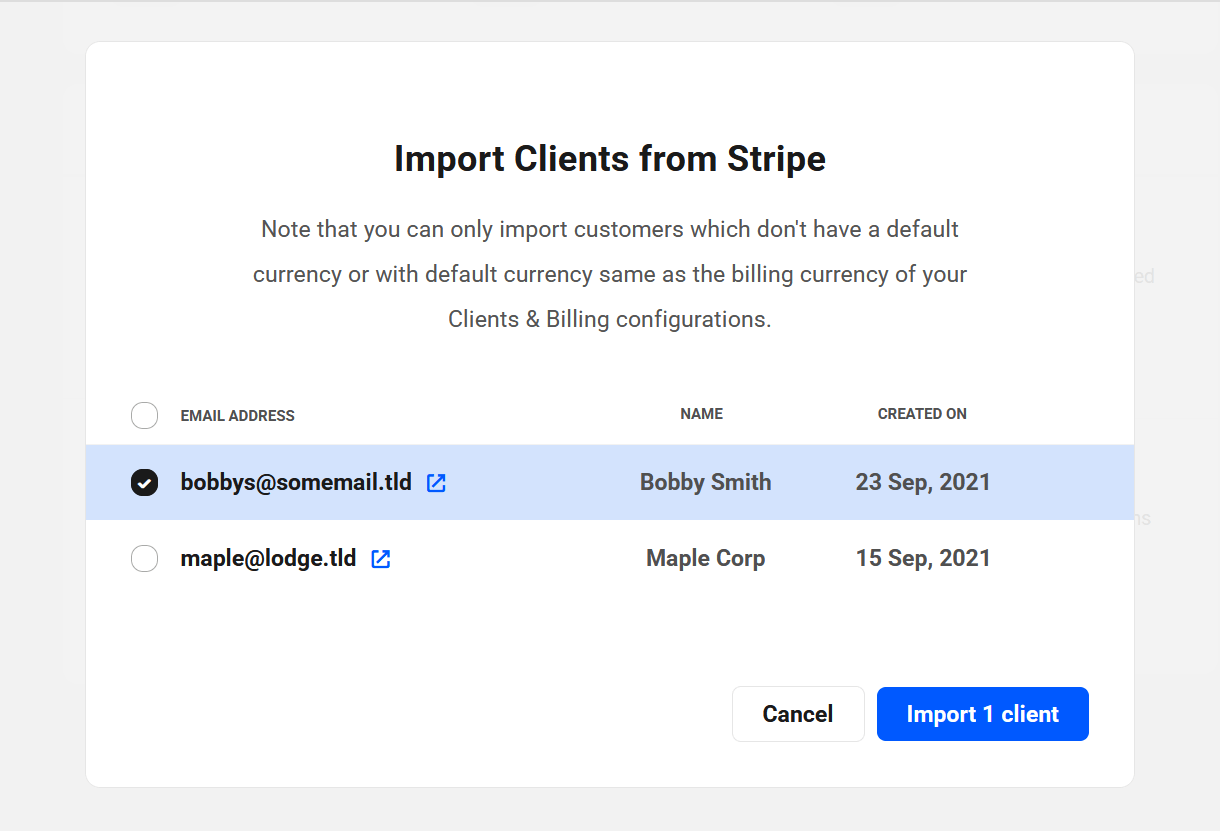
The imported clients will now be listed under the Clients tab of your Client Tools where you can manage all aspects of each clients’ activity related to your Hub business.
Please note that when importing customers from your Stripe account, existing subscriptions will not be imported and cannot work with your Clients & Billing portal. Those subscriptions will of course continue to work as usual in your Stripe account.
Import Products & Services
Here, you can quickly import any existing product from your connected Stripe account. All pricing plans associated with an imported product will also be imported automatically.
When importing products from your Stripe account, only the pricing plans with the same currency as you set when you connected your Stripe account in the Billing tool will be imported. If a product only contains plans in a different currency, the product itself will still be imported, but it will have no associated plans. You can of course create new pricing plans for any product in the Billing tool. See Adding Products Manually in our Billing documentation for details.
Click the Import link on that line to pop open a modal window where you can select the products you wish to import.
If you wish to import them all, check the box at top-left, just above the Product column. Click the Import button to proceed.

The imported products will now be listed under the Products & Services tab of your Billing tool where you can manage all aspects of each product & their pricing plans for your Hub business.
If you had manually created a pricing plan with a fixed billing cycle in your Billing tool, then disconnect your Stripe account and reconnect the same account, any such plans that you then import from Stripe will not include your fixed billing cycle. The pricing plan will default to unlimited and will auto-renew until canceled. This is a limitation of the Stripe API and it cannot be adjusted in the Hub.
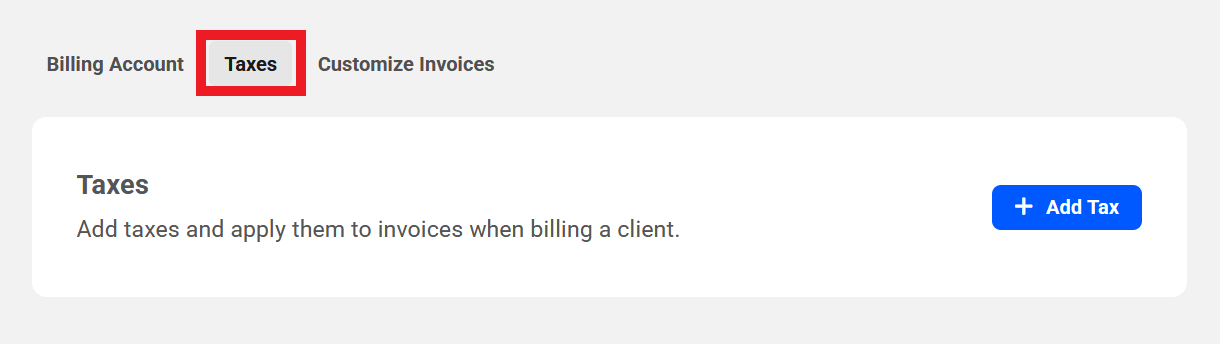
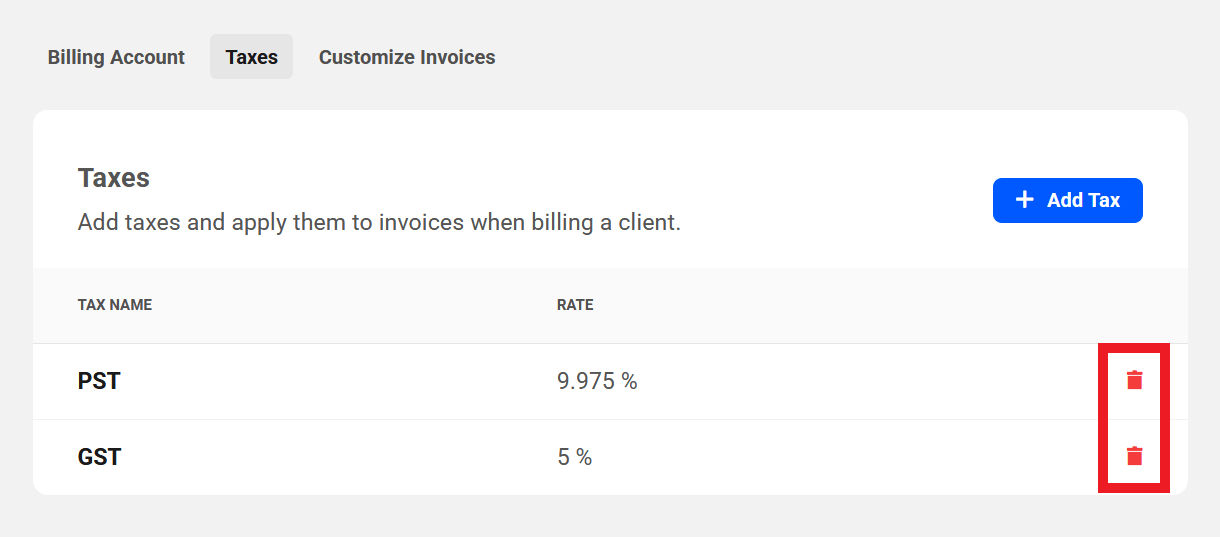
11.4.2 Taxes
Link to chapter 4This section enables you to create any needed tax rates that you can then apply to any invoices when billing your clients.
If you have created any Reseller products and wish to apply taxes to them, you must create the tax rates here first. You can then select them to be added to every Reseller invoice in the Reseller Settings.
Any taxes you create here and apply to an invoice will be applied to the total value of the invoice; it is not possible at this time to create taxes per product or service. A future update to Client Tools may include this functionality however.
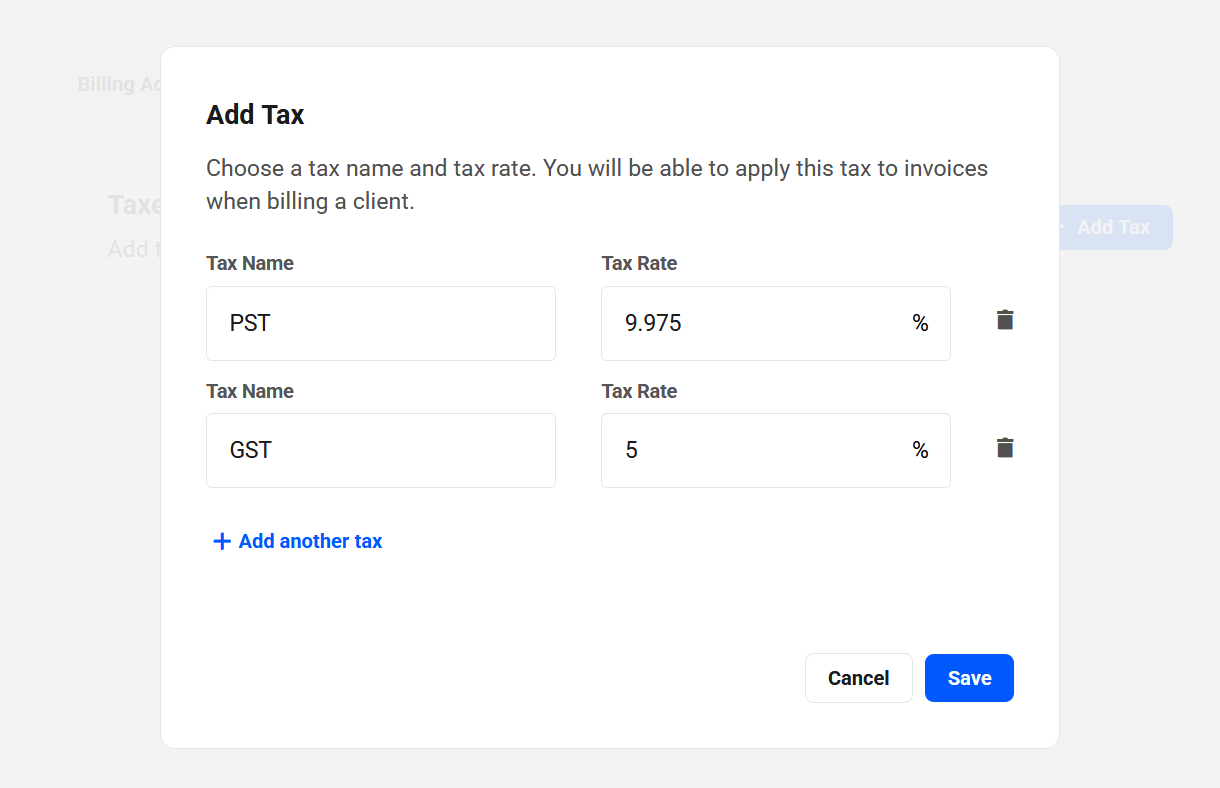
Click the + Add Tax button to pop open a modal window where you can create the tax rates you need.
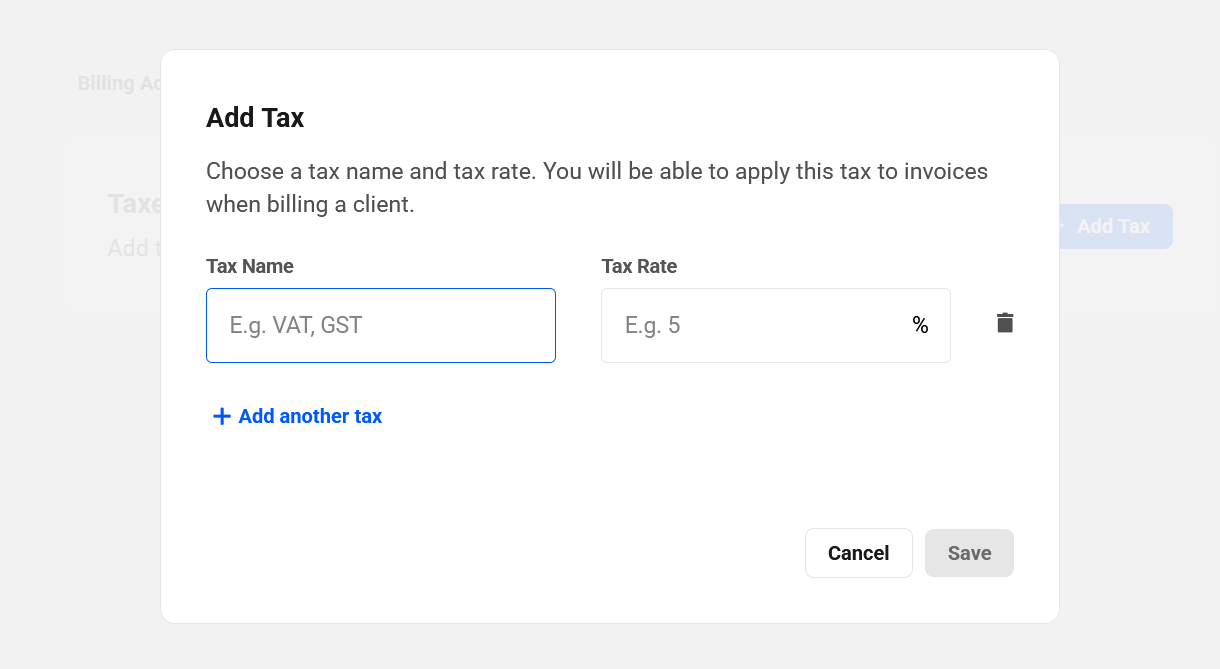
For each tax, enter the Tax Name you want to appear on invoices, as well as the Tax Rate. The Tax Rate must be a percentage value between 0% and 100%, and can contain up to 4 decimal places.
For each additional tax you want to add, click the + Add another tax link. You can add up to 10 taxes at a time. Once you’ve added all the taxes you need, click the Save button.
Your available taxes will then appear in a list under the Taxes tab.
Note that taxes that you’ve already added cannot be edited. If you need to change the name or rate of any existing tax, you would need to delete it first by clicking the trash icon, then add a new one to replace it.
A modal window will pop open prompting you to confirm the action. Click the Delete button to proceed.
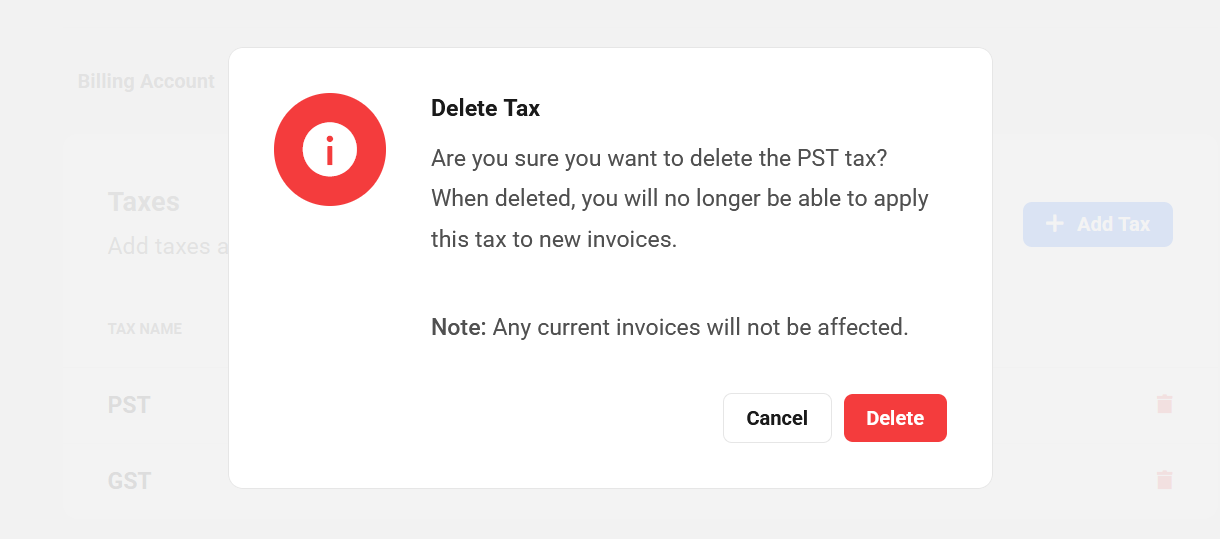
Note that deleting an existing tax simply removes it from your Billing tool and it will no longer be available to apply to any new invoices. Existing or outstanding unpaid invoices where that tax has been applied will not be affected as the tax will still exist in your Stripe account.
If you need to add more taxes, simply click the + Add Tax button again and proceed as above. All taxes that you create here will then be available to apply to any invoices you create for your clients. See the Creating Invoices chapter in the Billing documentation for more information.
11.4.3 Customize Invoices
Link to chapter 4This section enables you to customize the content that will be included in all your invoices.
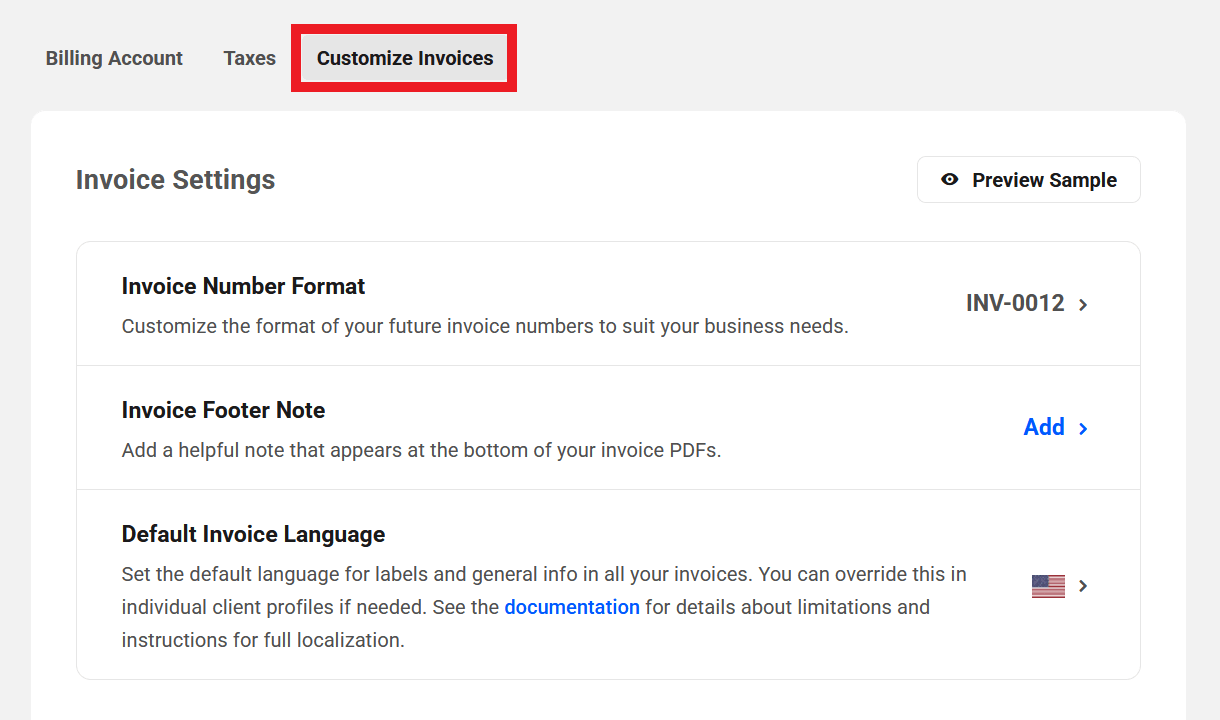
Invoice Settings
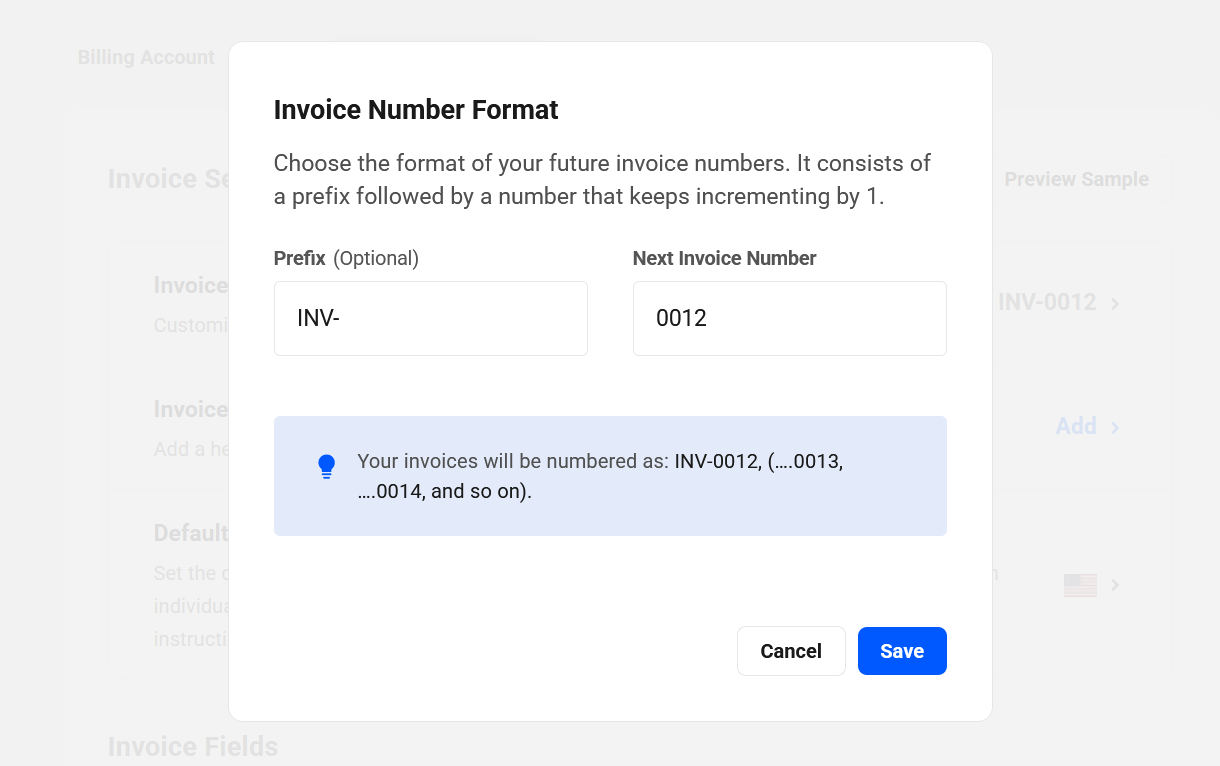
Invoice Number Format
Click the current number format displayed on the right to pop open a modal window where you can customize how that should be incremented for your invoices.
Enter an optional Prefix and set what the Next Invoice Number should start at. Each subsequent invoice will be incremented by 1.
Note that the prefix and number you set here can be modified at any time, but that would only affect new invoices. Existing invoices would not be affected by any change here.
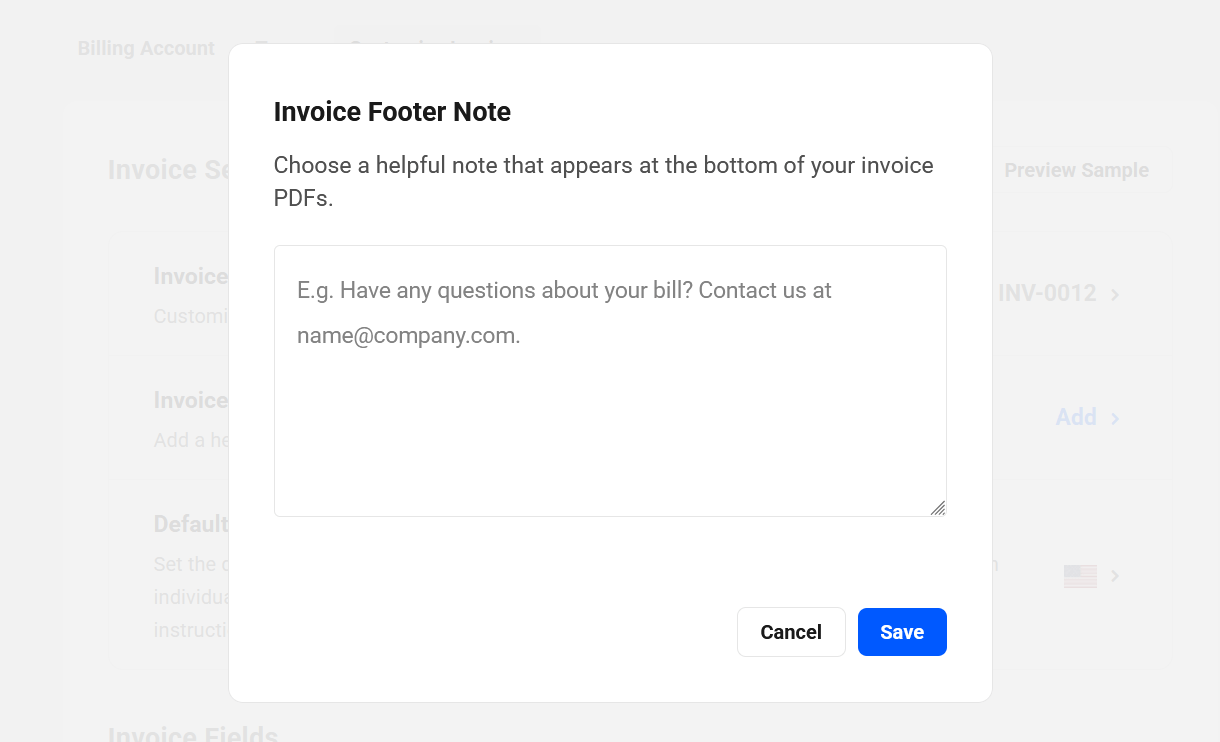
Invoice Footer Note
If you wish to include a custom note at the bottom of every invoice, click the Add button and enter the message you want to display.
Default Invoice Language
Select the default language that will be used for labels & general information in all your invoices. You can override this setting for individual clients if needed in their Client Profile.
Click the language flag currently displayed and select the preferred language to be used.

Selecting any language other than English here will only affect the labels and other general information in your invoices. It does not affect the custom information you may have entered in your Business Profile, any Client Profile, any Custom Fields or Invoice Footer Notes. If you wish to localize those items in a different language, you would need to edit and translate them in their respective settings.
Note also that this setting does not affect the email language which is English by default. A future update to Client Tools will enable you to customize the email language as well.
Invoice Fields
Here, you can select exactly which additional fields you want displayed in all your invoices.
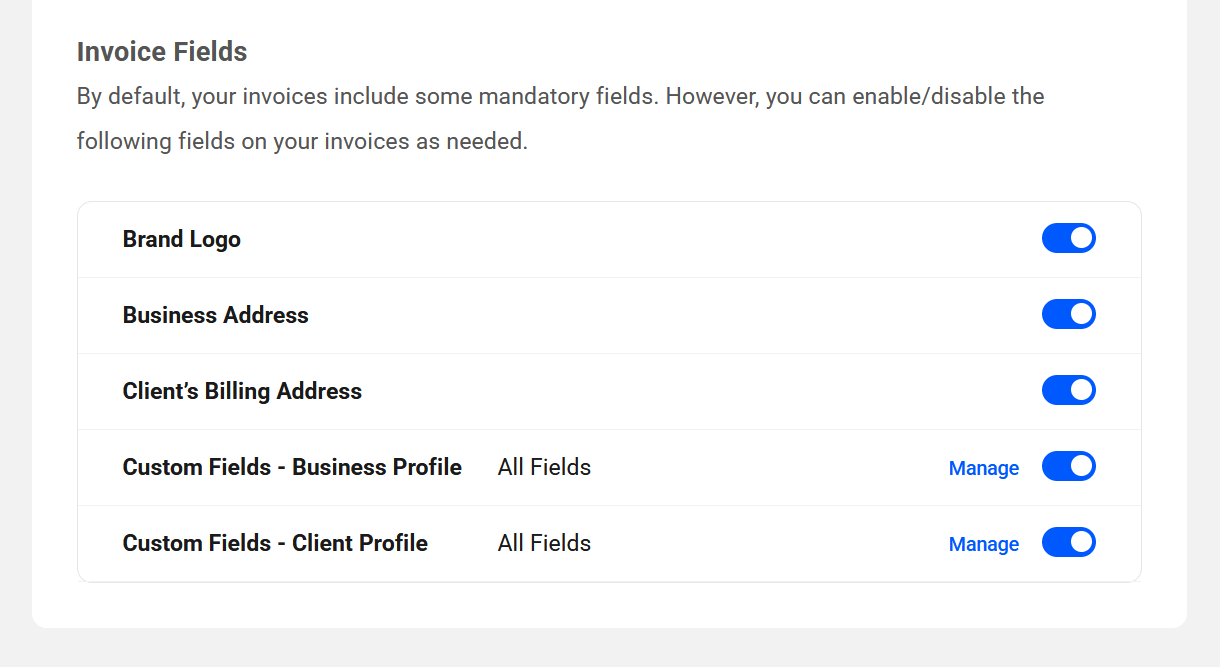
Brand Logo
Toggle this on if you wish to include the logo you uploaded in the Business Profile section.
Business Address
Toggling this one on will include the business address you set in the Business Profile section.
Client’s Billing Address
Toggle this on to include the client’s billing address, if that information is available in their client profile.
Custom Fields – Business Profile
Enable this option to include any Business Profile custom fields that you may have created in the Custom Fields section.
Click the Manage link if you want to enable or disable any specific custom fields you have created. These would appear in the business profile section in your invoices.
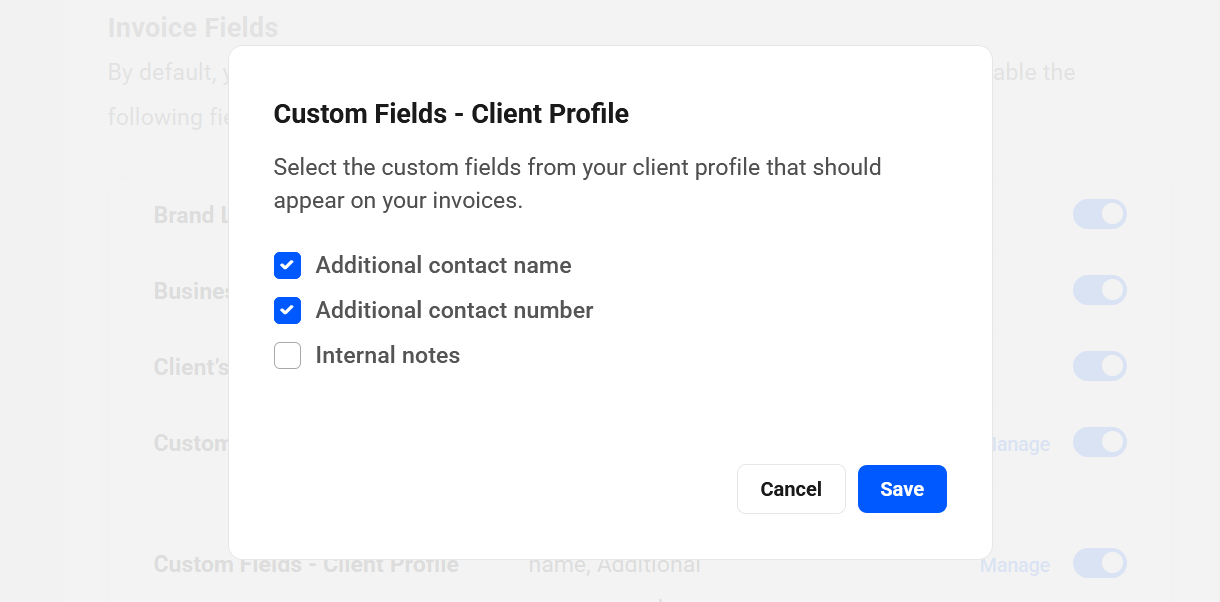
Custom Fields – Client Profile
Enable this option to include any Client Profile custom fields that you may have created in the Custom Fields section.
Click the Manage link if you want to enable or disable any specific custom fields you have created. These would appear in the client profile section in your invoices, if you have entered information in those fields in their client profile.
If you have set any Client Profile custom fields to be hidden from clients, you’ll likely want to be sure they are not included in your invoices if they contain information you don’t want them to see. Click the Manage link to disable any such hidden fields if needed.
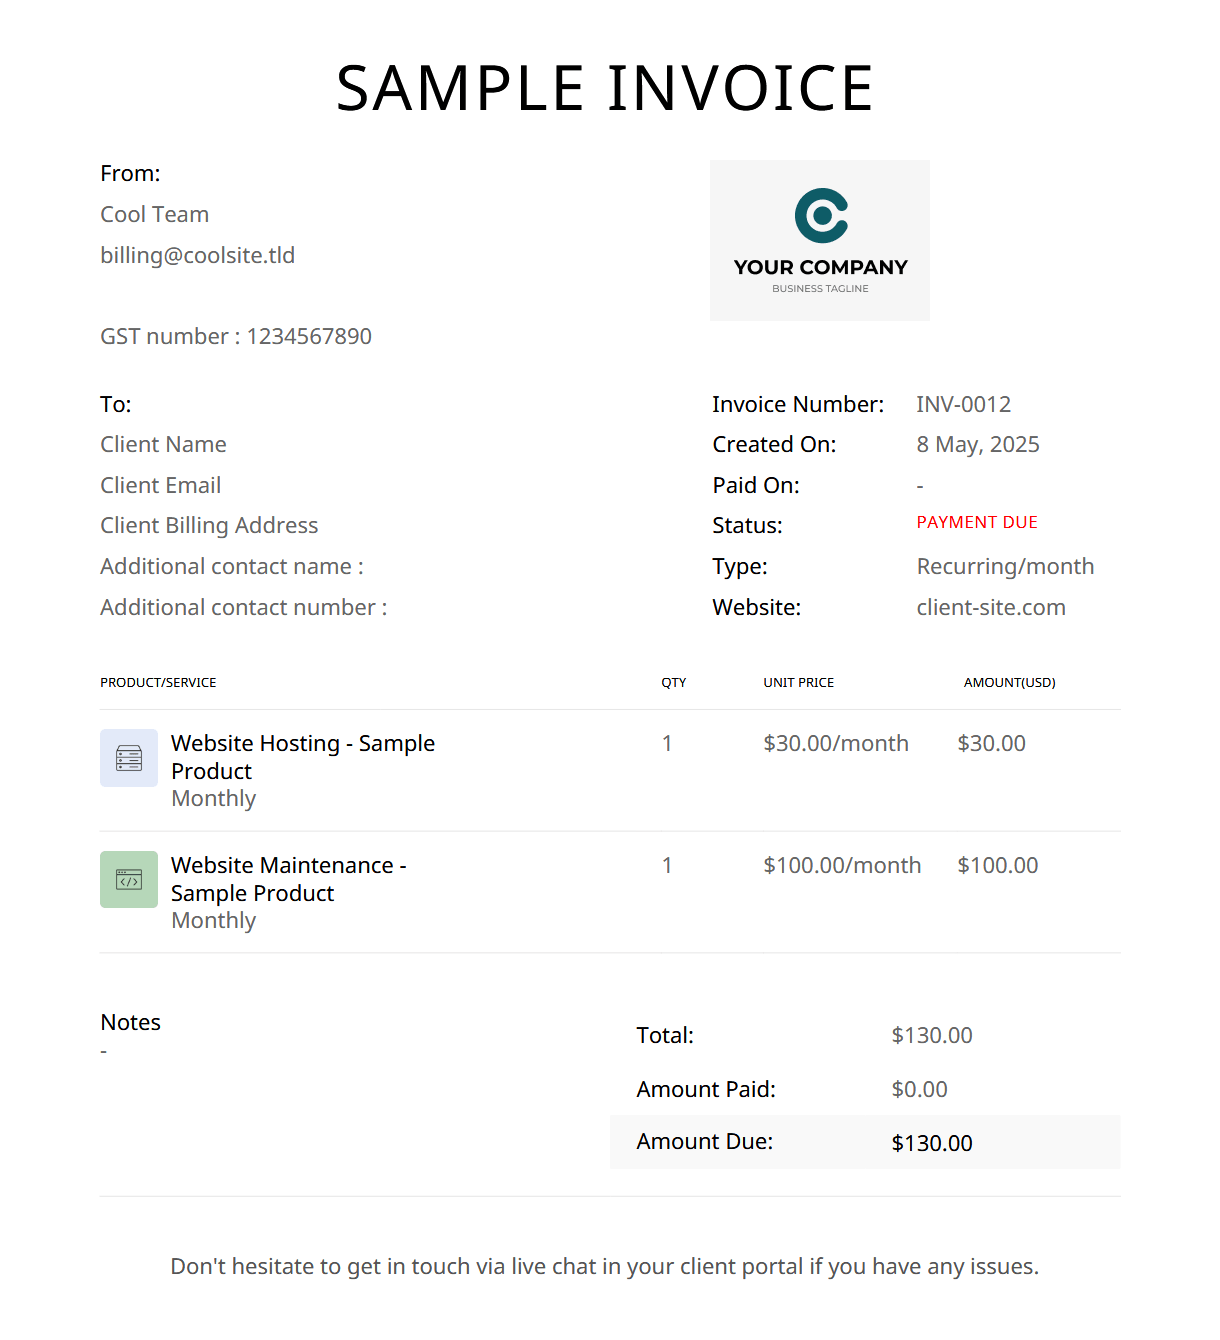
Preview Sample
Click the Preview Sample button at the top of the screen to open a new tab with a preview of what your invoices will look like when sent to your clients. Below is an example of what an invoice could look like with options configured and custom fields included.
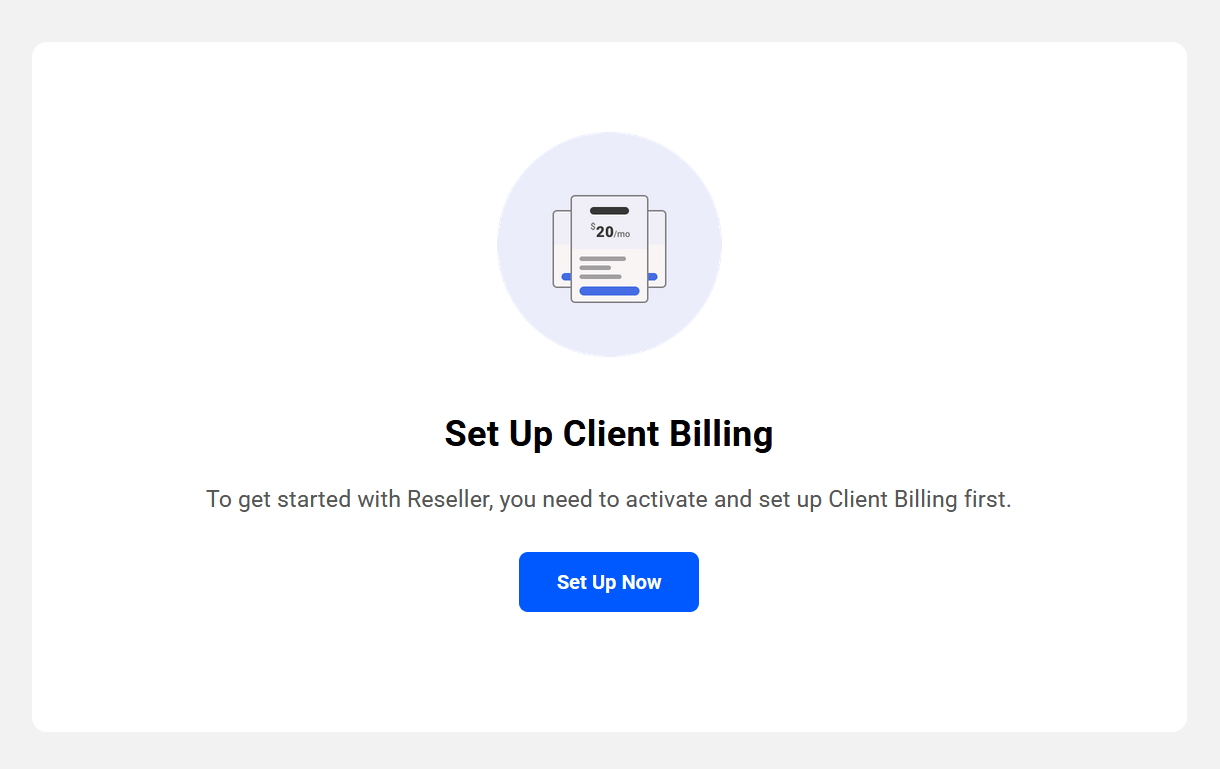
11.5 Reseller Settings
Copy chapter anchor to clipboardThis is where you can configure the default options that will be applied to all of your hosting and domain Reseller products.
If you haven’t yet activated Billing and connected your Stripe account, you’ll be prompted to do that first.
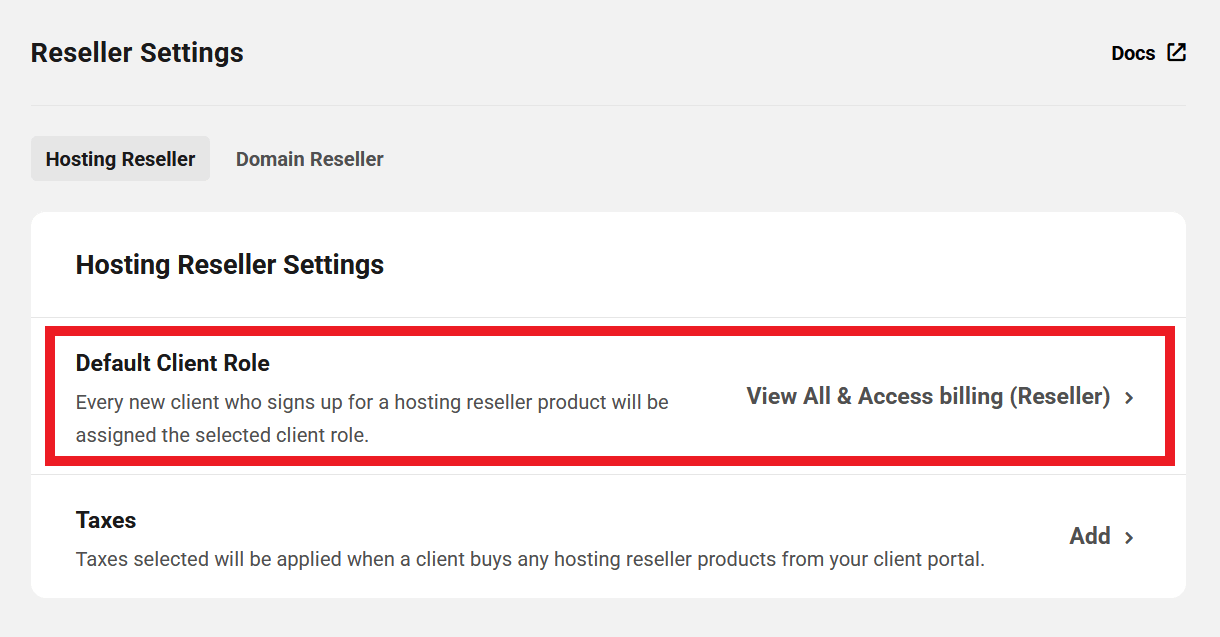
11.5.1 Hosting Reseller
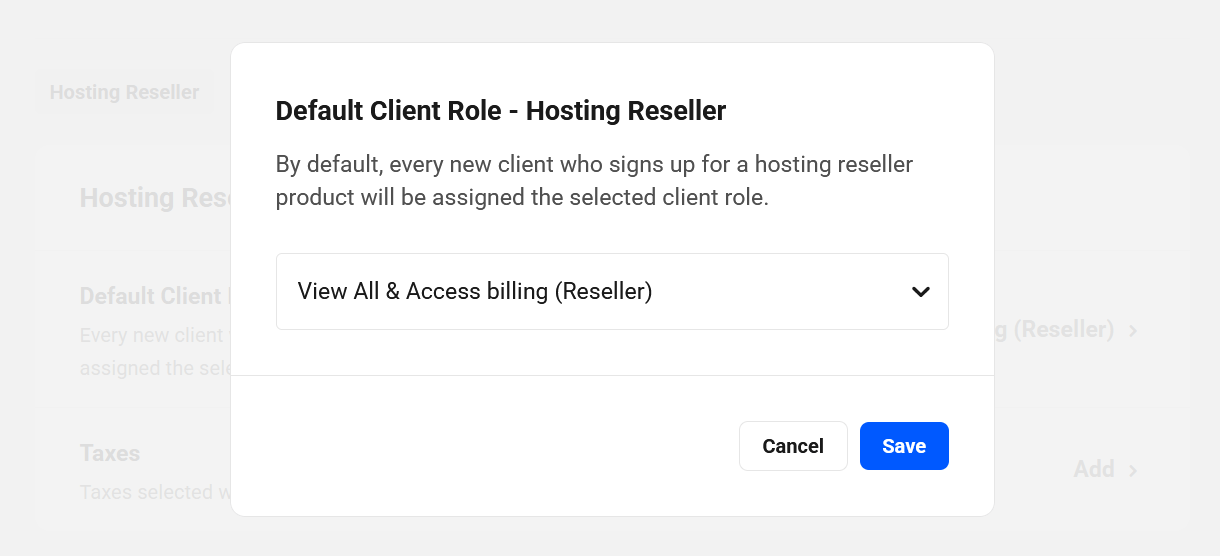
Link to chapter 5Default Client Role
Select the default role you wish to be given to every client who purchases a hosting reseller product from you. This is the role that will be applied by default unless you specify a different role in a hosting reseller product.
If you wish to change the default role, click the role currently displayed to pop open a modal window where you can select the new default role. Click Save when you’re done.
If none of the existing roles meet your requirements, you can create a custom role that includes the required Create new hosting site capability. See the Client Role section in the Creating Hosting Products chapter of our Reseller documentation for details.
It’s important to note that the Hub client role is applied per client account, not per site or domain. If you have different client roles assigned to different reseller products and a client purchases two or more such products, their role will automatically update to that of the most recently purchased product. If needed in certain situations, you can always update the client’s role manually in their client profile.
Taxes
Select the taxes you wish to be applied specifically to your hosting reseller products.
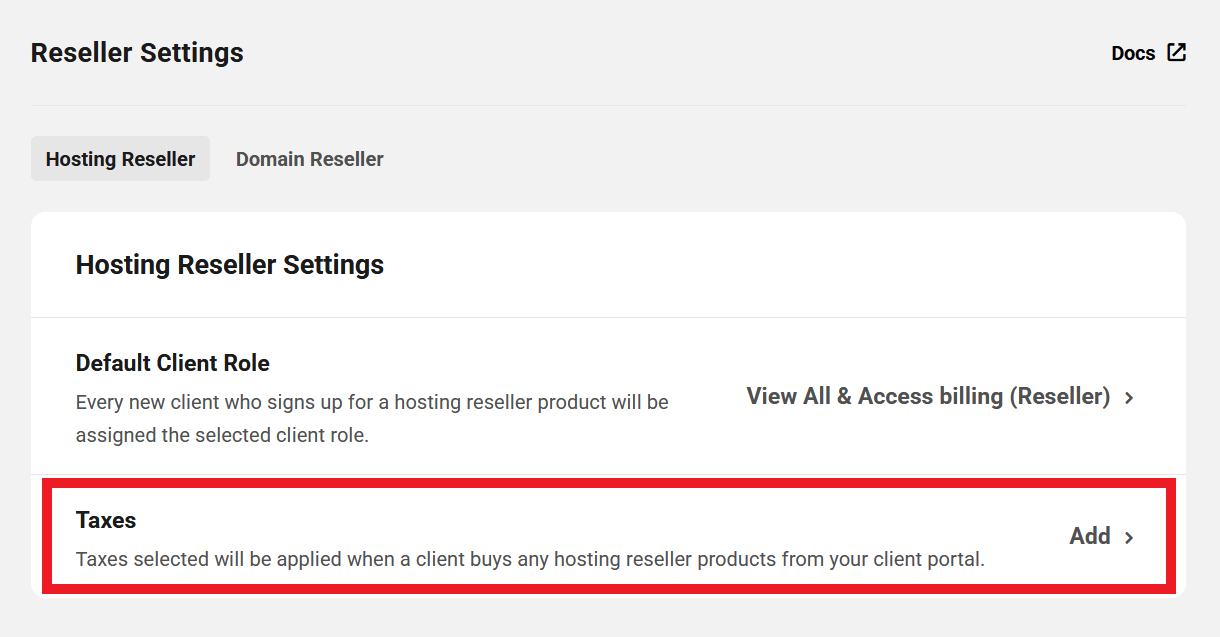
Click the Add Tax button, or any tax that you may have already set here, to pop open a modal window where you can select the taxes you need. Click Save when you’re done.
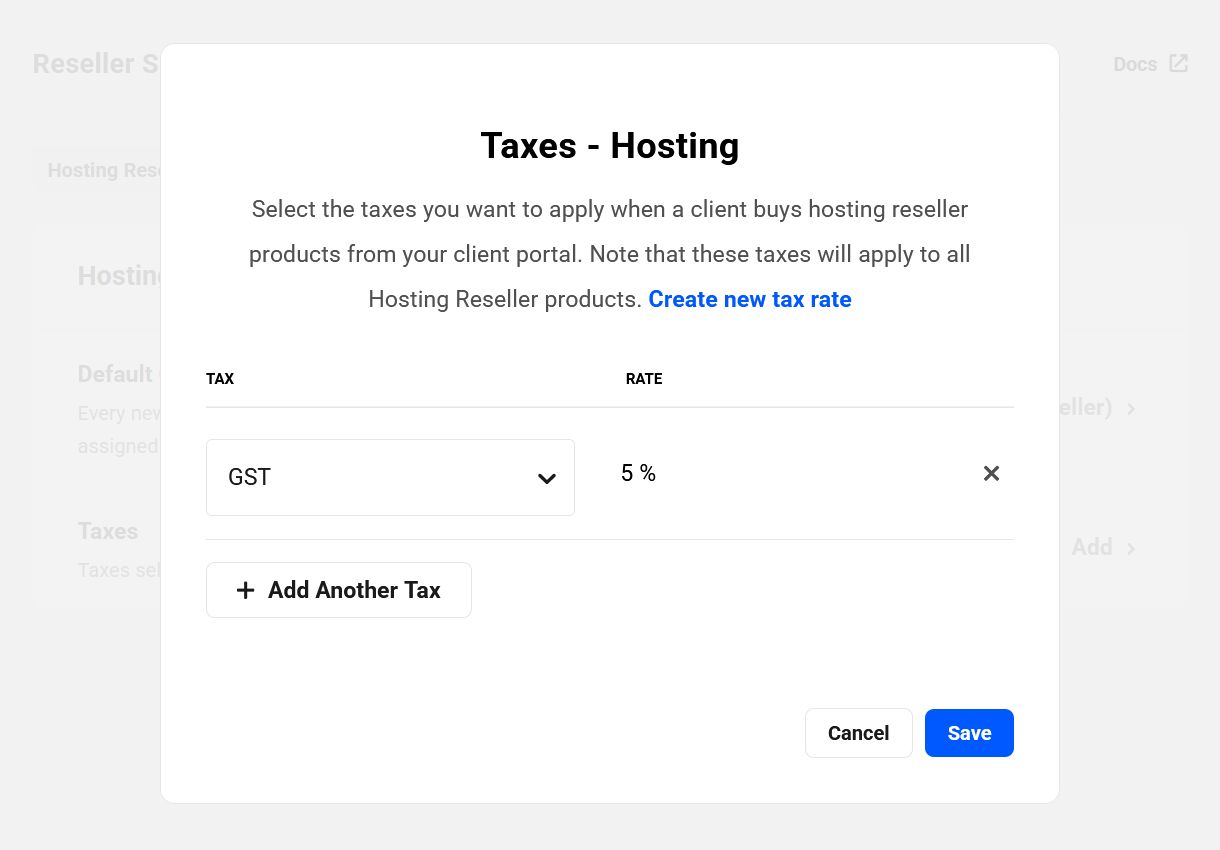
If none of your existing taxes apply, you can create new ones under the Taxes tab in the Billing settings above. Then come back here and select them for your hosting reseller products.
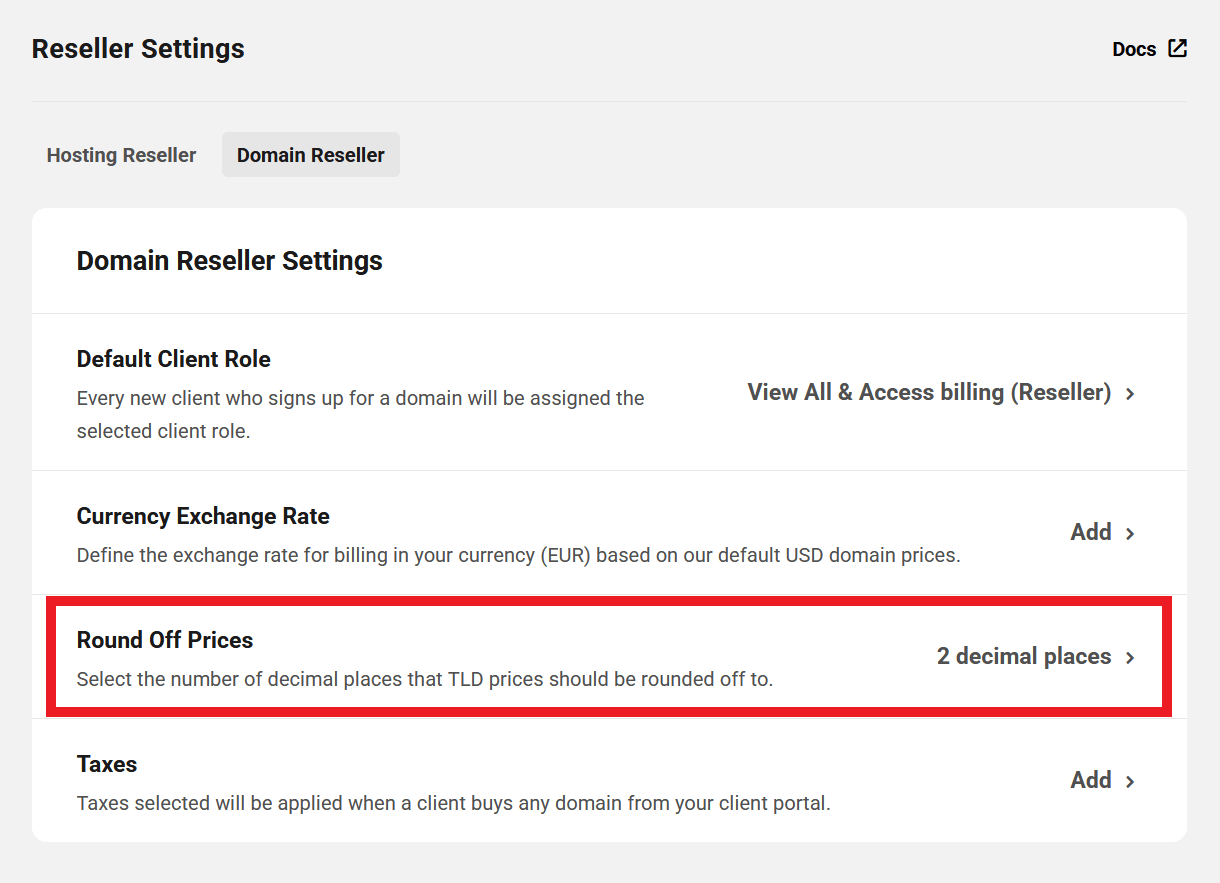
11.5.2 Domain Reseller
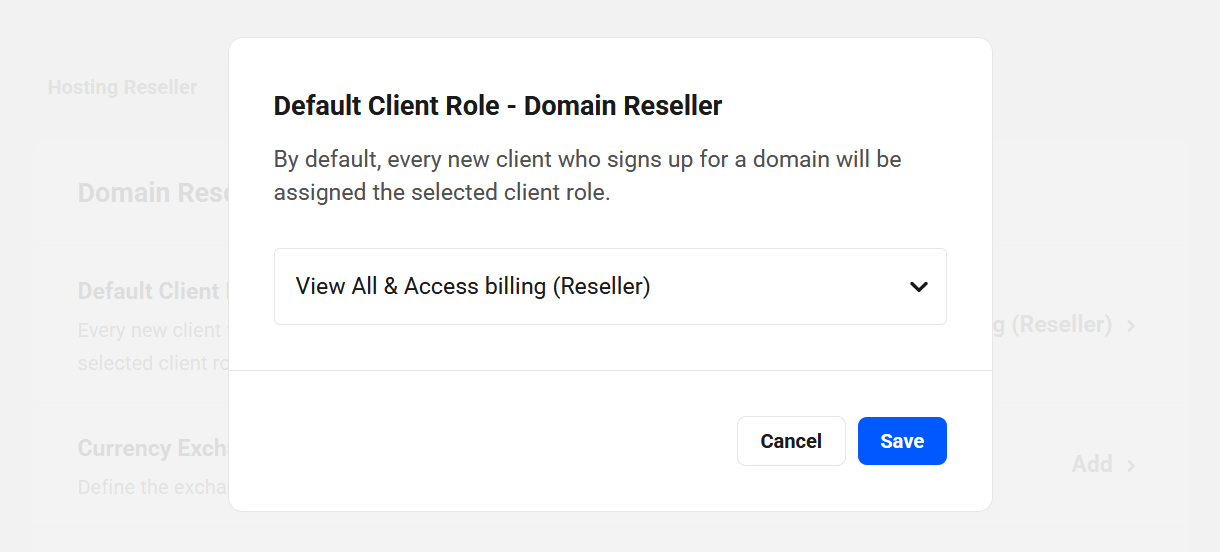
Link to chapter 5Default Client Role
Select the default role you wish to be given to every client who purchases a domain reseller product from you.
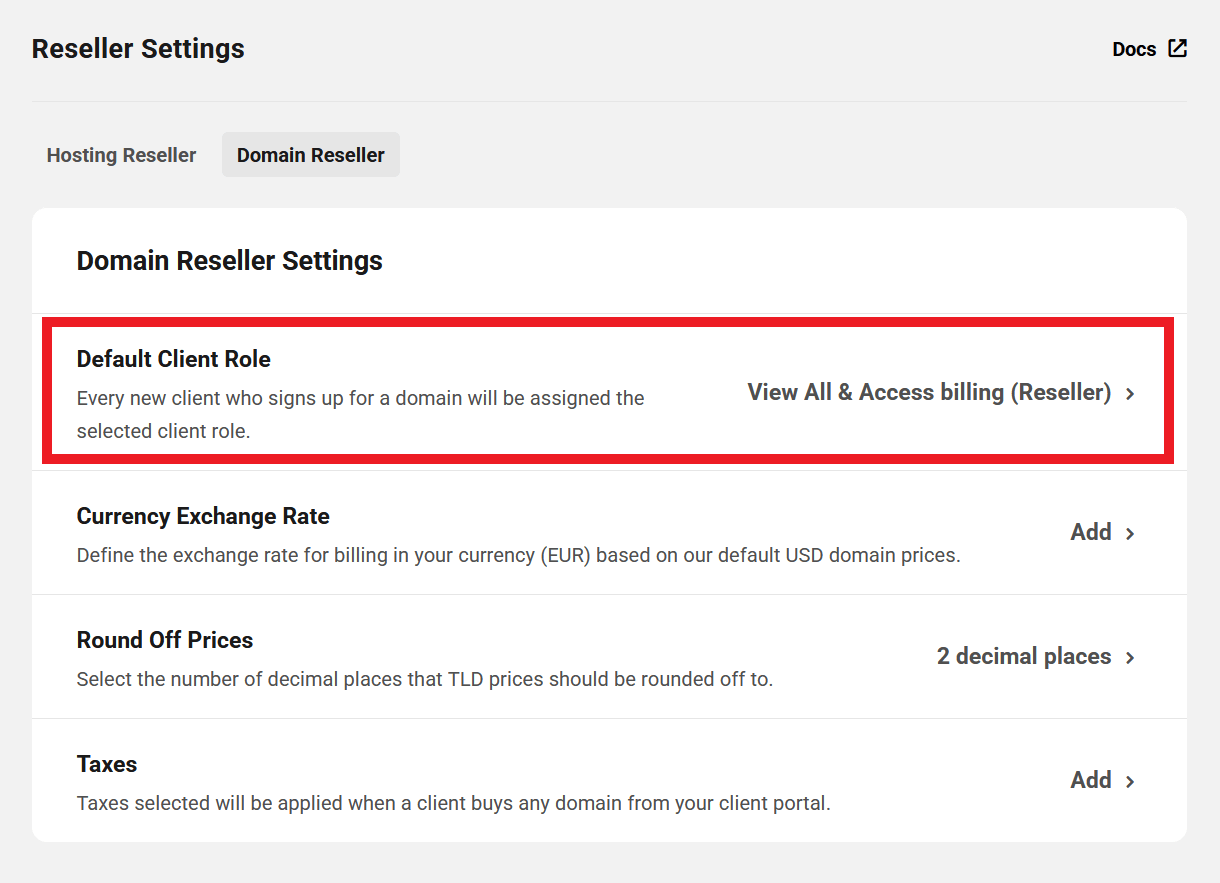
Just like with the Hosting Reseller settings above, if you wish to change the default role, click the role currently displayed to pop open a modal window where you can select the new default role. Click Save when you’re done.
If none of the existing roles meet your requirements, you can create a custom role that includes the required Register New Domain capability.
It’s important to note that the Hub client role is applied per client account, not per site or domain. If you have different client roles assigned to different reseller products and a client purchases two or more such products, their role will automatically update to that of the most recently purchased product. If needed in certain situations, you can always update the client’s role manually in their client profile.
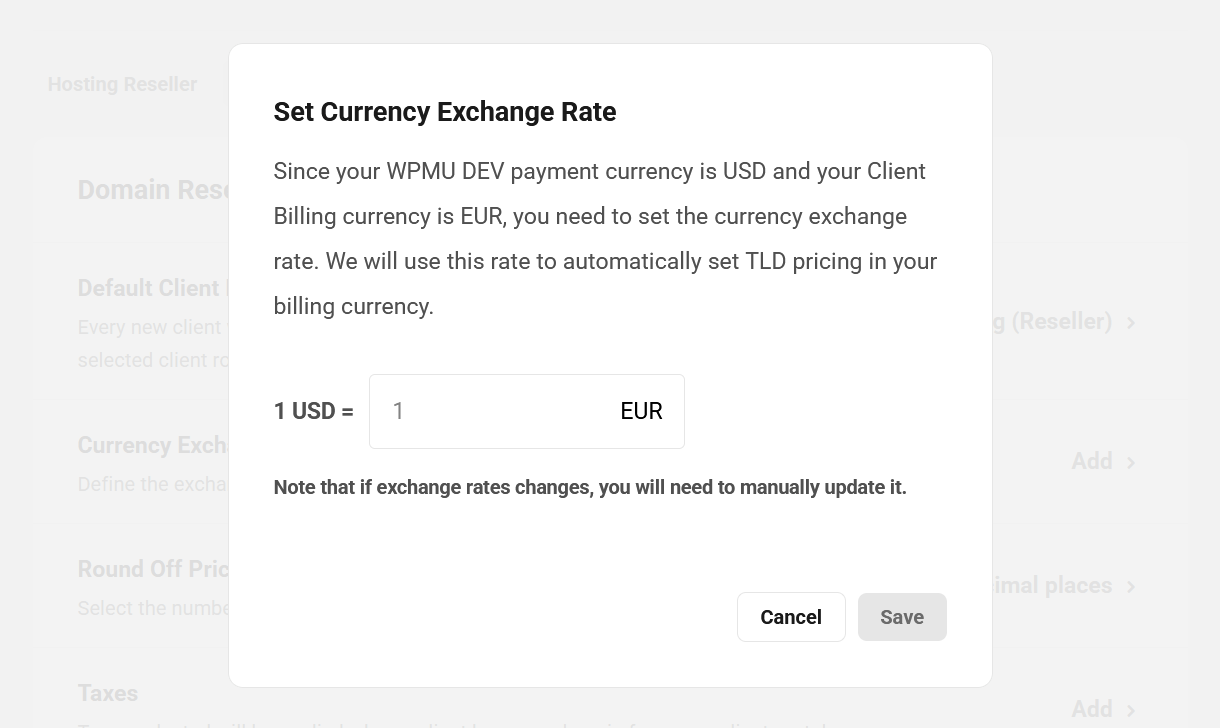
Currency Exchange Rate
This option only appears if the Billing Currency you set when you connected your Stripe account is any other than USD.
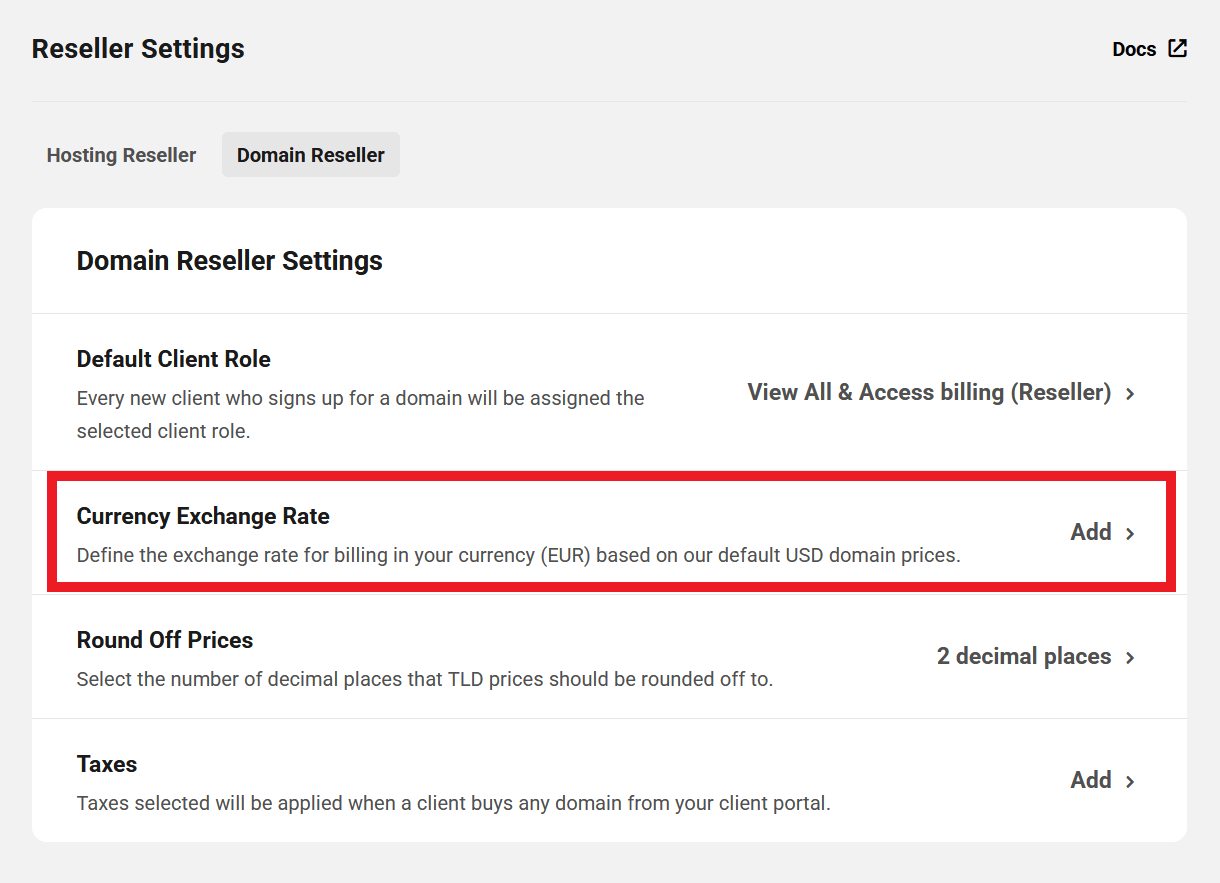
Click the Add button to pop open a modal window where you can set the desired exchange rate for all domains you sell in USD. Note that this is not a dynamically updated value; if exchange rates fluctuate and you need your prices to reflect that change, you would need to update the rate here manually.
Round Off Prices
Click the currently displayed number to adjust the number of decimal places that your domain prices should be rounded off to, if needed.
Taxes
Select the taxes you wish to be applied specifically to your domain reseller products.
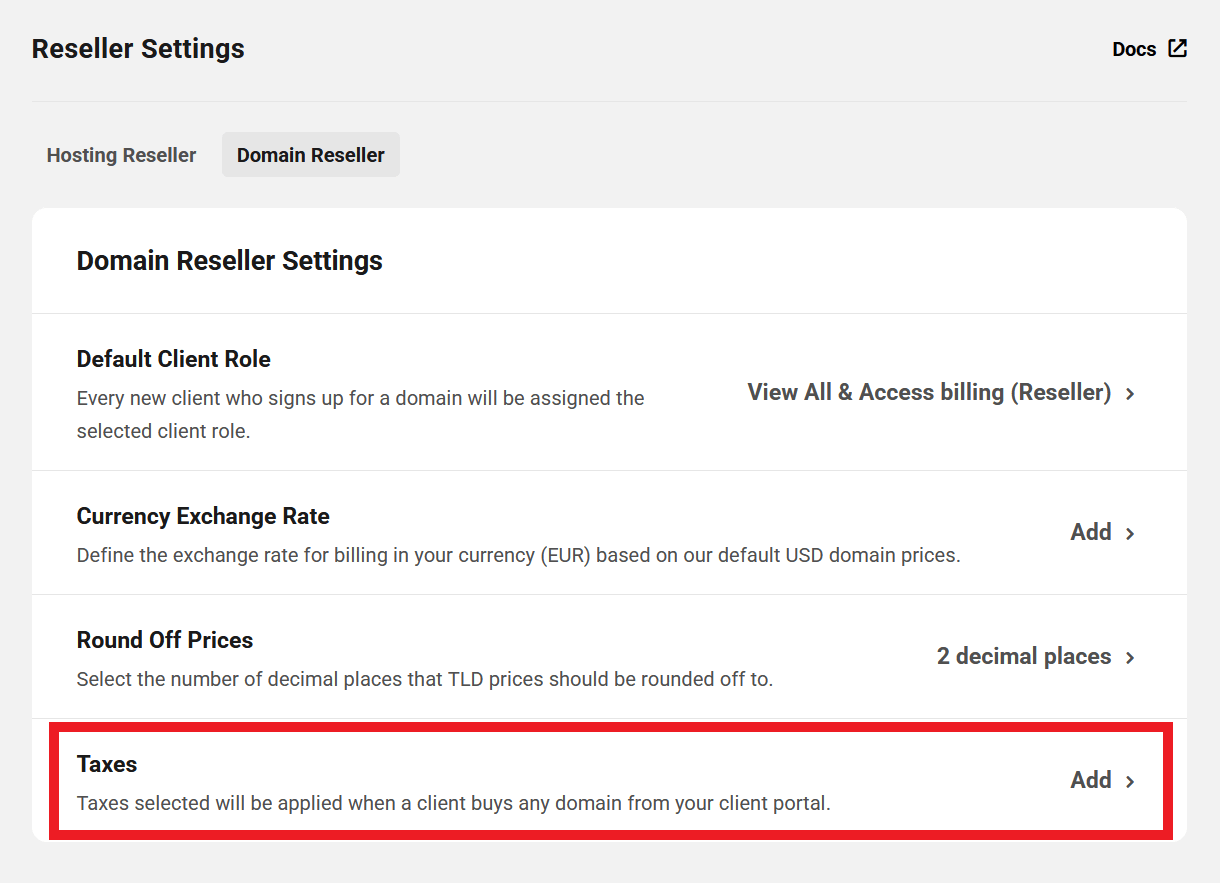
Click the Add button, or any tax that you may have already set here, to pop open a modal window where you can select the taxes you need. Click Save when you’re done.
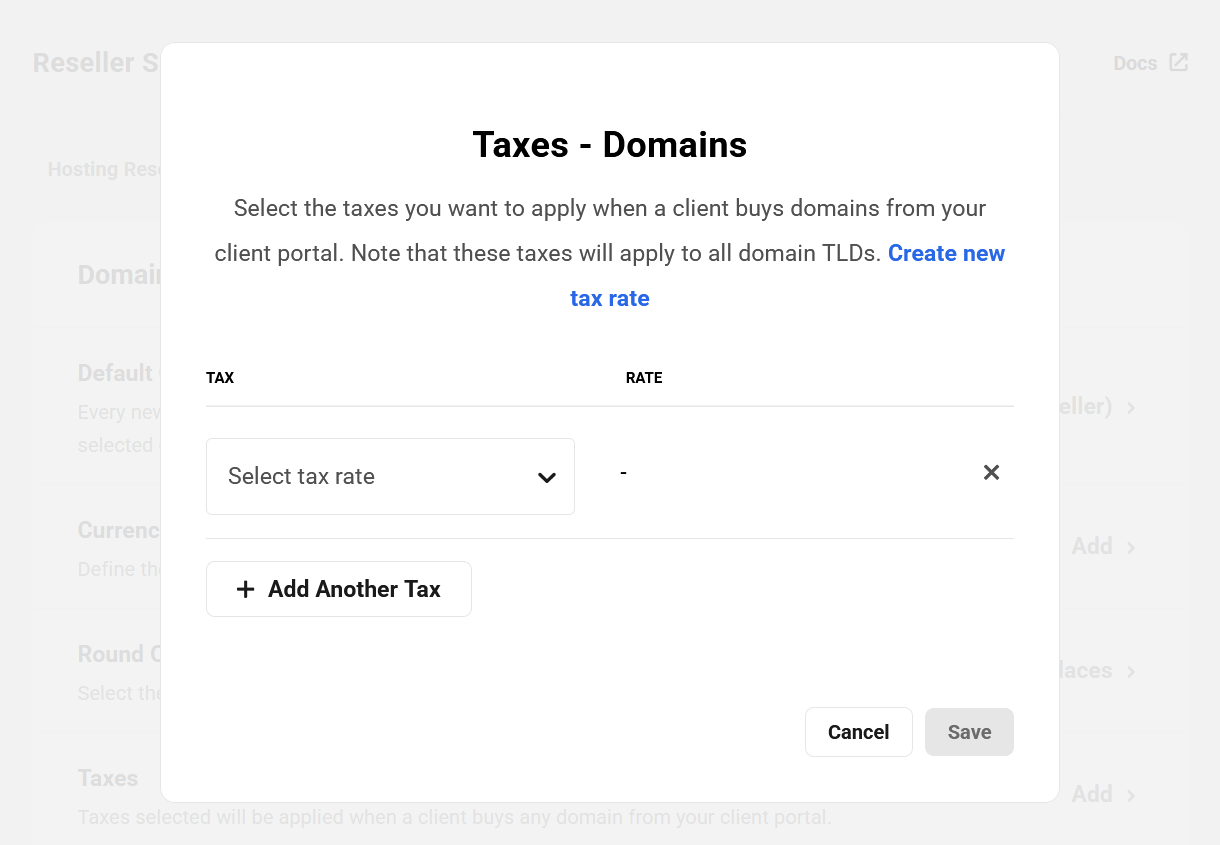
If none of your existing taxes apply, you can create new ones under the Taxes tab in the Billing settings above. Then come back here and select them for your domain reseller products.
11.6 Get Support
Copy chapter anchor to clipboardIf you still have questions or need assistance after reading this document, please don’t hesitate to contact our support superheroes using the available options under the Support tab in your Hub or via the Support tab in your WPMU DEV Dashboard.
