8. Smush
This guide explains how to use Smush Pro’s image optimization features to compress, resize, and display all your images without sacrificing quality. Use the index on the left to quickly locate usage guidance on specific Smush features.
Smush requires PHP 7.4 or greater. See WPMU DEV Minimum Requirements for details.
Recommended by GTMetrix to help resolve the Efficiently encode images audit, Smush aims for the best possible compression/quality ratio for every image. For example, Smush will run a lossy compression when converting jpg to webp, but will do lossless for png to webp.
If you haven’t installed Smush yet, then you should visit the Smush Pro page where you can explore the plugin’s many features, and where WPMU DEV members can install Smush Pro directly to any connected site.
Every WPMU DEV hosted site comes fully loaded with Pro versions of the following plugins automatically installed for you: Smush, Hummingbird, Defender, SmartCrawl, and Forminator. Not hosting with us yet? Check out our Hosting page to see if we might be a good fit for your projects.
Upon activation or when certain features are configured, this plugin may add cookies to the user’s browser, store personal information in your database, or integrate with 3rd-party applications. You may need to disclose this information to your site visitors. For details, see Our Plugins in our privacy policy documentation.
Advanced users can leverage some simple WP-CLI commands to optimize, list, and restore images with Smush Pro. See this API doc for more info.
We’ve put together some awesome tutorials on optimizing content & pages created with some of the most popular page builders out there. If you’re using any of the ones listed below, we highly recommend checking out the associated posts to help you get the most out of Smush.
Optimize Elementor Using Smush and Hummingbird
Optimize Elementor for Core Web Vitals Using R.O.S.E.
Optimize WPBakery Sites
Optimizing WPBakery’s Impreza Theme
Optimize Divi with Hummingbird and Smush
Optimizing Astra with Hummingbird and Smush
How to Speed Up Slider Revolution in WordPress
Speed Up and Optimize Avada Using Smush and Hummingbird
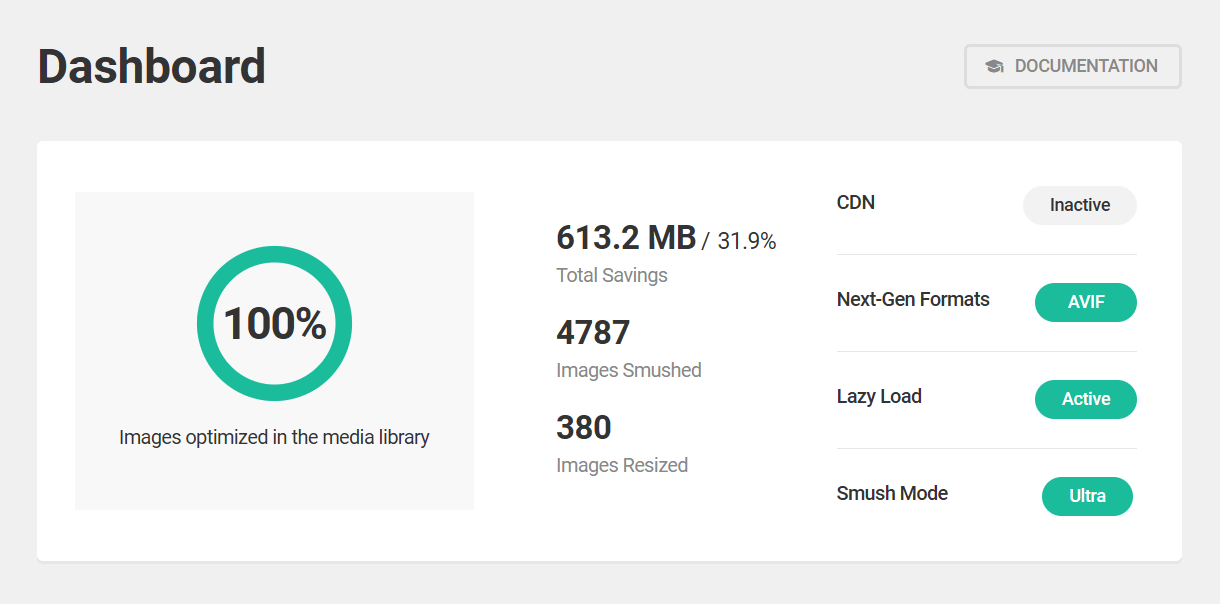
8.1 Dashboard
Copy chapter anchor to clipboardThe Dashboard reports your Smush stats and provides an overview of enabled features.
8.2 Bulk Smush
Copy chapter anchor to clipboardThe Bulk Smush feature allows you to apply all your enabled features to any uncompressed images in your Media Library with a single click. The Pro version allows you to optimize images up to 256Mb/image, while the free version allows a maximum of 5Mb/image.
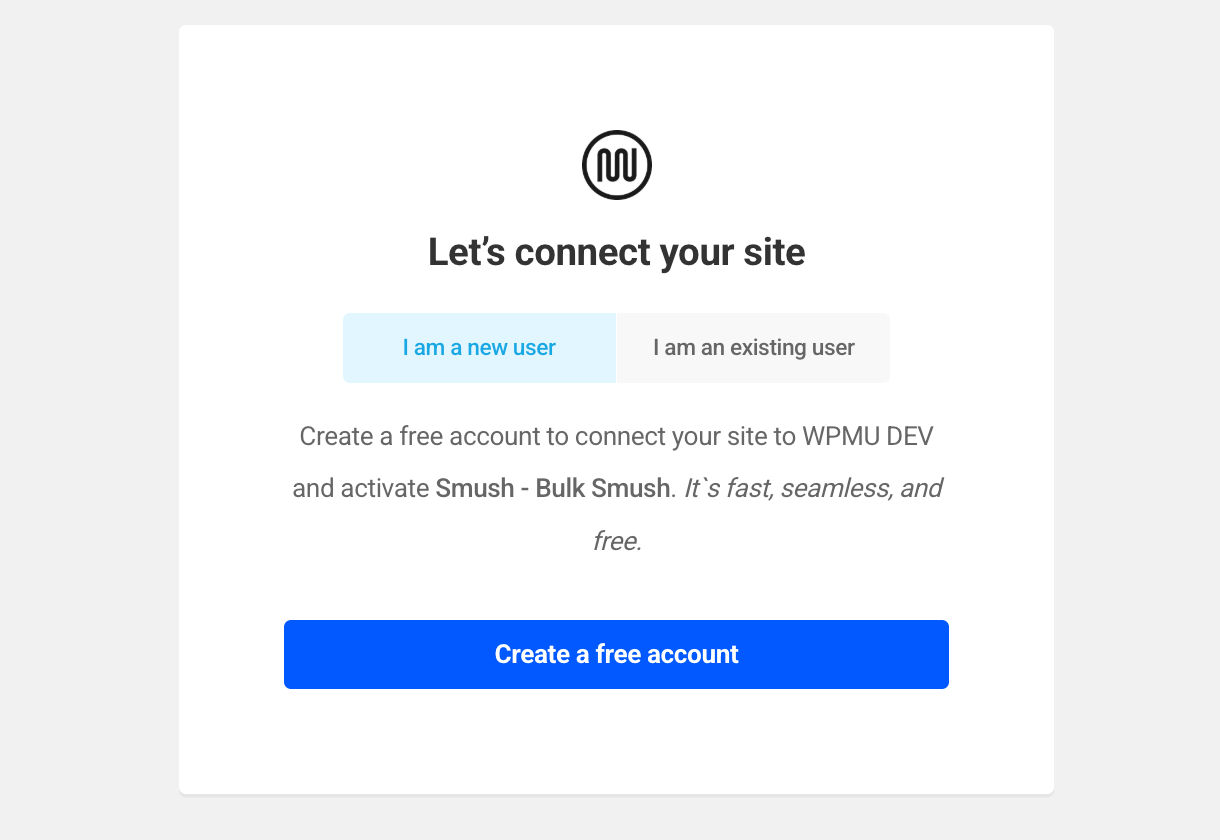
This feature requires a connection to the WPMU DEV API. So if the WPMU DEV Dashboard plugin is installed on your site but not yet active, or you’re not logged into it, you’ll be prompted to do that first. If the WPMU DEV Dashboard is not installed on your site, you’ll see a Connect My Site button here. Clicking that button will pop open a modal window where you can create a free account or connect to an existing one.
Please note that although the image optimization limit for the pro version is 256 Mb, we advise not to get too liberal with adding large images. Doing so may affect the site’s performance, regardless of the allowed limits.
You can trigger an immediate scan of your image library at any time by clicking Re-Check Images at the top of the screen.

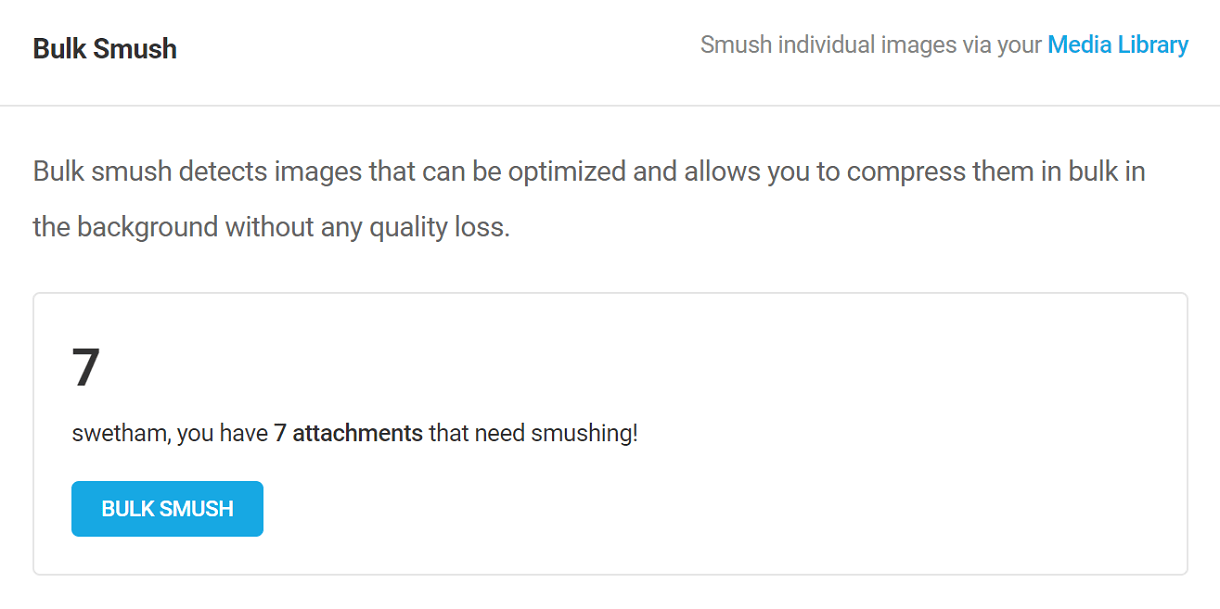
The Bulk Smush module will alert you the uncompressed images in your Media Library. Click Bulk Smush to compress all un-Smushed images. Alternatively, click Media Library to open the library and compress images individually as described in Media Library below.
Note that, on WordPress Multisite networks, Bulk Smush is not available by default and needs to be enabled in the Network Admin under Smush > Settings > Permissions. Once it has been enabled, Bulk Smush will be available on the subsites.
With Automatic Compression and all other features enabled, you may seldom need to Bulk Smush as your images will be compressed during the upload process.
What does Bulk Smush compress?
As noted above, Bulk Smush will only compress images in the Media Library. If the images are in a different location (e.g., a plugin folder), then Directory Smush can be used. However, the same rules below apply.
- images must be under 256Mb if using Smush Pro (5Mb in Smush free);
- images must be in .jpeg /.jpg or .png format (transparent .png images can be compressed but will not be converted to .jpeg),
- images will only be compressed if the result would be an image with a smaller file size.
What does Bulk Smush NOT compress?
- any image format that is not .jpeg /.jpg or .png,
- images with ‘missing headers’ (typically a corrupt or badly saved image),
- document, video, audio files (e.g., .pdf, .avi, .mp3, .mp4).
How are images optimized?
The Smush API sends your images via HTTPS to secure 3rd-party servers where they are compressed by writing temporary files to disk. The optimized images are returned to your server and temporary files are deleted immediately. There is no local or intermediate storage which eliminates the possibility of your images being accessed by unauthorized parties during the process.
Parallel Processing
Bulk Smush works on optimizing all the default WordPress image sizes for a media item in parallel, which makes the image optimization process much faster.
Parallel processing requires the curl_multi_exec() function to be enabled on your server. If your hosting provider has disabled that function, Smush will fall back to processing images sequentially, and you’ll see a notice at the top of the screen.

If that function is enabled on your server, but you wish to disable the parallel optimization feature and optimize images sequentially instead, add the following constant to your wp-config.php file, just before the line that says “That’s all, stop editing“:
define ( 'WP_SMUSH_PARALLEL', false );
Get all the details on parallel processing and see how Smush stacks up against the competition for speed in our New Smush Parallel Processing Compresses Images 8x Faster blog post.
Background Processing (Smush Pro only)
Bulk Smush processes your images in the background, so you need not keep the window open while it’s working.
You can optionally receive an email, at the admin address that is set under Settings > General in your wp-admin, when the process is complete.
Note that if you have enabled the White Label option in the WPMU DEV Dashboard plugin, this email will also be fully white labeled with no mention of WPMU DEV.
Canceling Bulk Smush
If you need to stop the Bulk Smush process, click the Cancel link at the far right of the progress bar.

If clicking the Cancel link does not stop the process for some reason, you can force it to stop by pasting this URL in your browser and refreshing the page. Change yoursite.tld to your actual domain name.
https://yoursite.tld/?wp_smush_stop_background_processing=1
If clicking that link still does not stop the process, you can try either of the following two code options. Remember to remove the code afterwards or you will not be able to run the bulk smush at all.
- Add this constant to your wp-config.php file, just above the line that says “That’s all, stop editing“:
define('WP_SMUSH_STOP_BACKGROUND_PROCESSING', true); - Or add this filter to your child-theme functions.php or a mu-plugin:
8.2.1 Bulk Smush Settings
Link to chapter 2The Bulk Smush Settings are your primary optimization tools and they apply only to Bulk Smush and thus to images in your Media Library only.
Our blog post, How To Ace Google’s Image Page Speed Recommendations With Smush, focuses on Smush features that directly impact your Google Page Speed score.
Smush Mode
You can customize the level of compression you need for the images with Smush mode. There are three levels of compression:
Basic – With lossless compression, this method provides pixel-perfect images with minimal file size reduction. Your visuals will remain clear without any compromise in performance
Super – The lossy compression of super mode offers much better compression and file size reduction than basic mode without compromising the image quality. The reduced file size provides better performance and load speed.
Ultra – The Ultra mode offers a professional-level image compression that is 5 times greater than the Super mode. It can reduce file sizes significantly while maintaining impressive image quality. This is a pro feature and requires an upgrade to Smush Pro.

If one or more images are returning API errors when you try to compress them, it may be due to the compression mode used. See Bulk Smush Issues in the Troubleshooting chapter below for details.
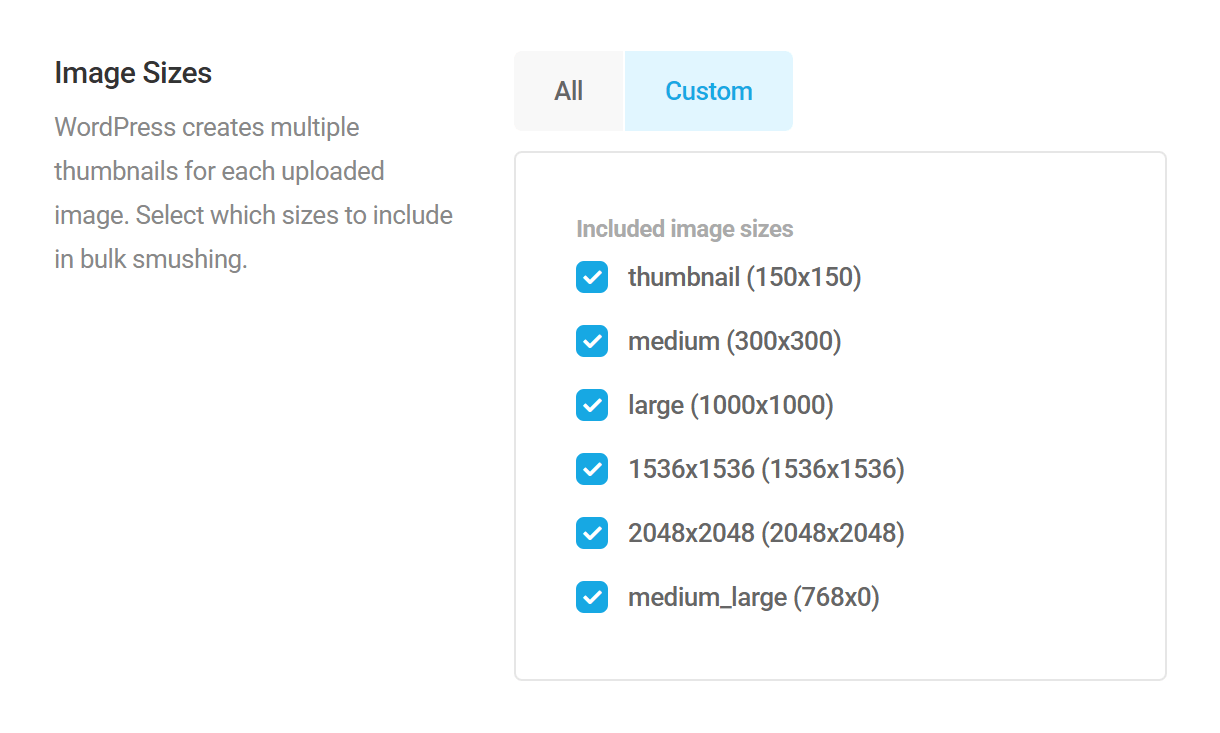
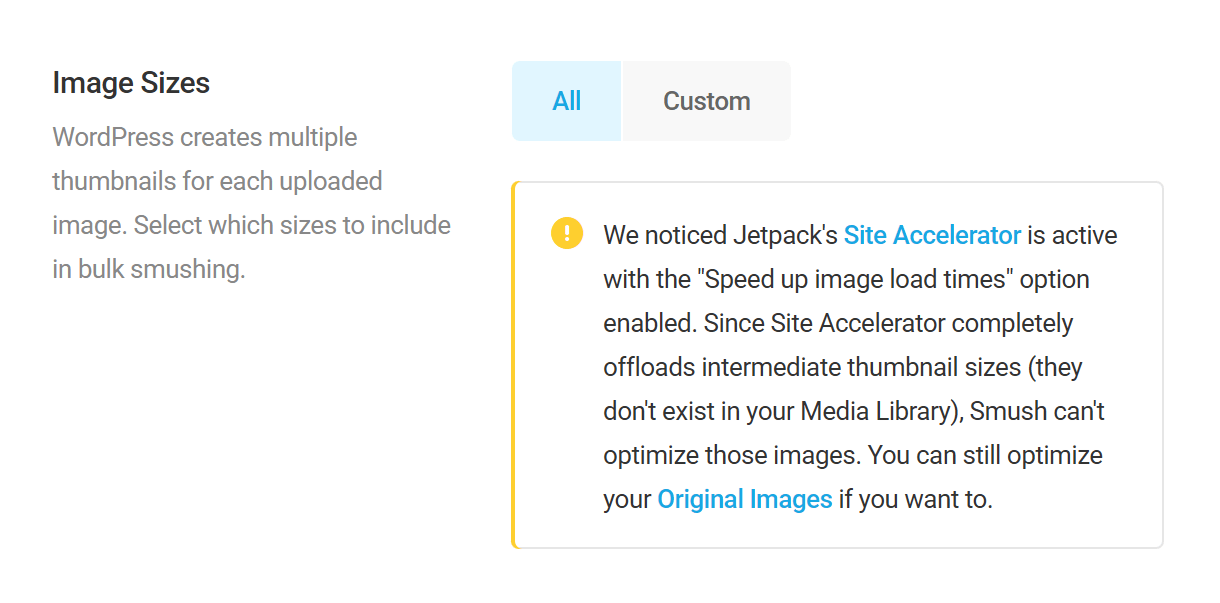
Image Sizes
The Image Sizes feature allows you to choose which thumbnails they want to be compressed and which ones Smush should ignore.
In order to serve scaled images, WordPress generates multiple copies in different sizes of every uploaded image. Some themes and plugins also require copies. These copies, called thumbnails, can add up quickly, so we recommend you compress all thumbnails.
WordPress duplicate images are a net positive for most users – a simple exchange of storage space for faster page speed. WordPress pros, on the other hand, achieve page speed in many ways and the benefits of duplicate images may be minimal. Follow the Learn More link for guidance on preventing WordPress from creating multiple copies of your uploaded images.
Click Custom to reveal a list of the thumbnail sizes that WordPress is creating on your site. Select the checkboxes for the images you want to be compressed, and leave those you don’t want compressed unchecked. The image sizes you select will be compressed automatically upon upload if you have Automatic Compression enabled.
WordPress.com users
If your site is hosted on either a Business or an eCommerce plan at wordpress.com, and you have the Site Accelerator option enabled in the Jetpack plugin, you will not be able to bulk smush your images. That is because that feature in Jetpack offloads image thumbnails to wordpress.com’s own CDN and Smush cannot fetch them to optimize them for you.
You will see a notice like this when that Jetpack feature is enabled:
Automatic Compression
Click the slider to enable automatic compression, and Smush will compress every image copy WordPress generates as soon as it’s created. Smush will only automatically compress the image sizes you selected in the Image Sizes setting above.
Enabling this option will ensure that all images are automatically optimized when they’re uploaded to your Media Library, regardless of the method used to upload them: through the media library uploader, through WordPress or WooCommerce Rest API, or via WordPress mobile apps.
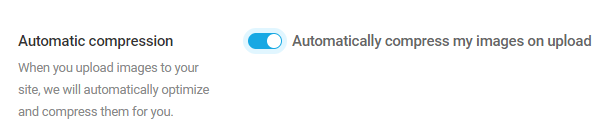
Please note that if an image is larger than 32 Mb, it will not be compressed automatically, even if the automatic compression feature is enabled. We suggest manually compressing any images that exceed 32 Mb in size.
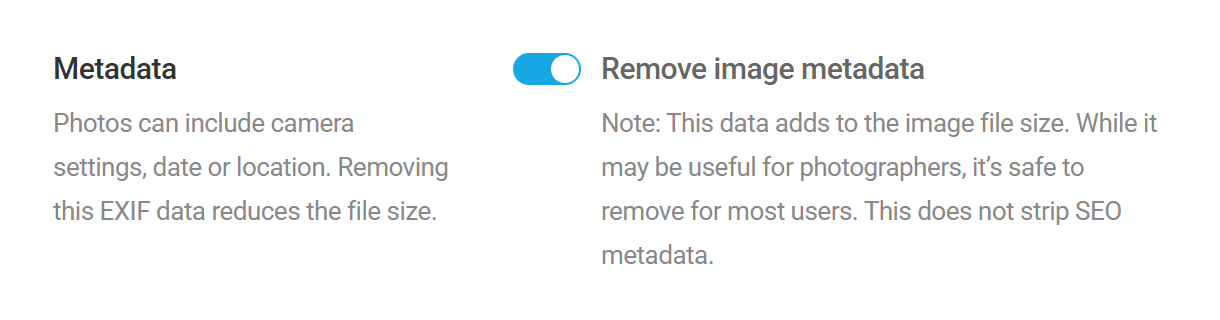
Metadata
If yours is a photography site, you may want to retain the metadata that digital equipment frequently attaches to your images, but for most sites, it is entirely unnecessary. Click the slider to enable Smush to strip unnecessary metadata from all images.
Please note that EXIF metadata might contain data related to image color profile or orientation. Removing such data might alter the original colors of the image or its orientation.
Directory Smush
The /uploads folder used by your Media Library is the primary folder for images, but images can reside elsewhere. For example, plugins that include their own images may store those images in the /plugins folder. Directory Smush finds uncompressed images stored outside the uploads folder and allows you to compress those images if you wish.

Click Choose Directory to reveal a list of directories where uncompressed images are located. Click the arrow to the left of any directory to reveal a list of subdirectories, and click the arrow to the left of any subdirectory to reveal the images within.

Click the checkbox next to any directory or subdirectory to compress all the images they contain or select images individually if you wish, then click Choose Directory to begin compression. If several directories are selected, the process could take several minutes.

Currently, Directory Smush only supports image compression. However, we are planning to support next-gen conversion in the near future.
Advanced Settings
Click on the Advanced Settings heading to reveal additional options.
Large Image Resizing
WordPress automatically creates a scaled version of the uploaded images larger than 2560x2560px and keeps the originally uploaded images as a backup. Using image resizing options, you can modify the default resizing threshold and disable the creation of scaled images.
Resize large images – This option lets you change the default max width and height threshold defined by WordPress to other dimensions.
Disable scaled images – Enabling this option completely disables the scaling functionality. When enabled, WordPress will no longer create scaled versions of the uploaded images, regardless of their size. This option ensures that the originally uploaded images are retained without any automatic resizing.
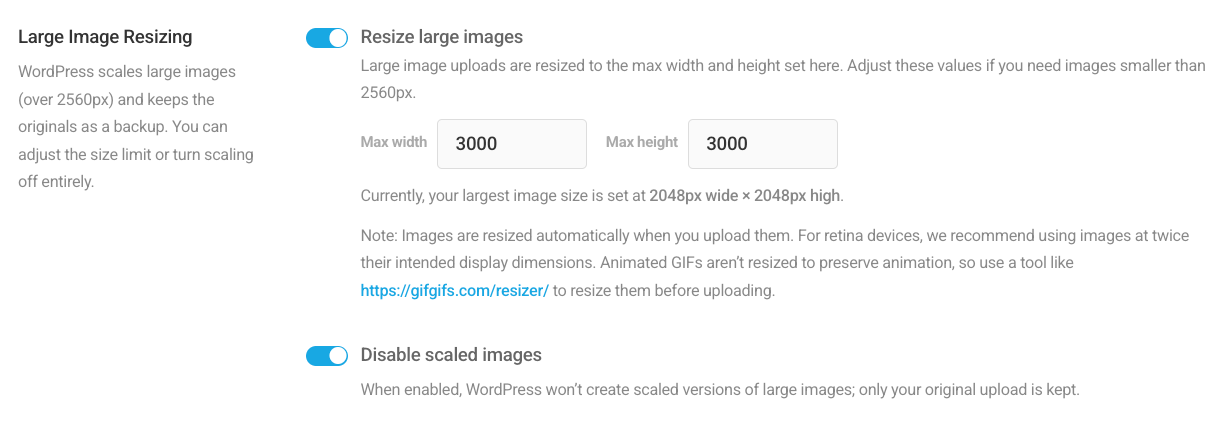
For example, If the dimensions of the original image are 4000x4000px and if only the Resize original images option is enabled with max width and height values set to 3000x3000px, the original image is backed up, a scaled version is created, and the scaled version is then resized to 3000x3000px.
If only the Disabled scaled images option is enabled, no automatic resizing of the uploaded images occurs, and the original image is retained as is.
If both options are enabled, the original image will be resized to the set threshold value (3000x3000px in our example).
Original Images
By default, WordPress will only optimize attachments generated when images are uploaded, and not the original uploaded images themselves. To optimize your original images, enable Optimize original images.
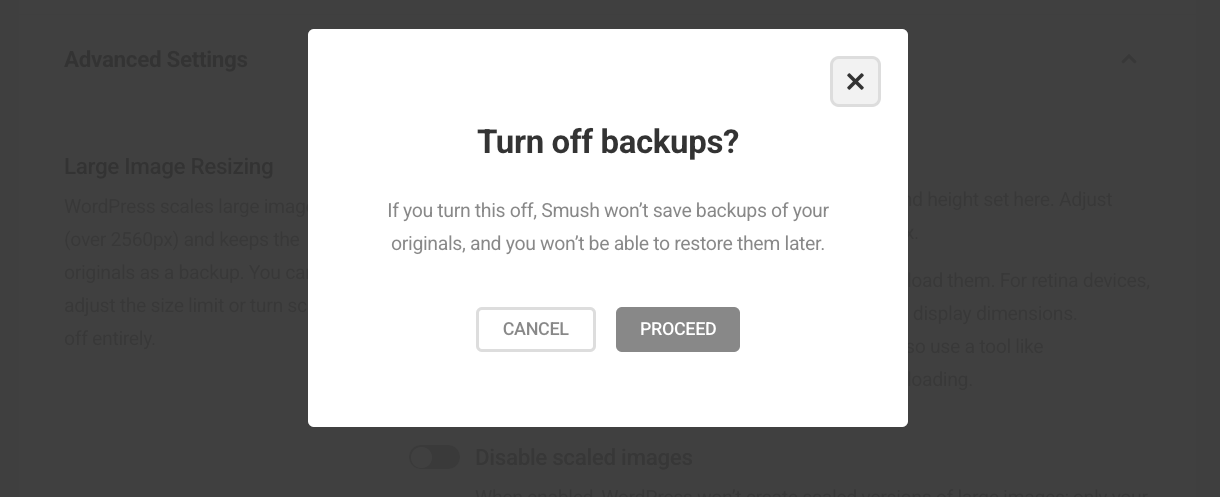
To save a copy of your original images, enable Backup original images. If enabled, keep in mind that saving a copy of original images can significantly increase the size of your uploads folder. See also Restore All Images below for important information.
Note that both Optimize original images and Backup original images are enabled by default on new installs or when you reset Smush settings.

If you turn off Backup original images, you’ll see a confirmation modal letting you know that backups of your originals will no longer be saved and that those images cannot be restored later.
If one or more original images are returning API errors when you try to compress them, it may be due to the compression mode used. See Bulk Smush Issues in the Troubleshooting chapter below for details.
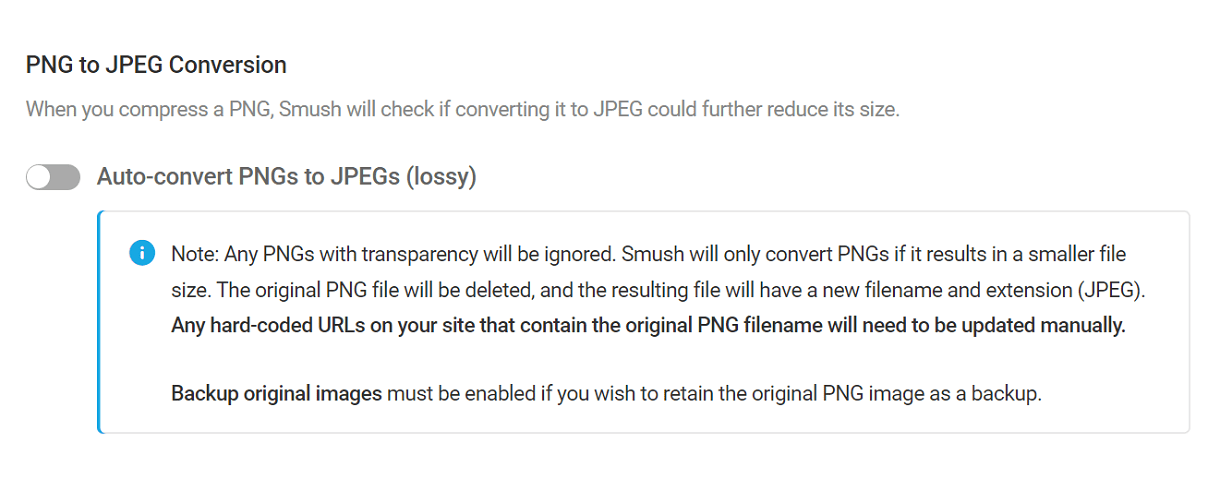
PNG to JPEG Conversion (Smush Pro only)
Click the slider to enable this feature and Smush will convert non-transparent PNG files to JPEGs, but only when doing so results in a smaller file size.
In this process, the original PNG file will be deleted. However, you can retain the original PNG file as a backup by enabling the backup original images option.
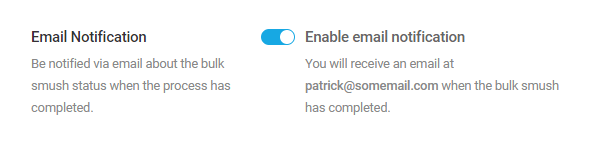
Email Notification (Smush Pro only)
Enable this option to have an email sent to your admin email address when the bulk smush process completes in the background.
Restore All Images
The Restore All Images feature can only be used to restore images that have been uploaded to the /uploads/ directory via the Media Library. This feature will not restore any images that have been optimized using Directory Smush. If you need to restore optimized images in a directory other than the /uploads/ directory, you will need to restore those manually.
The Backup original images option must be enabled in the Bulk Smush settings before you optimize your media library. Bulk Restore will use the original image backups to restore your images and thumbnails to their original unoptimized state.
If the Optimize original images option was enabled when you optimized your media library, but you had not yet enabled Backup Original Images, your thumbnails can still be regenerated, but the quality will be impacted by the compression of your original images.
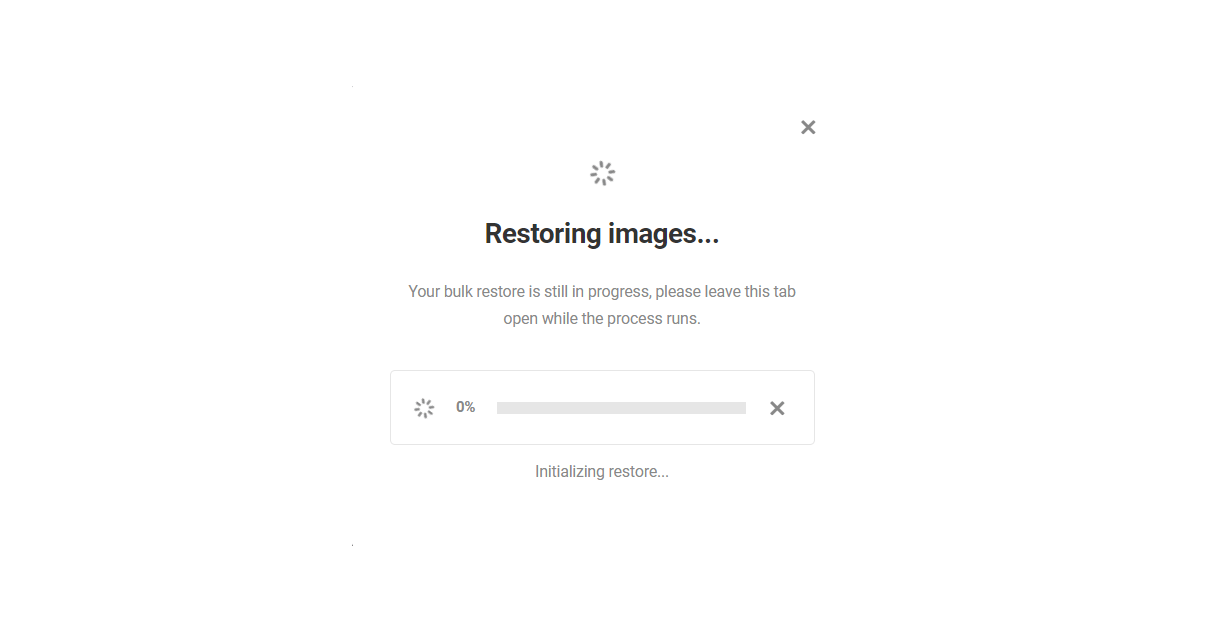
Click Restore All Thumbnails to start the restoration process.

You will then be met with a confirmation request. Click Restore to follow through with the restoration. Alternatively, click Cancel or the X icon to exit without initiating the restoration.

The restoration process will be tracked by a progress bar and you can cancel the process by clicking on either of the X icons.
If all images have been successfully restored, you’ll receive a success message. Click Finish to complete the process.

If Smush has run into any errors while trying to restore your thumbnails, you will receive a message informing you of which images were not regenerated.

Click Retry to run the restoration process again or Cancel to close the message. You can view the unrecovered images in your media library by clicking on the arrow icon for each image.
You can now restore one or more original images directly from your Media Library using the Smush restore bulk action.
8.2.2 Media Library
Link to chapter 2When activated, Smush adds features to your Media Library that allow you to filter images by Smush status, selectively compress or restore images and view the Smush stats associated with each image.
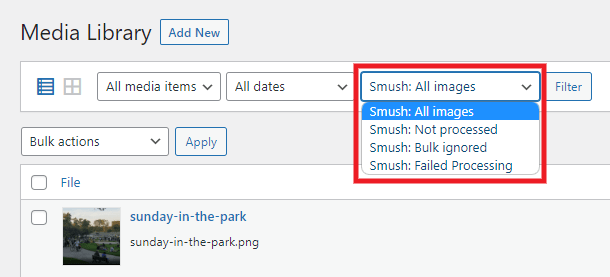
Use the Smush filter to display all images, just those that were ignored, those not yet processed or those for which processing failed.
Note that Smush does not compress video or Gif files. Any other ignored image types could indicate that you are not making full use of all available compression features.
Smush adds a column to the Media Library indicating whether an image has been compressed or not.
Images that have not been processed by Smush can be compressed by clicking the Smush button for that image. You can also exclude images from being compressed when running Bulk Smush by clicking the Ignore link.

If you want to allow Bulk Smush to compress images that you have set to ignore, click the Revert back to previous state link for that image.

If you had already Smushed your images with Basic or Super smush mode, then enabled Ultra Smush afterwards, click the Ultra Smush link to get even more savings for those already processed images.

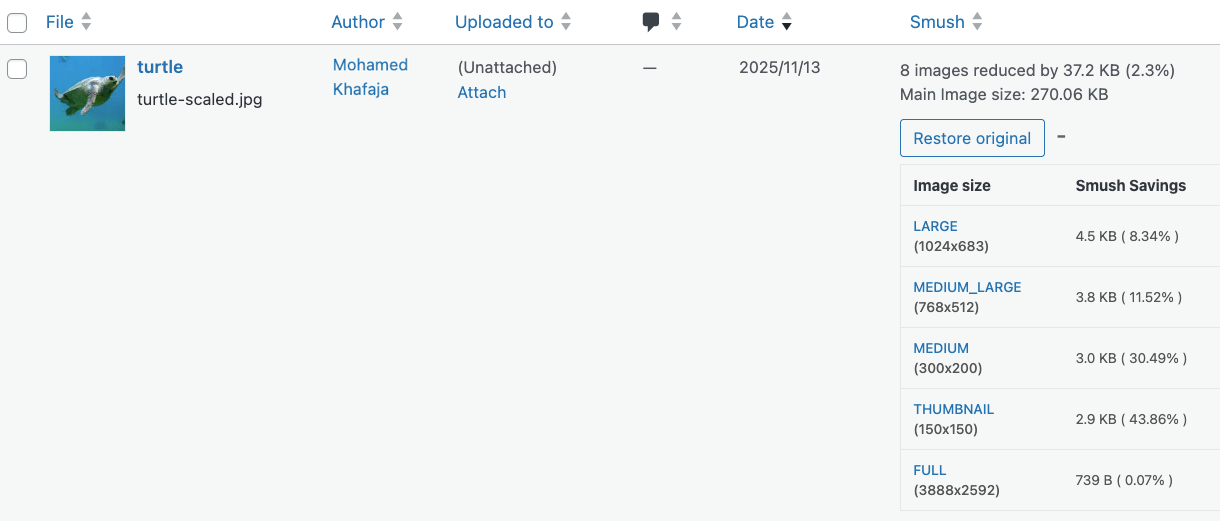
Any image that was processed after the Backup Original Images option was enabled can be restored by clicking the Restore Original button that appears for those images.

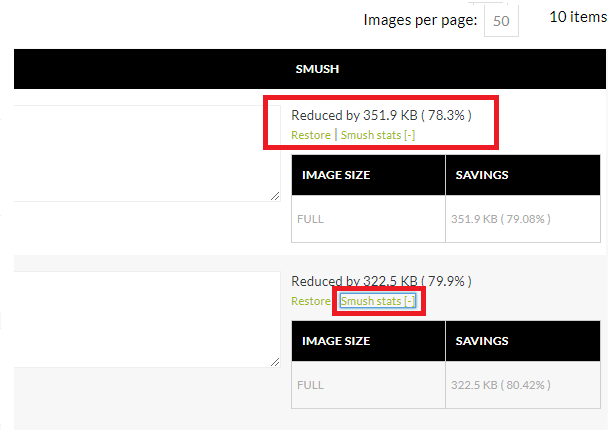
Once an image has been processed, you can click the plus icon to reveal a list of the thumbnail copies WordPress has created for that image, along with the sizes of those files before and after compression.
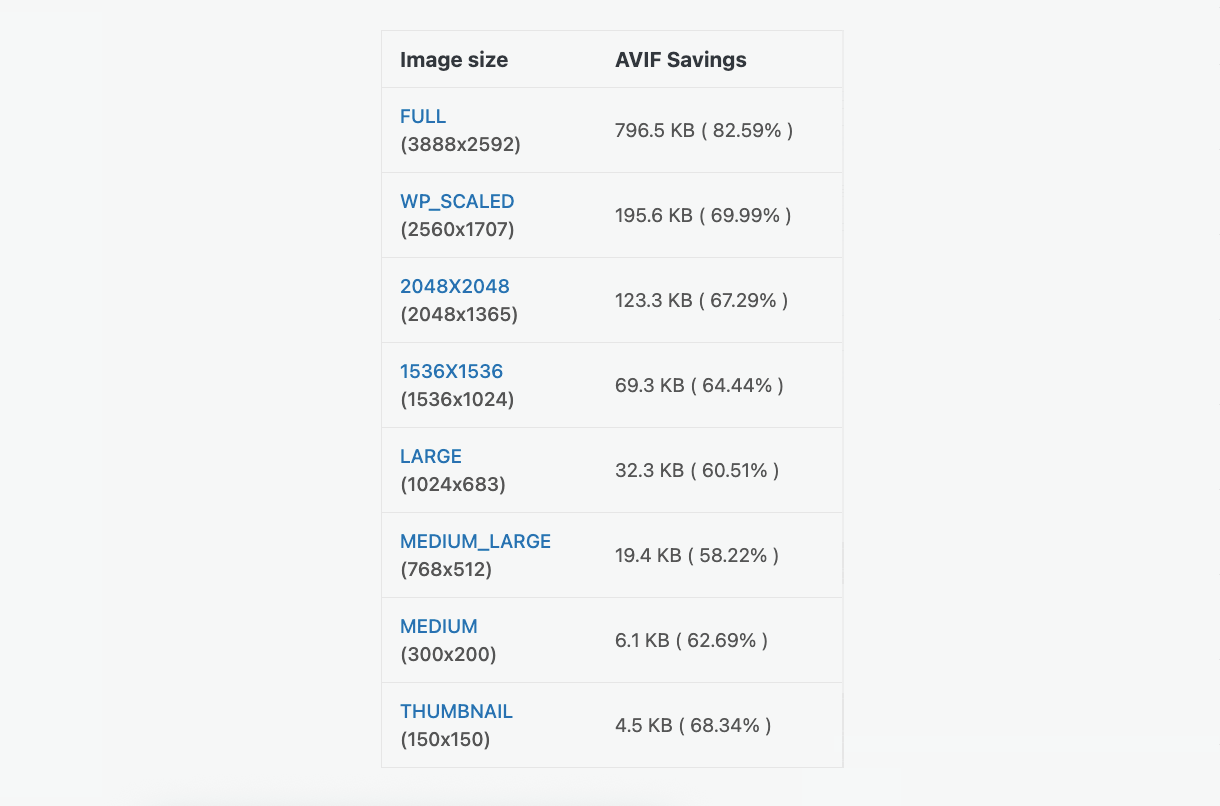
If you are using the Next-Gen Formats feature to create WebP or AVIF versions of your uploaded images, you’ll see additional information beneath the default Smush stats that display the image size reductions for the selected next-gen format.
Restoring Images
If you had optimized images before enabling Backup Original Images, and need to restore the originals and/or the thumbnails, you have a couple of options.
Restore the Original Image and its Thumbnails
You can restore the original image manually by re-uploading it to your media library. Then run Bulk Smush to optimize the thumbnails.
If the image was attached to a post or used somewhere else on your site, you will of course need to manually update that post or site element with the newly uploaded image as well.
Restore Just the Thumbnails
Smush can Bulk Restore all thumbnails of all images if the Backup Original Images option was already enabled. But it does not have an option to restore thumbnails for single images, whether that option was enabled or not.
So you would need to use a 3rd-party solution like the Regenerate Thumbnails Advanced plugin where you can choose the image(s)for which thumbnails should be restored.
Note however that if you had enabled the Optimize original images option in Smush, that 3rd-party plugin would still use the compressed original as its source. Consequently, the quality of the regenerated thumbnails will be impacted. In this case, you may wish to opt for the manual solution above.
Restore Selected Images
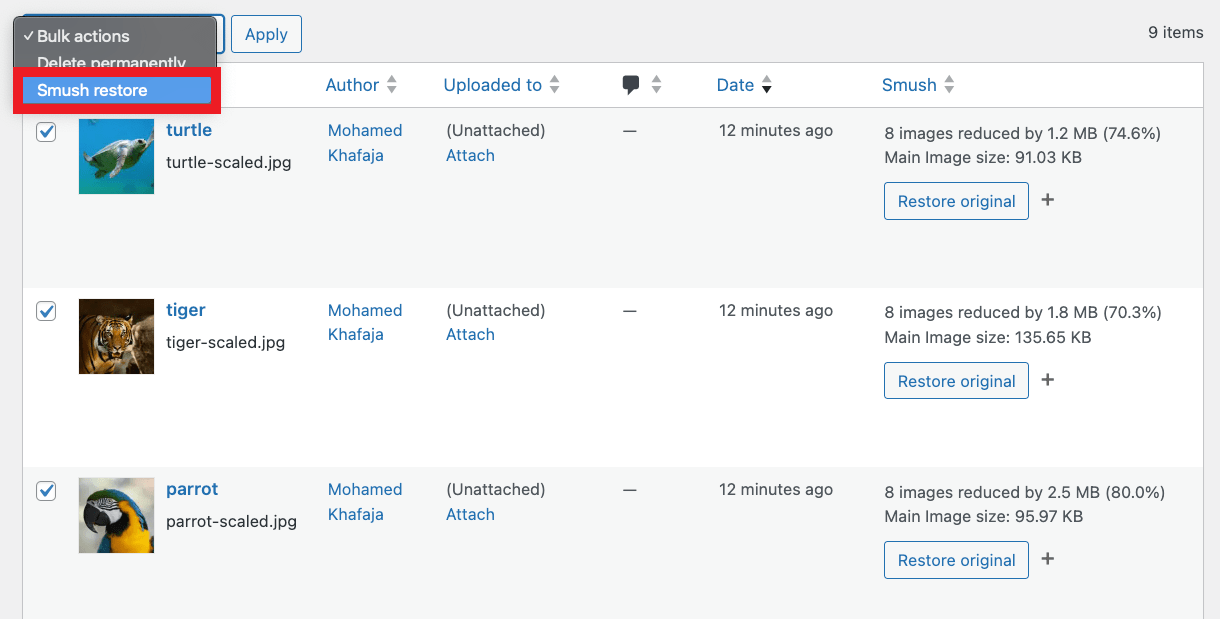
If you have enabled Backup Original Images, you can restore one or more optimized images directly from your Media Library using the Smush restore bulk action.
Select the images you want to restore, choose Smush restore from the Bulk actions dropdown menu, and click Apply. Smush will then attempt to restore the selected images from their original backups.
When the process completes, the notice below confirms the restoration result when all selected images are restored successfully.
![]()
If some of the selected images couldn’t be restored because no backup exists, you’ll see this notice.

If certain images couldn’t be restored due to a backup copy error, you’ll see the notice below.

If some of the selected images fail to be restored for different reasons, you’ll see a notice that summarizes all the issues.

Note that images that are currently being processed for optimization are skipped and will not be restored.
8.2.3 Bulk Smush Filters
Link to chapter 2Skip Selected Folders
By default, Bulk Smush will process all images in your /uploads directory.
If there are one or more folders in that directory that you do not want Bulk Smush to process, you can use this filter in a mu-plugin.
Edit the $excluded_paths array to specify the folders you want the process to ignore.
8.3 Lazy Load & Preload
Copy chapter anchor to clipboardLazy loading and preloading are two powerful techniques for optimizing image delivery and improving site performance
While lazy loading defers the loading of images until they’re needed, preloading ensures that key images are prioritized early. Together, they help reduce load times, improve Core Web Vitals like LCP, and create a faster, smoother user experience.
8.3.1 Lazy Load
Link to chapter 3Lazy loading retrieves only the data necessary to display what is actually being viewed at any given moment and can have a dramatic impact on page speed. The heavier your site is with images, the greater the benefit. The feature’s settings allow you very specific control over what file types are lazy-loaded, as well as when and where that occurs.
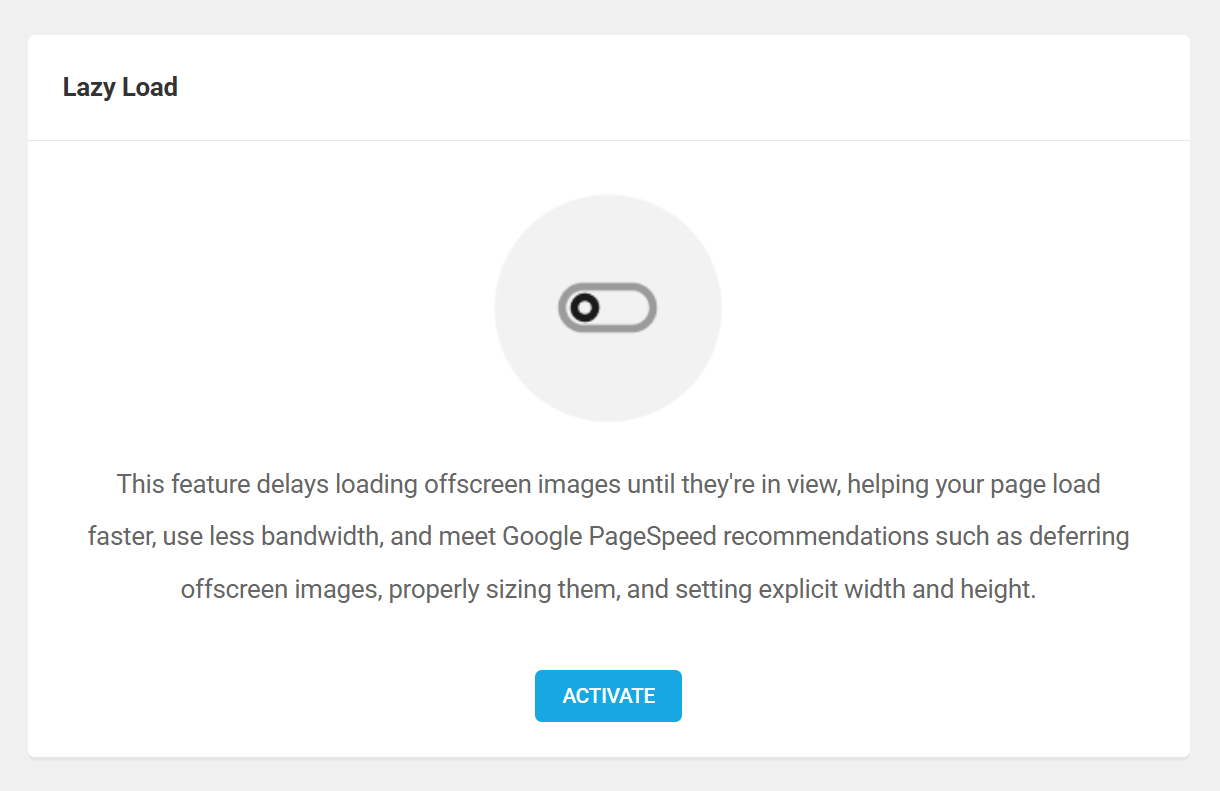
To enable lazy-loading, select Lazy Load in the Smush menu and click Activate.
Smush Lazy Load may not work as expected if Lazy Load is enabled in any other active plugins. For best results, activate Lazy Load in only one plugin at a time.
In case some of your images are not being lazy loaded even after enabling the feature, it could be because the image code contains attributes that are excluded from lazy loading for compatibility reasons. For example, a new attribute called fetchpriority was added in WP 6.3. If an image has this attribute value set to high, it will not be lazyloaded. The featured images are set to high priority by default, so they won’t be lazyloaded. You can refer to this section of the documentation for more information.
Smush can only lazy load background images that are declared in inline CSS. For example:
<div class="footer-text" style="background:url(/wp-content/uploads/path-to-image.png) center center no-repeat;">
Media Types
You can choose which media types are lazy-loaded and which are not by selecting or deselecting the file type checkboxes.

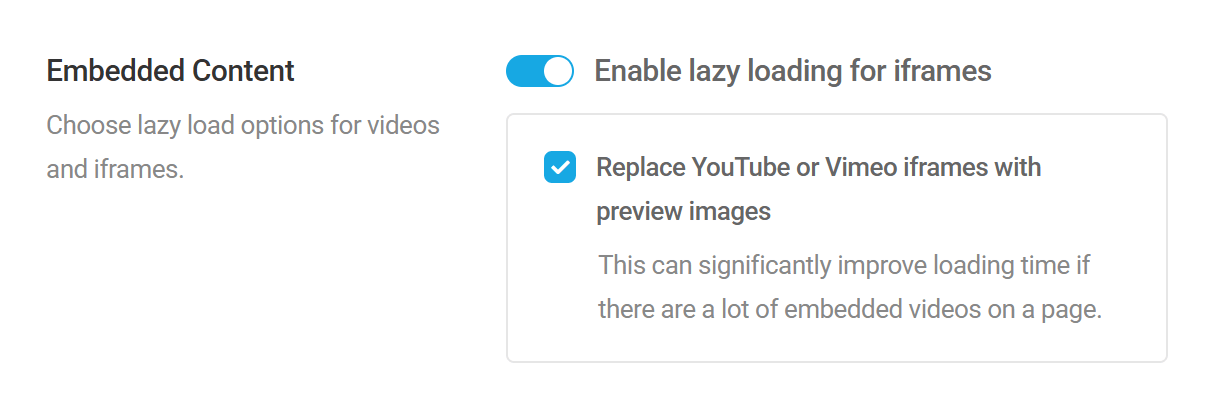
Embedded Content
If you have content embedded on your pages via iframes, enable this option to lazy-load those iframes. Once enabled, you can also choose to replace YouTube or Vimeo iframes with preview images. The videos themselves will only load when their play buttons are clicked.
This can help to significantly improve your page speed scores for the following audits:
- Some third-party resources can be lazy loaded with a facade
- Reduce JavaScript execution time
- Reduce the impact of third-party code
- Reduce unused JavaScript
- Reduce unused CSS
- Does not use passive listeners to improve scrolling performance
- Avoid serving legacy JavaScript to modern browsers
- Avoid long main-thread tasks (desktop)
Using Custom Preview Images
Smush will use the most appropriate size of any default preview images provided by YouTube or Vimeo for your embedded video. However, if you wish to use a custom image instead (in jpg or png format), you can specify that by including the following attribute in the iframe code when adding it to your page or post:
data-poster="https://full-url-to-your-image.jpg"
You can also use this same attribute to load a preview image if the video does not have any thumbnail set.
Embedding Playlists and Showcases
There is no default way to lazy load and display a preview image for YouTube playlists or Vimeo showcases/albums. However, by using the following filters in your active child-theme’s functions.php file or a mu-plugin, you can get that done.
Vimeo
To lazy load Vimeo showcases with a preview image of the first video, add both of the following filters as they are with no modifications.
YouTube
To lazy load YouTube playlists with a preview image of any video in each playlist, use the following filter. Replace PLAYLIST_ID_HERE with only the ID of the playlist you’re embedding, and replace VIDEO_ID_HERE with the ID of the video whose thumbnail image you want to use as the lazy loaded preview image. You can include as many playlists as needed in the filter by adding a new line in the $map_playlist_ids array.
Output locations
You can choose where lazy loading is applied by selecting or deselecting the out location checkboxes.
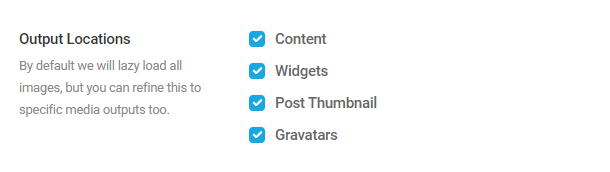
Image Sizing (Smush Pro only)
The options here help Smush to serve the correct image size to browsers in every situation.
If you are using the Smush CDN, combining the options here with the Dynamic Image Sizing option in the CDN will ensure the best performance possible.
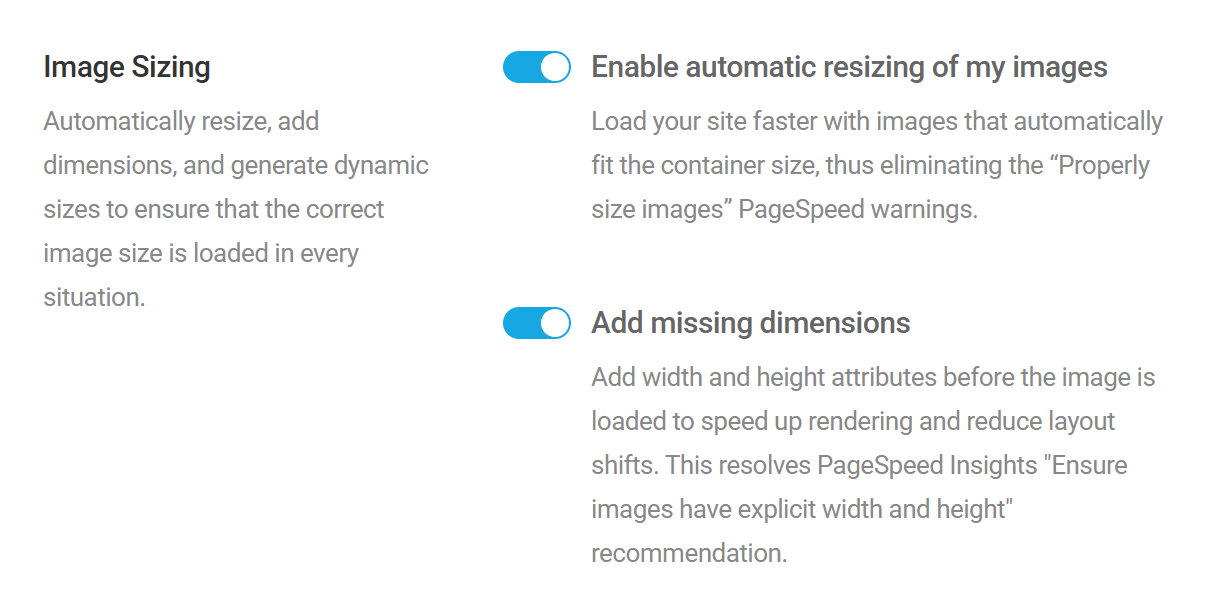
Enable automatic resizing of my images
Enabling this option will eliminate the “Properly size images” PageSpeed warning by dynamically resizing images to perfectly fit their containers, regardless of their original size.
Add missing dimensions
Enabling this option will automatically add any missing image dimension attributes to speed up rendering and reduce layout shifts. This resolves the PageSpeed Insights “Ensure images have explicit width and height” recommendation.
How Automatic Resizing Works
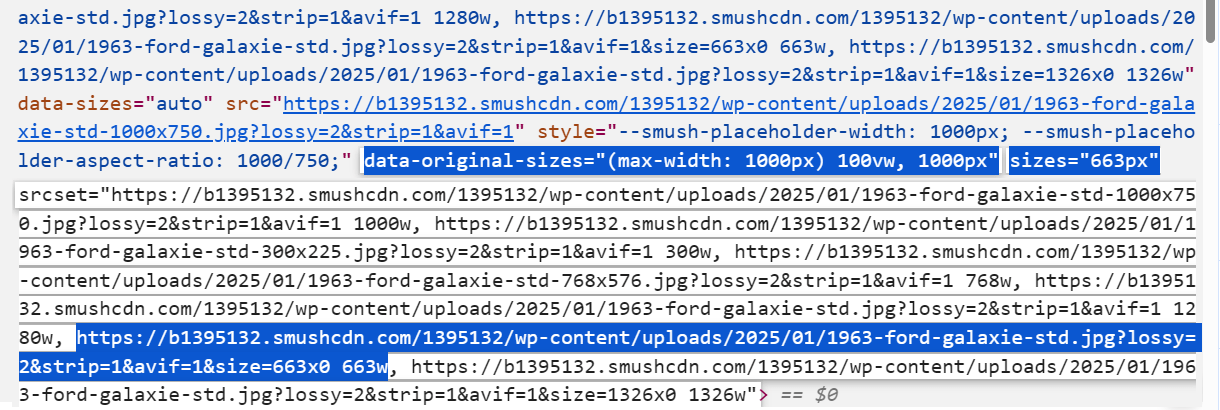
By default, every image served to the user’s browser gets a sizes attribute with a max-width as defined by the content_width in your active theme. For example, if your theme defines the content_width as 1000px, then that would be the largest image size served to the user’s browser, even if the original image is larger. If the original size of an image is smaller than the content_width, then the largest size of the image served will be its original size.
The image below illustrates what you might see in your browser’s developer tools for the example above. The srcset contains several possible image sizes that can be served depending on the browser’s viewport size. But even though the original image in this example has been scaled to 1280px wide, the max-width that will be served is 1000px because that’s what is defined in the theme for the content_width.

When the automatic resizing option is enabled, the values of the original sizes attribute are delivered in a new data-original-sizes attribute, with the sizes attribute now specifying the exact size of the image to be dynamically served to the browser according to the viewport size. When this is combined with the Dynamic Image Sizing feature in the Smush CDN, you’ll also see that additional size in the srcset so you’ll know it will perfectly fit the image container.
Note that if your theme does not define the content_width, or if it is defined incorrectly, then the largest image size in the srcset will be the plugin default of 1920px, unless you have set a smaller size in the Image Resizing option in Bulk Smush. If you set a size smaller than your theme’s content_width in Image Resizing, then that would be the largest size served to the browser for your full_size images.
Advanced Settings
Click on the Advanced Settings heading to reveal additional options.
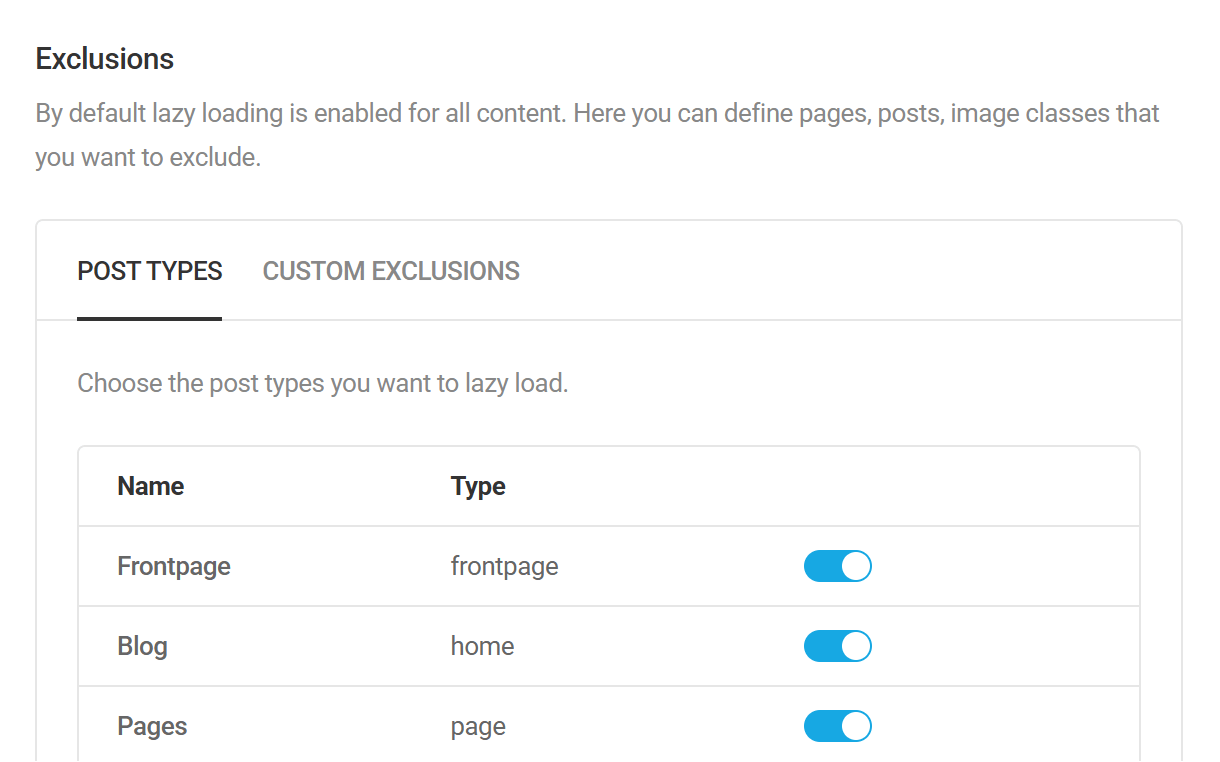
Exclusions
By default, lazy loading is enabled for all content. Here, you can define post types, specific pages and posts, as well as specific images that you want to exclude.
Post Types
You can choose which post types use lazy loading and which ones don’t by enabling or disabling the slider for each post type.
Custom Exclusions
Here, you can define specific items that you want to be excluded from lazy loading.
Posts, Pages & URLs
You can disable lazy loading for all images or iframes on any posts, pages or URLs by entering the URLs in the Posts, Pages & URLs field, one URL per line.

Classes & IDs
Here, you can exclude specific images or iframes by specifying any classes, IDs, attributes, keywords or strings of characters from the image or iframe codes, one entry per line.
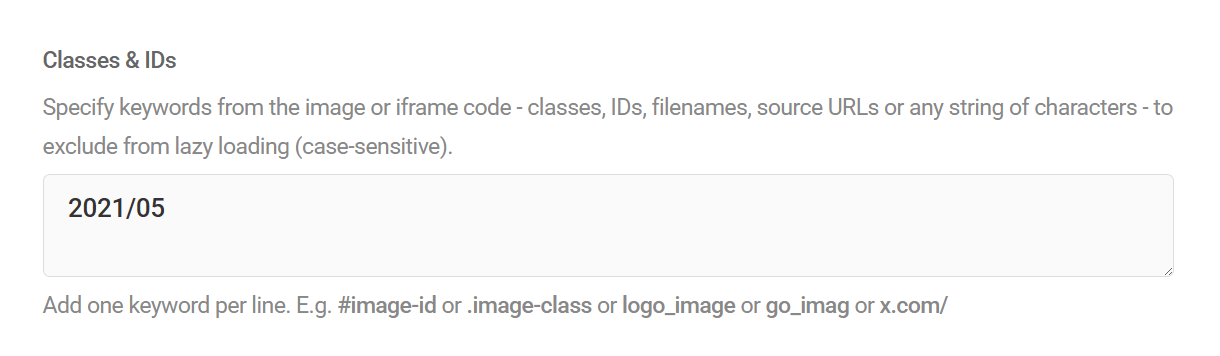
For example, specifying any of the following from the image code below would exclude the image from lazy loading:
wp-image-10248
cat-
3 kittens
2021/05
<img decoding="async" src="https://example.com/wp-content/uploads/2021/05/cat-3535404-1000x667.jpg" alt="3 kittens" class="wp-image-10248" title="3 kittens title">
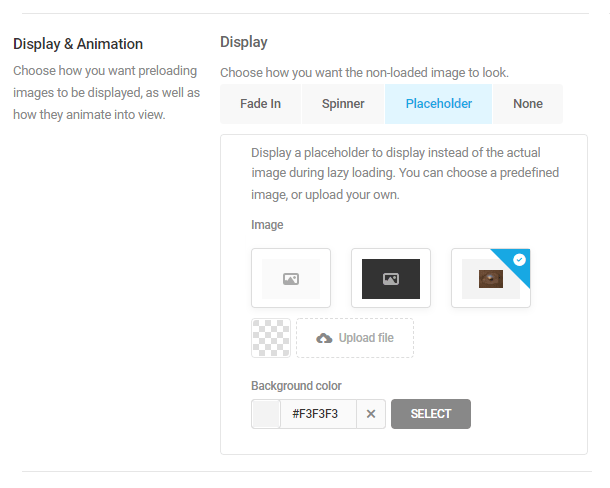
Display & Animation
You can choose how images appear as they scroll into view by selecting an animation effect, a placeholder image or no effect at all.
Fade In
Images will load first and then begin to fade in. Set the duration of the fade-in milliseconds by entering how long the fade should be from start to finish into the Duration field. The fade will begin as soon as any part of the image scrolls onto the screen. You can delay the fade if you want the animation to occur with the entire image in view by entering the delay time in milliseconds into the Delay field.

Spinner
Choose the Spinner if you want a spinner to display while images fully load. Use the uploader to upload a custom spinner if you wish.

Placeholder
If you want a custom placeholder image to display while images load, use the uploader to upload your image. There are two images already present that you can choose to display as well. You can add a background color if you wish by using the color picker provided. Of course, you can simply choose None and containers will remain empty until images are fully loaded.
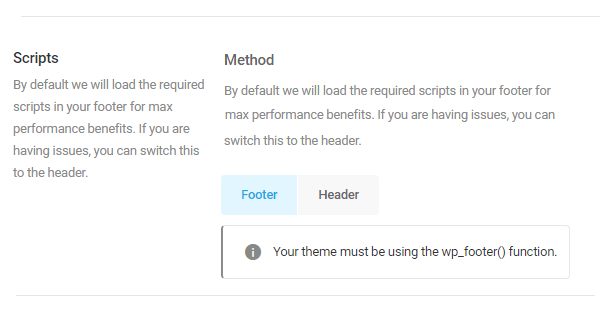
Scripts
By default, the scripts required to support a page’s functionality are placed in the footer to facilitate faster page speed, but there may be times when you need scripts to load early. Choose whether scripts load in the header or footer by clicking the corresponding button.
NOTE: Your theme must be using the wp_footer() function for this feature to work. The function should be located in your wp_include folder, or you can simply contact your theme’s developer and inquire about whether the function is present.
Native lazy load
Click the Enable native lazy loading toggle to enable support for native browser lazy loading.
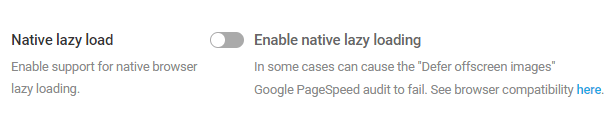
In some cases, this can cause the Google PageSpeed audit to fail the “Defer offscreen images”. Disable native lazy loading to rectify this.
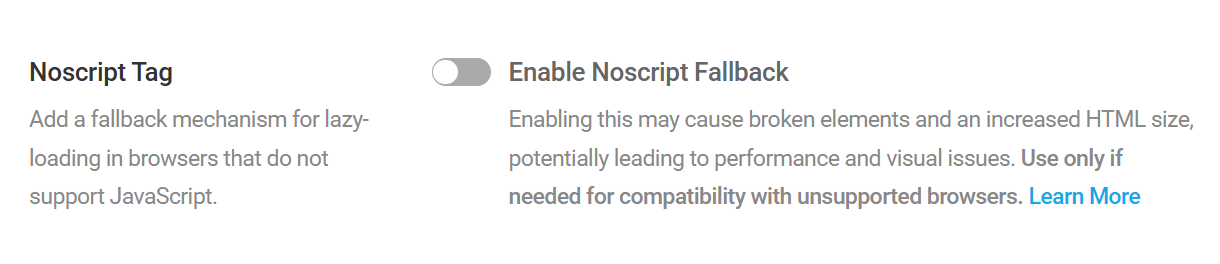
Noscript Tag
Enabling this option provides a fallback mechanism to lazy-load images in browsers that do not support javascript. However, if you are using W3C’s validation tool, or are perhaps using image transitions triggered via javascript, you may experience issues if NoScript is enabled on your pages. In such cases, you might want to leave this option disabled.
Deactivate
If you no longer want to use the lazy load feature, you can deactivate it at any point by clicking Deactivate.
Lazy Loading Filters
Documentation on the filters below will remain here for those who may currently be using them, or who need a programmatic approach. But since version 3.16.2, you can exclude any images or iframes from lazy loading by specifying any string of characters from the image or iframe code, without using any of these filters. See Exclusions above for details.
Exclude Attributes from Lazy Loading
Images that have certain attributes may conflict with Lazy loading. To ensure compatibility, images with such attributes are excluded from the lazy loading process.
Images with the following attributes will be excluded from lazy load by default.
However, if you wish to exclude any attribute other than those mentioned above from lazy load, for example data-skip-lazyload, you can use the following filter.
Change data-skip-lazyload in the following code to the correct attribute if different.
Disable Lazy Loading for Selected Images
This filter only applies if you have enabled the Lazy Load feature in Smush.
There may be times when you wish to exclude one or more images from lazy loading. For example, any images resting above the fold.
While there is no option in the plugin itself to exclude specific images from lazy loading, there is a filter that can be used to achieve this:
smush_skip_image_from_lazy_load
The filter can be used in your active theme’s functions.php file, or in a mu-plugin uploaded to your site. For more on using mu-plugins, see our Installing Mu-plugins documentation.
If you have the Smush CDN enabled, do not use the CDN URLs in this filter; they won’t work. You must use the actual server URLs of your images, as seen when you view an image in your Media Library.
Exclude a Single Image
To exclude only a single specific image from lazy loading, use this code and adjust the image URL:
Exclude Multiple Images
To exclude multiple images from lazy loading, use the following code instead. Adjust image URLs in the $skip_images array and add/remove as needed (note only the last entry in the array should not have a comma at the end).
Skip all image URLs that contain /preloader.png
Lazy Loading Images from URLs without Extension
To lazy load images from URLs without extensions, add the following filter. Note that this filter currently supports images from gravatar.com or googleusercontent.com. To support images from other sources, change the regex accordingly.
8.3.2 Preload Pro
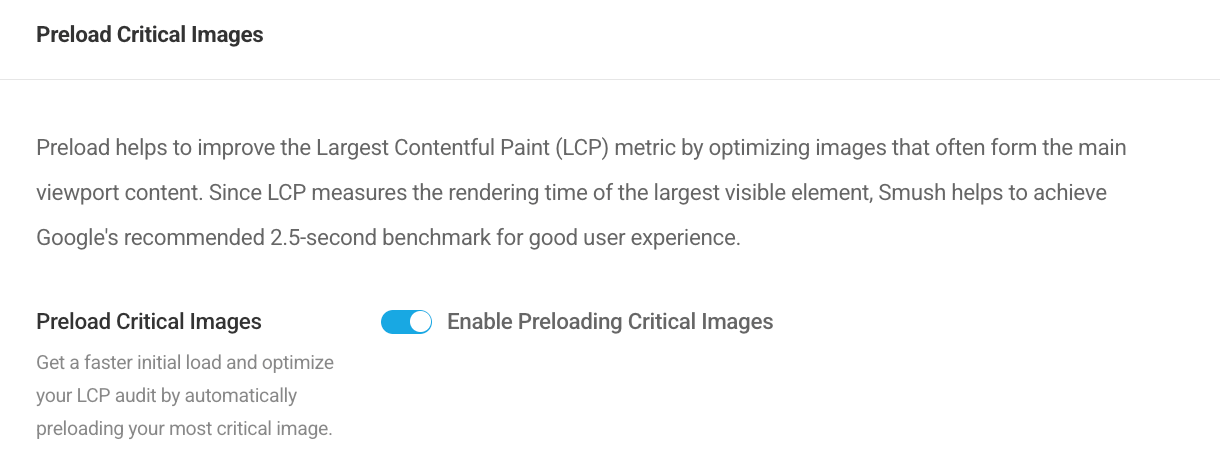
Link to chapter 3Preloading critical images helps improve your site’s Largest Contentful Paint (LCP) score by prioritizing the loading of the largest image in the viewport. Since LCP measures the time it takes for the largest visible element on a page to load, optimizing it is essential for achieving a better PageSpeed score and a smoother user experience.
Smush will automatically detect and preload the largest image above the fold to help meet Google’s recommended 2.5-second LCP benchmark. Additionally, the fetchpriority="high" attribute will be automatically added to every LCP <img element to ensure they are not lazy loaded.
Click the Enable Preloading Critical Images toggle to activate the feature if you haven’t already.
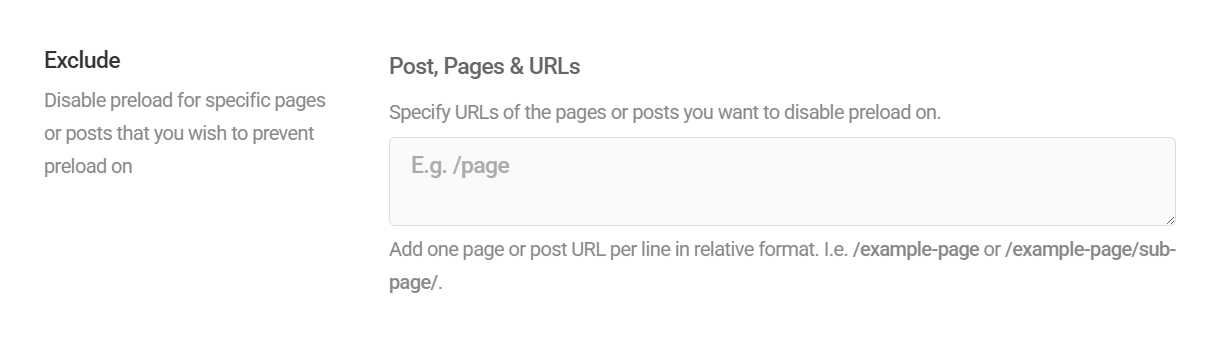
Exclude
If there are any pages, posts or URLs where you need to prevent image preloading, enter their relative URLs in the field provided, one per line. This can be especially useful if LCP images are changed dynamically on a page. This option only appears once the feature is active.
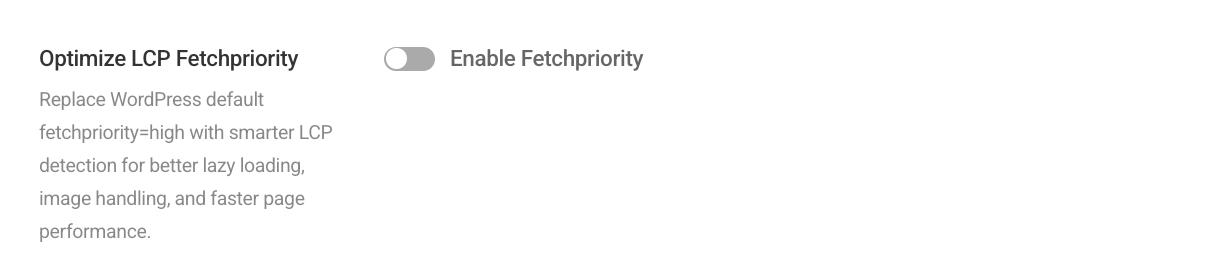
Optimize LCP Fetchpriority
Enable this option to replace WordPress’s default fetchpriority=”high” attribute with smarter LCP detection. WordPress automatically applies fetchpriority=”high” to the first three images on a page, which can interfere with lazy loading and image handling. This detection method is more accurate and ensures better lazy loading. The option only appears when Preload Critical Images is enabled.
Click the Enable Fetchpriority toggle to activate this feature.
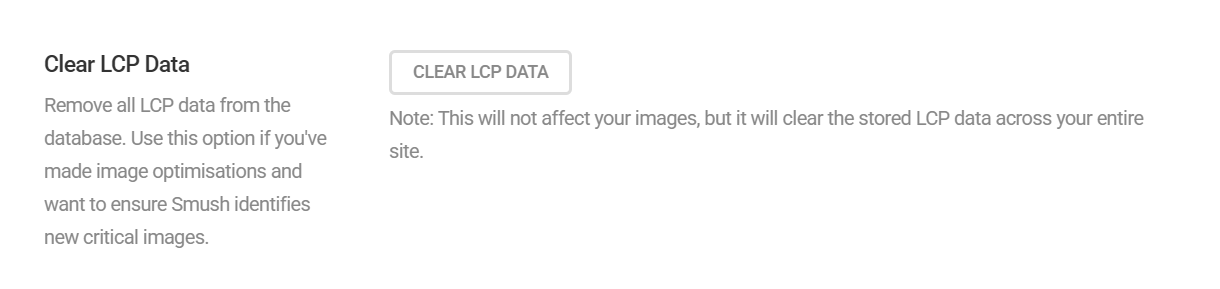
Clear LCP Data
Use this option to clear all LCP preload data from your site if needed. For example, if you’ve made image optimisations and want to ensure Smush identifies new critical images.
8.4 CDN Pro
Copy chapter anchor to clipboardOne of the major factors that can make your site slow is the distance your content has to travel between the hosting server and the location of the visitor viewing your site. Generally speaking, the further the location, the longer your site will take to load. A chief value of CDNs is that they pre-position your content in servers around the world thereby reducing the distance your content has to travel no matter where a visitor is located.
The Smush CDN consists of 80 terabytes-per-second servers in 119 locations around the world. Closer servers mean faster speeds and faster speeds mean better page rank. Our CDN also ensures that a larger number of users can visit your site at the same time, without causing delays in content delivery.
- Valid SSL required – A valid SSL certificate installed on your domain is required for the CDN to function without error. If you are using Cloudflare and getting Error 526: Invalid SSL certificates, you’ll want to review Cloudflare’s help doc here to resolve the issue.
- Faster initial load time – As images served from the CDN need to be cached before being served, Smush will temporarily serve the original image until the image is cached. Once the caching process is complete, Smush serves it from the CDN.
- Uploads directory outside the WordPress root? – Unconventional WordPress configurations where the uploads directory is located outside of the WordPress root are not supported by the Smush CDN. If you are experiencing issues after enabling the CDN on such an install, please contact our support team who will investigate and provide a customized workaround if possible.
- Local media only – The Smush CDN can only fetch and serve images that are stored on your site’s server. It cannot serve images that have been offloaded to 3rd-party cloud servers like Amazon S3.
- Retina images – If you are using the WP-Retina 2x plugin and also want your retina images to be served via the Smush CDN, you’ll need to add the following constant to your wp-config.php file, just before the line that says “That’s all, stop editing“:
define ( 'WP_SMUSH_CDN_DELAY_SRCSET', true );
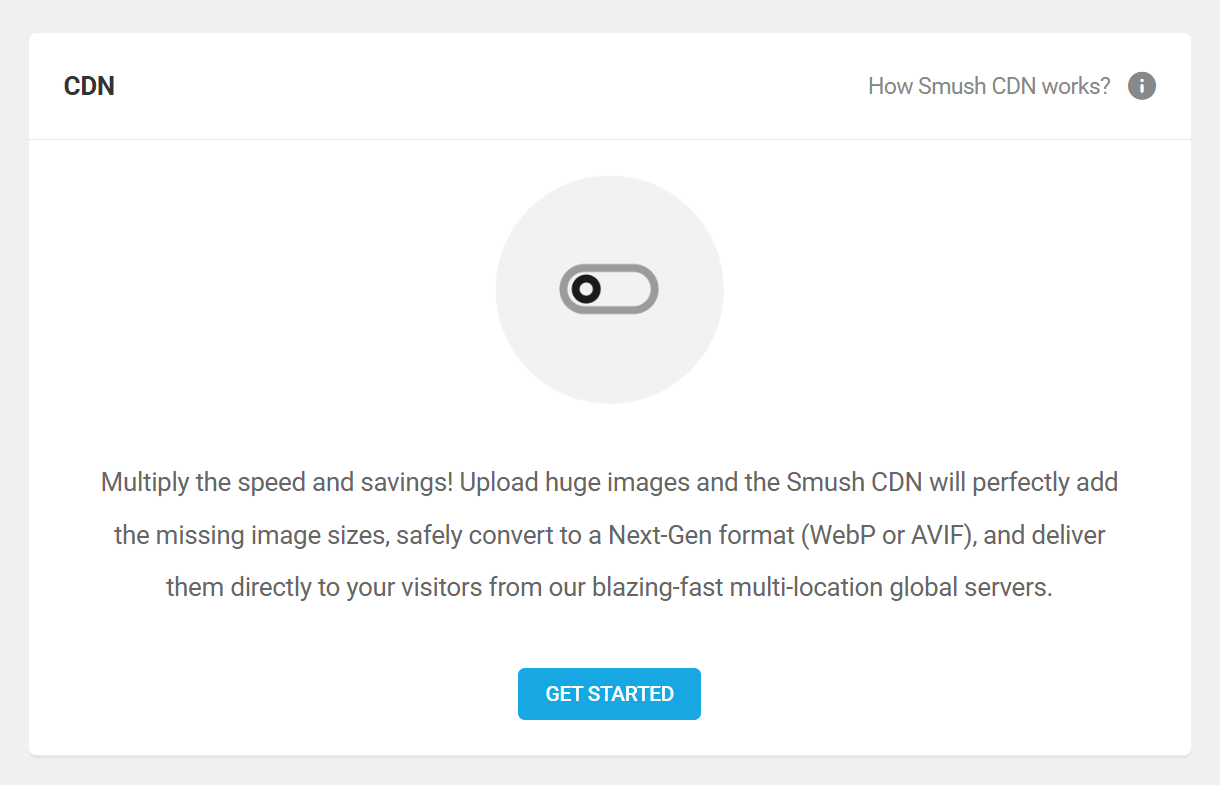
To enable the Smush CDN, select CDN in the Smush menu and click Get Started.
Enabling the CDN will have no impact on the Bulk Smush or Directory Smush features, as those run independently from the CDN.
Note that WordPress automatically compresses JPG images to 82% by default. So, while the CDN does serve images faster thanks to its cache, it is possible that you wouldn’t see any improvement in compression just by serving images from the CDN.
However, if you enable the Next-Gen Conversion option below, you may see a remarkable improvement. WebP lossless images are 26% smaller in size compared to PNGs, while WebP lossy images are 25-34% smaller than comparable JPG images. AVIF images are up to 60% smaller than comparable JPG or PNG images. More information can be found in this Google developers article and this web.dev article.
The WPMU DEV CDN uses specific image attributes to deliver images to the browser. However, if your active theme or plugins use different attributes to serve images, then the CDN won’t be able to serve images with those attributes. You can refer to this section of the documentation for more information.
Please see our CDN Troubleshooting doc if you need to replace one or more images already cached by the Smush CDN.
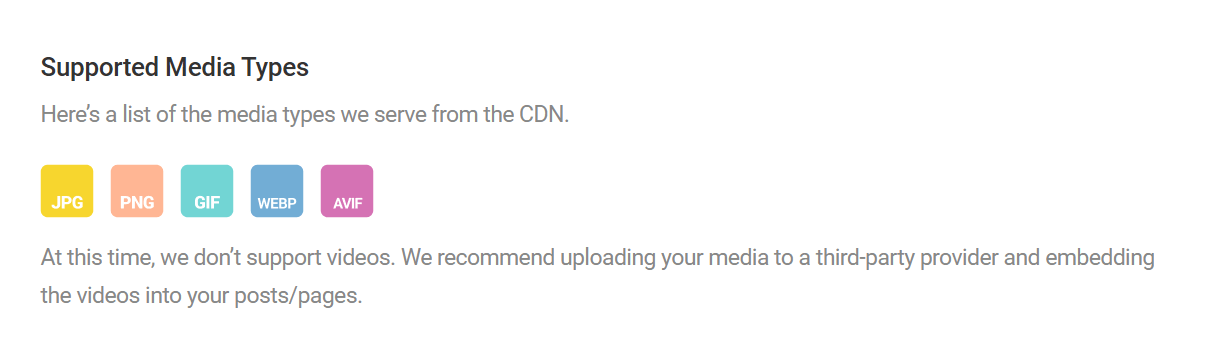
Supported Media Types
Smush CDN can serve the following media types: JPG, PNG, GIF, WebP and AVIF (SVG format is not supported).
Note: If you are trying to serve large GIF images on your site, they may timeout. If you experience this issue, try to replace the large GIFs with smaller ones or consider using a different file format.
The CDN does not currently support videos. We recommend you consider a third-party provider specializing in video hosting and that you embed the videos into your posts and pages.
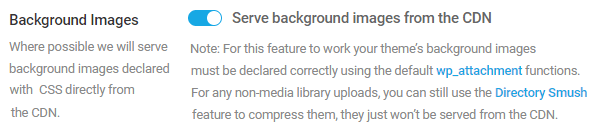
Background Images
When enabled, background images that have been declared with CSS will be served from the CDN whenever possible.
For this feature to work, your theme’s background images must be declared correctly using the default wp_attachment functions. Non-media library uploads can still be compressed using the Directory Smush feature, they just won’t be served from the CDN.
Click the slider to enable Smush to serve your background images from the CDN. When disabled, background images will be served from either your primary server, which we do not recommend, or from a third party if you’ve invested in one.
Smush CDN is able to serve background images if they are served via an <img> HTML tag, or via inline CSS in any valid HTML tag, or when declared in a <style> tag, or when declared in a data-settings attribute (like in Elementor sliders). It cannot serve background images added to your website in a CSS stylesheet.
The Smush CDN will serve background images using the following methods (div can be replaced by any valid HTML tag in these examples):
It will not serve background images using the following method:
Right-click on your background image and use the browsers built-in inspector to see what method your theme/plugin is using to serve your background images. If you need help contact our 24/7 live support team.
Dynamic Image Sizing
This option will ensure that browsers can display the best image size according to the user’s device and viewport.
It will fetch all registered image sizes of the same aspect ratio and include them in the image srcset, and will append several additional sizes as well. If the image srcset is missing, it will be generated automatically.
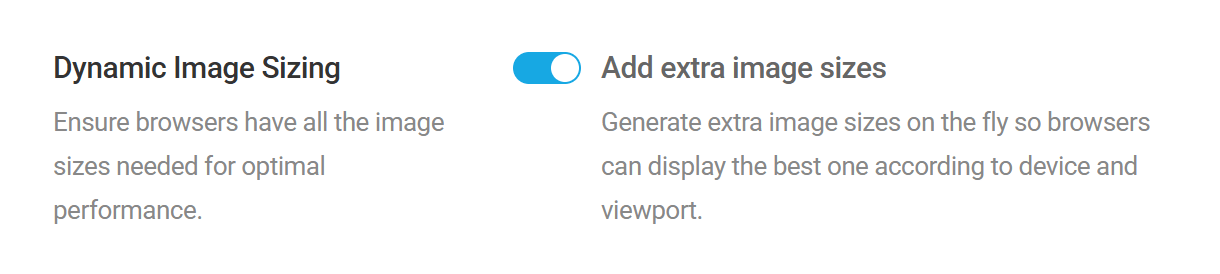
If you have enabled Smush Lazy Load, combine this option with the Automatic Resizing option in Lazy Load to ensure the best performance possible.
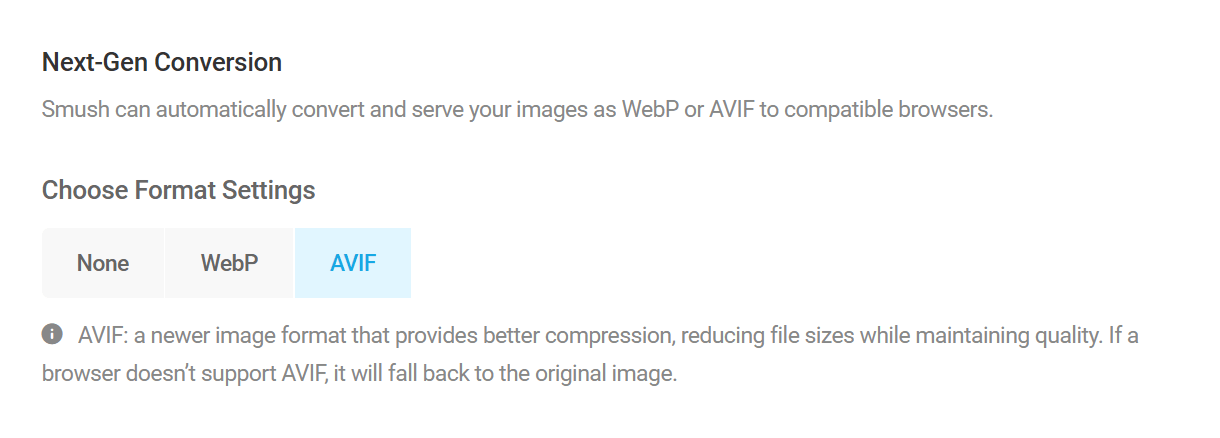
Next-Gen Conversion
Smush can automatically convert and serve your JPG and PNG images as WebP or AVIF to compatible browsers. WebP conversion is lossy when converting from JPEG images, and lossless when converting from PNG images. AVIF conversion is lossy for both PNG and JPEG images.
We’ll detect and serve WebP or AVIF images to browsers that will accept them by checking Accept Headers and gracefully fall back to your normal PNGs or JPEGs for non-compatible browsers.
Select the next-gen format you want to convert your images to. Select None if you don’t want the CDN to convert them at all.
Rest API
Click the Enable REST API support toggle to allow Smush to automatically replace image URLs when fetched via REST API endpoints.
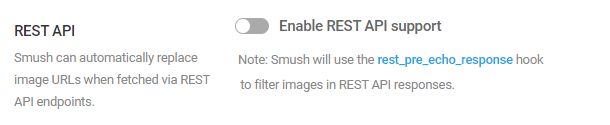
Image Exclusions
Here, you can exclude specific images from being served from the CDN by specifying any classes, IDs, filenames, source URLs or any string of characters from the image code, one entry per line.
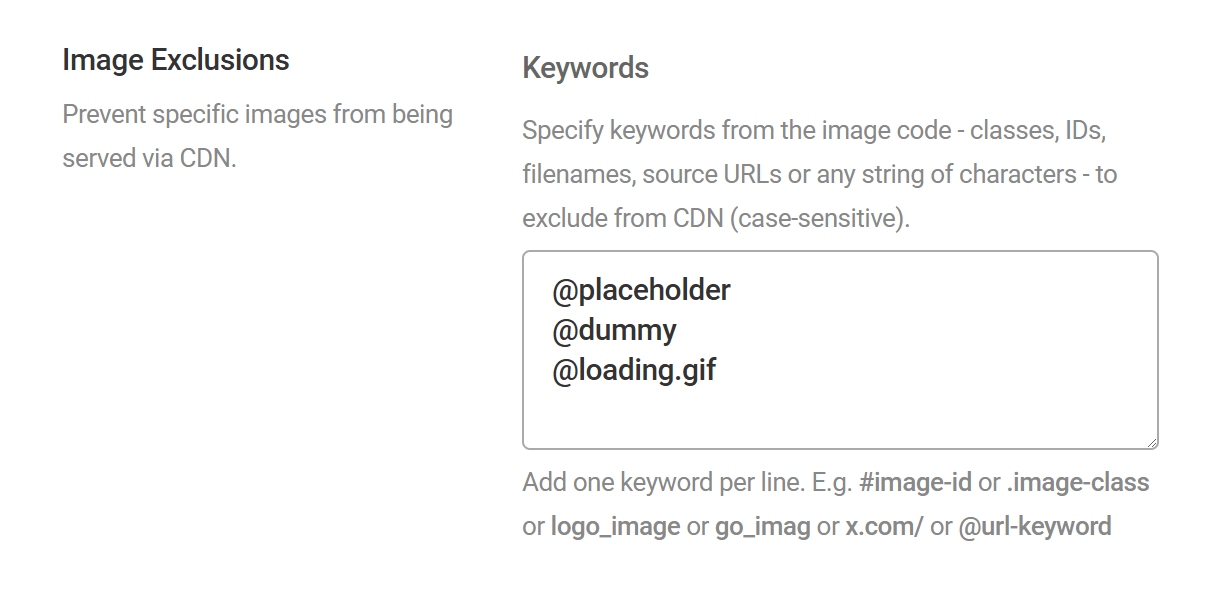
For example, specifying any of the following from the image code below would exclude the image from the CDN:
wp-image-10248
cat-
3 kittens
2021/05
<img decoding="async" src="https://example.com/wp-content/uploads/2021/05/cat-3535404-1000x667.jpg" alt="3 kittens" class="wp-image-10248" title="3 kittens title">
Note that when specifying keywords in URLs like @placeholder, only the URL that actually contains that keyword will be excluded from the CDN. Images from data-src or other attributes will still come from the CDN. This ensures that images you use as placeholders, loading indicators or slider backgrounds load properly with no distortion or delay if lazy-loaded.
Deactivate
You can disable the CDN feature by clicking Deactivate.

Staging Environment
The Smush CDN is disabled on the staging environments of WPMU DEV hosted sites, and Smush Pro will automatically serve media from the local server when active in a staging environment.
If you move your Staging files into Production where the CDN is active, your Production environment’s media will automatically be served from the Smush CDN.
Note also that the Smush CDN cannot fetch images from a password-protected site. So if that is the case in your 3rd-party staging environment, images will be served from the local source there.
Local Development Environment
Smush CDN cannot fetch images from a local development environment such as those built with XAMPP, MAMP, etc. The site must be publicly accessible for this feature to work.
Smush Pro will automatically serve media from the local server when active in a local environment.
Error Handling
The URL of any image served from the Smush CDN will of course be different than the URL for that same image in your media library, as it’s not coming from your site. The URL would look something like this:
https://XXXXXX.smushcdn.com/XXXXXXX/wp-content/uploads/2021/04/image.png?lossy=0&strip=1&webp=1
Where the 1st XXXXXX is your public WPMU DEV user number, and the 2nd is the public ID of the site connected to your Hub.
If there is any issue fetching an image from the CDN URL, we’ll redirect the image to load from its original media library URL, so your users won’t even know there’s a problem.
In most cases, errors are intermittent and resolve themselves within an hour or two. But if you do need help resolving a CDN issue, don’t hesitate to reach out to our support superheroes for assistance.
8.4.1 Bandwidth and Upgrades
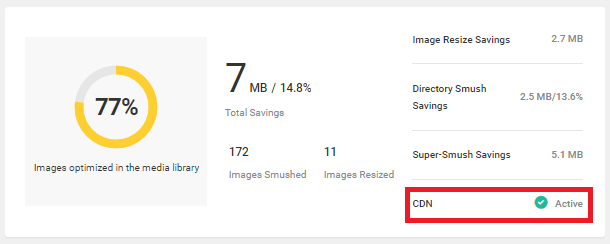
Link to chapter 4CDN bandwidth usage is reported in the Smush overview module. Under normal bandwidth usage, the CDN status will be reported as Active. When you’ve almost reached or exceeded your bandwidth, the CDN status will be reported accordingly.
Upgrades
Your WPMU DEV membership includes the following CDN bandwidth allotment by default:
- Free – 0
- Basic – 5GB
- Standard – 10GB
- Plus – 20GB
- Premium – 50GB
All hosting-only plans include 10GB of Smush CDN bandwidth.
More CDN bandwidth can be purchased as needed, from 50GB/mo to 10TB/mo, and your Smush CDN bandwidth plan can be upgraded or downgraded at any time.
For more information about tracking bandwidth usage and guided instructions for increasing and checking your plan, visit our Smush CDN bandwidth documentation.
8.4.2 Filters
Link to chapter 4This chapter outlines a few handy filters you can use to modify default Smush CDN behavior if needed.
Use a Different Attribute for Images in Content
By default, the WPMU DEV CDN will use the following list of attributes of your images to serve them to the browser.
hrefdata-hrefsrcdata-srcsrcsetdata-srcsetdata-thumbdata-thumbnaildata-backdata-lazyloaddata-bgdata-bg-imagedata-settings(as used in Elementor sliders)
However, if you have a plugin or theme that uses a different attribute for in-content images, for example data-desktop, you’ll notice they are not being served from the CDN.
You can use the following filter to instruct the CDN to use that attribute instead. Change data-desktop in the following code to the correct attribute if different.
Excluding Images from the CDN
Documentation on the filters below will remain here for those who may currently be using them, or who need a programmatic approach. But since version 3.16.10, you can exclude any images from the CDN by specifying any string of characters from the image code, without using any of these filters. See Image Exclusions above for details.
There may be times when you wish to exclude one or more images from the Smush CDN. For example, full-screen images in a slider getting resized by the Automatic Resizing option.
While there is no option in the plugin itself to exclude specific images from the CDN, there is a filter that can be used to achieve this:
smush_skip_image_from_cdn
The filter can be used in your active theme’s functions.php file, or in a mu-plugin uploaded to your site. For more on using mu-plugins, see our Installing Mu-plugins documentation.
Here are a few examples for using this filter:
Exclude a Single Image
To exclude only a single specific image from the CDN, use this code and adjust the image URL in the $src variable:
Exclude Multiple Images
To exclude multiple images from the CDN, use the following code instead. Adjust image URLs in the $skip_images array and add/remove as needed (note only the last entry in the array should not have a comma at the end).
Exclude a Single Background Image
To exclude only a single specific background image from the CDN, use this code and adjust the image URL in the $src variable:
Exclude Multiple Background Images
To exclude multiple background images from the CDN, use the following code instead. Adjust image URLs in the $skip_images array and add/remove as needed (note only the last entry in the array should not have a comma at the end).
Exclude Images by Post Type
To exclude images on all single posts of a specified post_type, use this code and change post on line 5 to the post_type you wish to exclude.
Change Background Image URL
Use this filter to swap the background image URL for a different one. Change the URL in the code below to the actual URL of the image you need to use.
Disable Auto-Resize for Selected Images
This filter only applies if you are using the Automatic Resizing feature in Smush CDN.
If you are experiencing issues with some plugin or theme generated images not displaying properly when using the Automatic Resizing feature, you can use the smush_skip_adding_srcset filter to exclude them. Below are some example uses of this filter:
Skip a specific image
Skip a list of images
Skip all image URLs that contain /preloader.png
Serve Image in a Custom Directory
By default, the WPMU DEV CDN serves images located in the wp-content directory. However, you can use the following filter to serve images stored in a custom uploads directory outside the default wp-content folder via the CDN. Change the directory URL in this code to the actual uploads directory on your site.
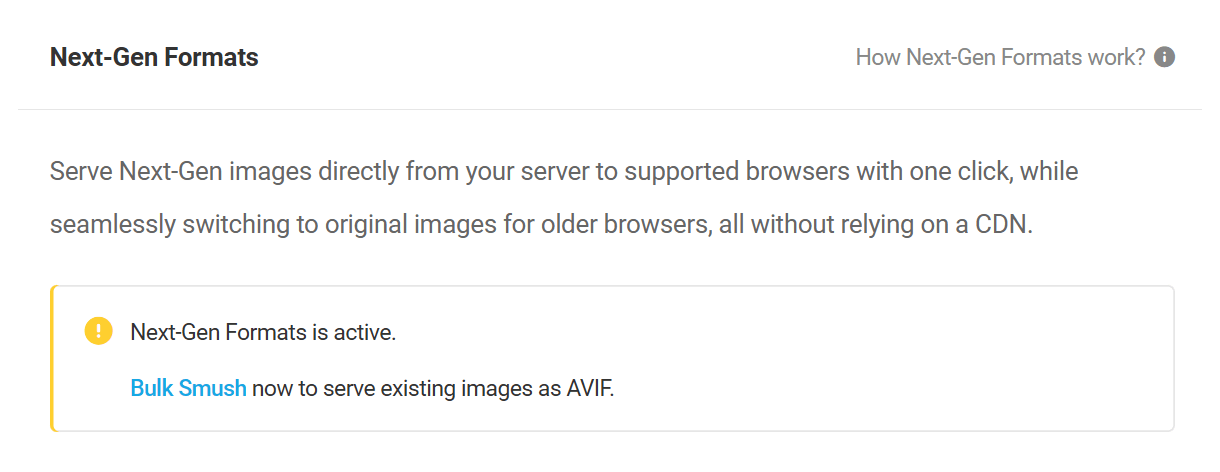
8.5 Next-Gen Formats Pro
Copy chapter anchor to clipboardThe Next-Gen Formats feature in Smush Pro enables you to serve images from your Media Library in next-gen WebP or AVIF formats, without relying on the Smush CDN.
Click the Get Started button to enable the feature.
Note that this feature only works for images in your Media Library; it cannot create next-gen versions of images located in other directories.
Once you have configured this feature, you will need to run Bulk Smush again for your existing media library images to get a WebP or AVIF version created for each one.
Depending on the next-gen format you choose, running Bulk Smush will create a /smush-webp/ or a /smush-avif/ folder in the wp-content directory that replicates the structure of your /uploads/ folder, and will create and store next-gen versions of all your images there.
The conversion to WebP is lossy when converting from JPEG images, and lossless when converting from PNG images. Conversion to AVIF is lossy for both PNG and JPEG images.
If you configure one next-gen format, then switch to a different one, clear all cache on your site to ensure your images are served correctly.
If the Smush CDN is activated, you must configure Next-Gen Conversion there. If you prefer to use the local Next-Gen Formats feature instead, please deactivate the CDN.

8.5.1 WebP - Direct Conversion
Link to chapter 5When you select the WebP format, you’ll have the option to use a Direct Conversion method which requires no configuration, or a Server Configuration method; see the next chapter for details on that method.
Selecting the Direct Conversion method will serve WebP images to browsers that support this format without requiring a CDN or any server setup.
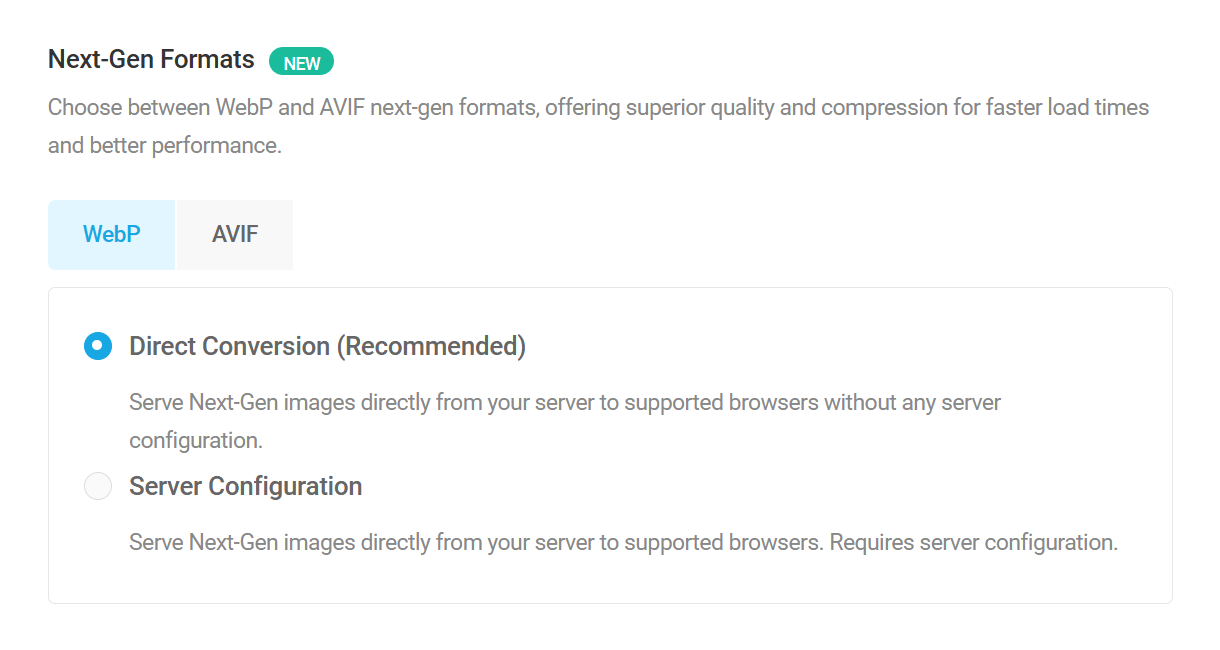
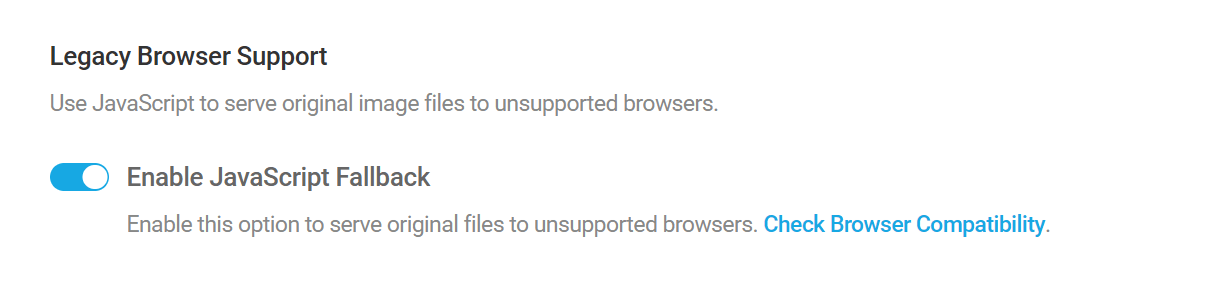
When the Direct Conversion method is enabled, an option to Enable JavaScript Fallback will appear. Enabling this option will ensure that the original JPEG/PNG images (without WebP conversion) will be served to browsers that don’t support WebP.
The Direct Conversion method does not support the conversion of background images defined in external CSS files. To convert these images, the Server Configuration method below must be used.
8.5.2 WebP - Server Configuration
Link to chapter 5If the Direct Conversion method above does not work for your project, or if you prefer setting things up directly on your server, choose the Server Configuration method.
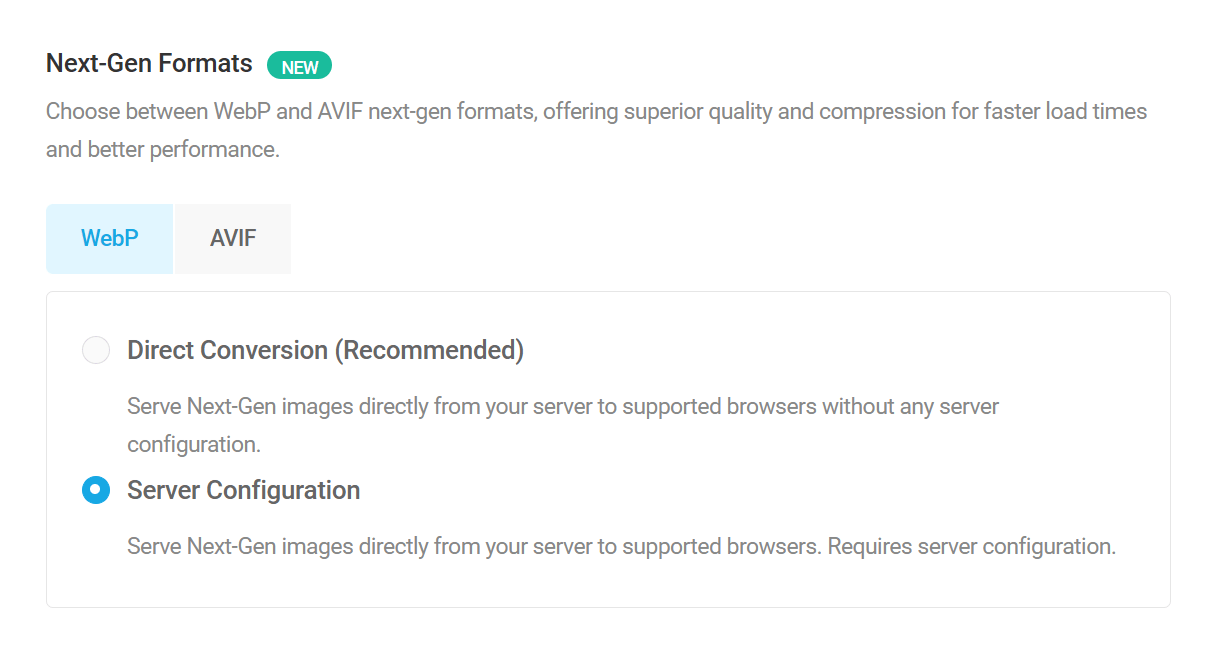
This method will search for your next-gen format images inside the /smush-webp/ folder and serve them to your site. If there’s no WebP file for a specific image, or if the browser does not support that format, the original JPEG/PNG will be served automatically.
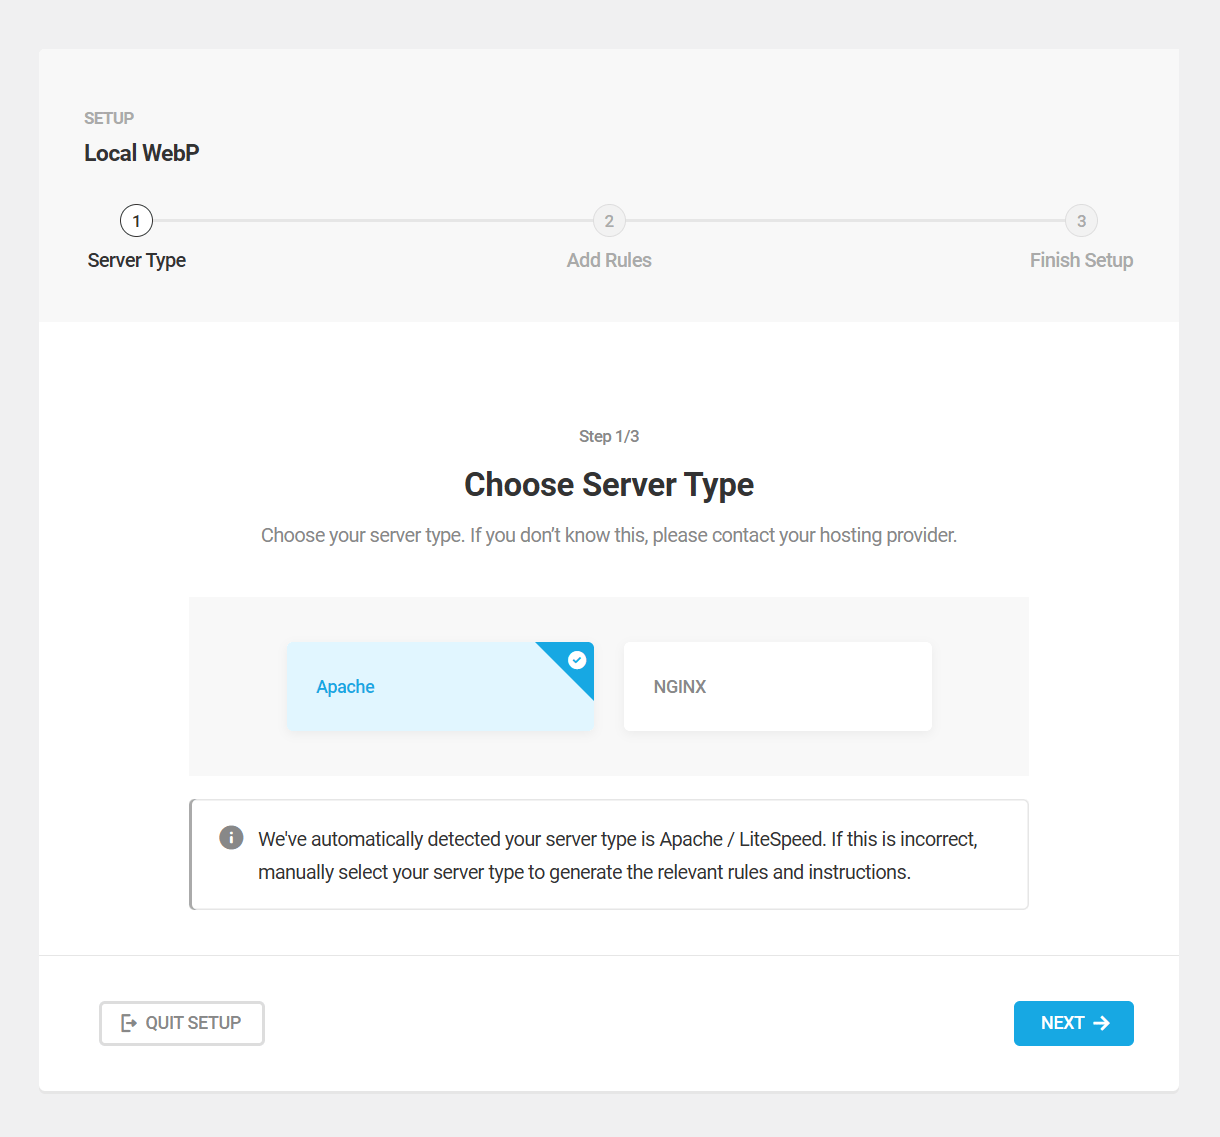
On WPMU DEV hosted sites, the server configuration will be handled automatically for you. If your site is hosted by a 3rd-party, follow the Server Setup steps below.
Server Setup
Step 1 – Choose Server Type
Smush will attempt to detect your server type as either Apache or NGINX. If your server type was not automatically selected, or the detected type is incorrect, select the appropriate server type and click Next.
If your server is running NGINX as a proxy for Apache, see Proxy / Hybrid Setups below.
If your site is hosted on a Bitnami instance, see Bitnami Setups below.
Note that Windows IIS servers are not supported for Local WebP; consider using the CDN WebP option instead.
Step 2 – Add Rules
If your server type is Apache, Smush can automatically apply WebP conversion rules to the .htaccess file located in your site’s root directory. Alternatively, click Manual and follow the on-screen instructions to apply these rules yourself. Also see Adding Rules Manually below.

If your server type is NGINX, WebP conversion rules must be added manually. Follow the on-screen instructions to apply these rules yourself. Also see Adding Rules Manually below.
If you do not have access to your NGINX config files, you will need to contact your hosting provider in order to facilitate these changes.
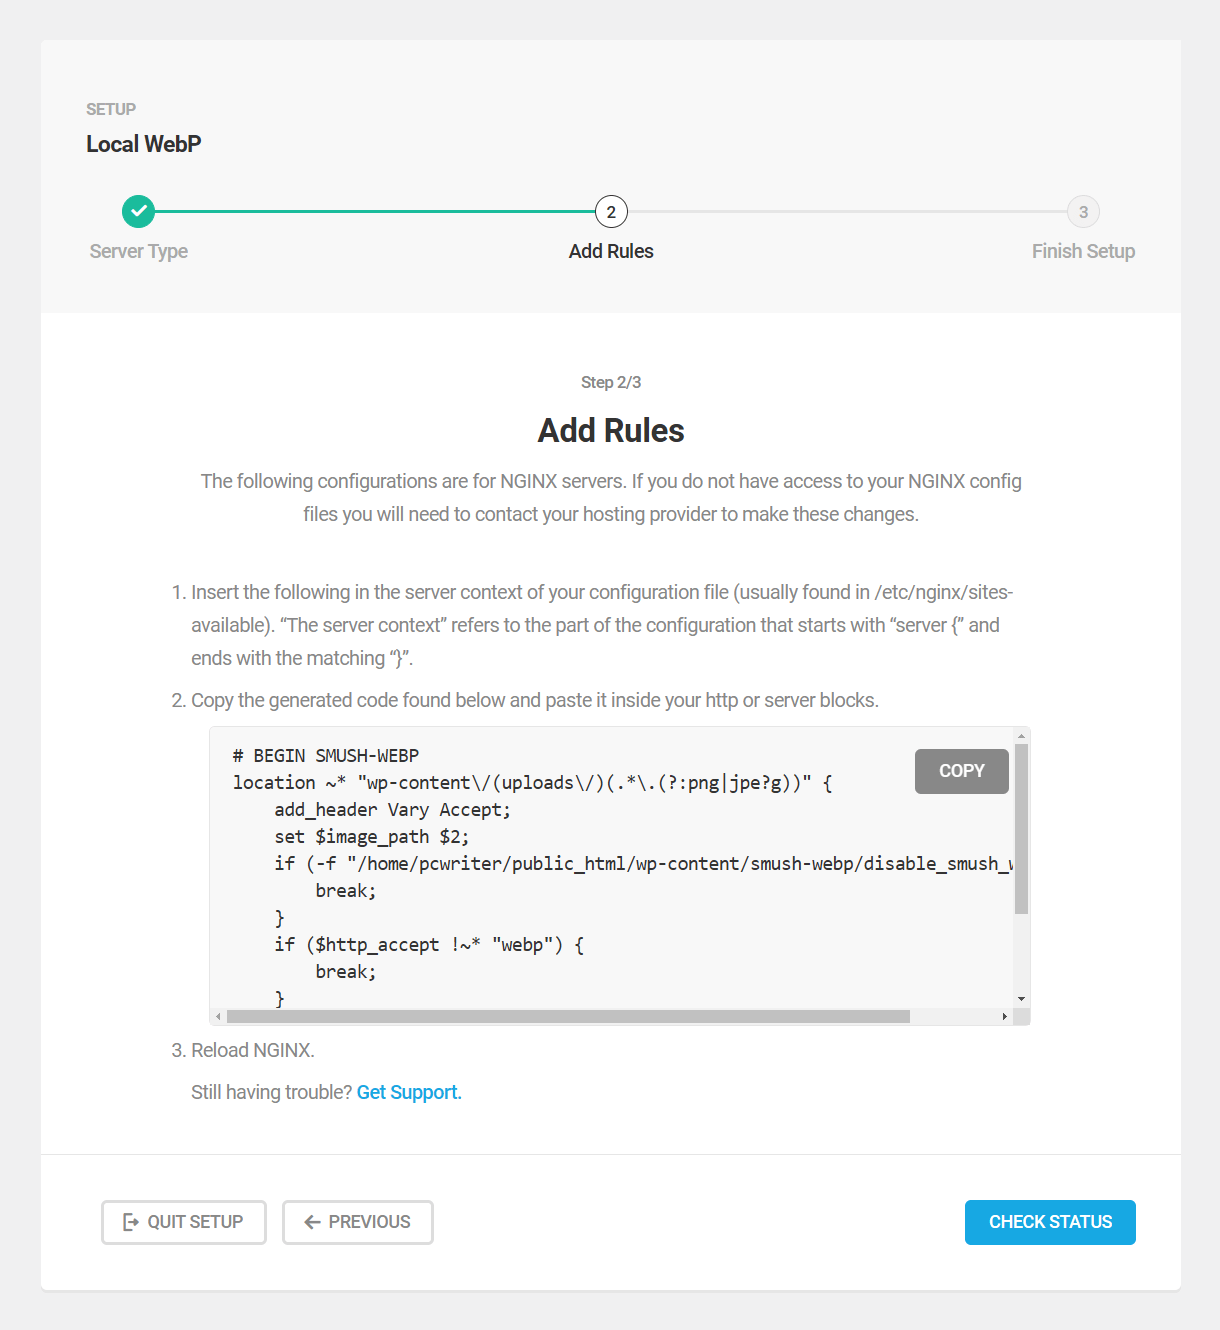
In standard nginx.conf configurations, these rules should be added after the root location directive. However, if you are using a complex custom configuration, you may need to place the rules elsewhere in your .conf file.
Step 3 – Finish Setup
If you’d like to convert existing images to WebP, click Convert Now to be redirected to the Bulk Smush page to start smushing your images.
Otherwise, click Finish to finish the setup process.

For WordPress multisite installations, WebP versions of existing images in the Media Library can only be created by ‘smushing’ the originals using the Bulk Smush tool on each individual subsite.
Adding Rules Manually
As seen in the Server Configuration Method chapter above, you’ll need to add rules manually if your server type is Nginx or Bitnami, or if the automatic method doesn’t work for you on your Apache server.
For both Apache and Nginx, the Setup Wizard will display the default rules you need for your specific install.
Apache
Add these rules to the .htaccess file in the root directory of your site (usually public_html).
If your WordPress is installed in a subdirectory and the site URL includes that subdirectory (like domain.com/wordpress), you do not need to change anything in these rules. However, you may need to add them to a .htaccess file in the wp-content/uploads directory instead of the root. Try the file in the root directory first, and if it doesn’t work there, move them to the file in the /uploads directory.
If your WordPress is installed in a subdirectory and the site URL does not include that subdirectory (loads at domain.com), see WordPress in its Own Directory below.
After WebP conversion rules have been configured, click Check Status.
Nginx
Before adding these rules to your nginx.conf file, be sure to adjust the path to the wp-content directory as shown on line 5 of the code below. You’ll find the correct path for your install in your site’s wp-admin under Tools > Site Health > Info > Directories & Sizes.
After WebP conversion rules have been configured, click Check Status.
Proxy / Hybrid Setups
If your server is running NGINX as a proxy for Apache, the Apache/Litespeed rules may not work in .htaccess, and you’ll need to add the NGINX rules manually instead.
If your server uses a hybrid setup running both NGINX and Apache (such as Cloudways or Nexcess), your images are most likely to be cached and served via NGINX. As such, in order to use Smush’s Local WebP feature, you will need to make the following changes:
- Exclude image extensions from NGINX rules so those files are now served via Apache.
- In Smush, go to the Local WebP page and follow the setup wizard’s guide to add Apache rules.
- Clear all cache and refresh your page.
After WebP conversion rules have been configured, click Check Status.
Bitnami Setups
Bitnami doesn’t allow overriding the htaccess rules in the local .htaccess file, so the setup is a bit different in this type of installation.
You’ll first want to locate your wordpress-htaccess.conf file, which can be found in the /opt/bitnami/apache/conf/vhosts/htaccess/ directory.
Then add the following rules in that file:
Check the file paths to make sure they are correct, then save the file and restart the Apache server using this command: sudo /opt/bitnami/ctlscript.sh restart apache
Once WebP conversion rules have been configured, click Check Status.
If the status message in Smush indicates WebP is still not working, try changing <IfModule mod_headers.c> in the rules above to <IfModule mod_headers>
WordPress in its Own Directory
When you install WordPress in its own directory (like domain.com/wordpress), but have it load at the root domain (domain.com), it inherits the DOCUMENT_ROOT of the parent directory. So if, for example, your WordPress is installed in a directory called “mysite” inside “public_html“, the document root of that site would still be public_html, not public_html/mysite
The Local WebP feature in Smush Pro will display the rules it needs with what it sees as the document root (public_html in the above example), and you would need to adjust those rules in a few places to include the directory where your WordPress is installed.
The examples below show where the rules need to be adjusted for each server type. For each instance where you see SUBDIR_HERE before wp-content, change SUBDIR_HERE to the actual directory name where your WordPress is installed.
Apache/Litespeed
The rules for Apache/Litespeed servers need to be adjusted in 3 places, as follows:
Note that these rules may not work in the root .htaccess file on some server setups, so you may want to try adding them to the .htaccess file in the wp-content/uploads folder inside your WordPress directory instead.
If the above rules do not work for your specific install, try modifying line #8 to this instead:
RewriteRule wp-content/uploads/(.*.(?:png|jpe?g))$ /SUBDIR_HERE/wp-content/smush-webp/$1.webp [NC,T=image/webp]
NGINX
The rules for NGINX servers need to be adjusted in 3 places, as follows:
8.5.3 AVIF
Link to chapter 5Selecting the AVIF next-gen format will serve AVIF images to browsers that support this format without requiring a CDN or any other configuration.

When this format is selected, an option to Enable JavaScript Fallback will appear. Enabling this option will ensure that the original JPEG/PNG images (without AVIF conversion) will be served to browsers that don’t support AVIF.
8.5.4 Settings (Next-Gen Formats)
Link to chapter 5Once the setup has been completed, a success message will be displayed with a reminder to run Bulk Smush to get local WebP/AVIF versions of all your existing images created. Images uploaded after the setup has been completed will be automatically converted to your selected format.
Revert Next-Gen Formats Conversion
If you need to delete the next-gen files from your server for any reason, such as if your storage space is reaching its limit, you can delete them easily. To completely remove the WebP or AVIF files from your server, click the Delete WebP/AVIF Files button. Your images will fall back to normal PNGs or JPEGs once the next-gen files are deleted.
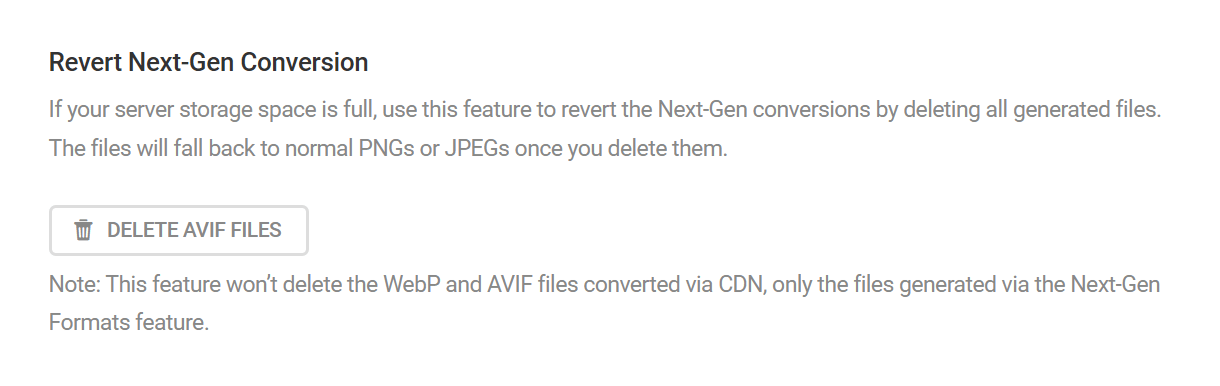
Note that this option will only delete image files created by the Next-Gen Formats module, and will not delete any next-gen files served by the Smush CDN.
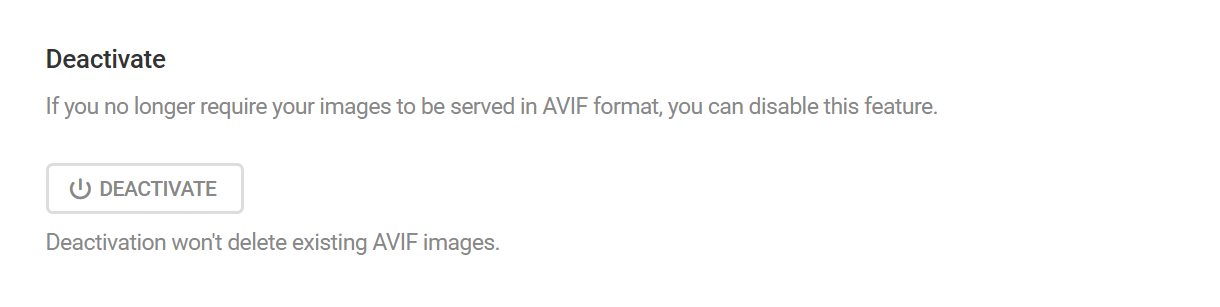
Deactivate
To deactivate the Next-Gen Formats module, click Deactivate. Your original JPEG/PNG images will then be served instead of the next-gen images.
The deactivation process will also create a disable_smush_[format] file inside the /smush-[format]/ directory created when you configured the feature. As long as this file exists, your original JPEG/PNG images will be served. If you re-enable Next-Gen Formats, the disable_smush_[format] file will be deleted and WebP/AVIF images will be served again without issue.
This can also come in handy when troubleshooting when you don’t want to delete your next-gen files.
8.5.5 Verifying Next-Gen Output
Link to chapter 5To check that your images are indeed being served in the selected next-gen format, you can simply check a page’s source code to see if images are being served from the /smush-[format]/ directory and have a .webp or .avif extension appended to their filenames, like this example:
https://coolsite.tld/wp-content/smush-avif/2025/02/image-1000x563.jpg.avif
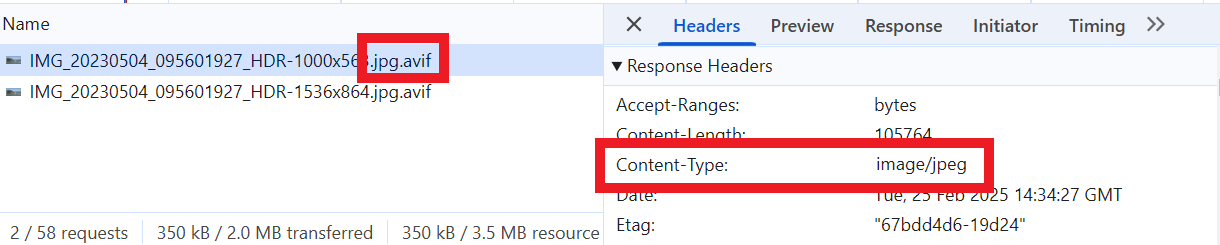
Alternatively, you can pop open your browser’s developer tools and click on the Network tab. Then reload the page to get fresh data in there and check the Response Headers for any image. If you see “content-type: image/webp” or “content-type: image/avif” there, that tells you that the browser is indeed serving up the selected next-gen version of the image.
Sometimes, a browser may fail to identify the exact content type of an image due to changes in the image URL. This can lead to a bit of odd behavior.
As illustrated in the image below, the final image extension is .avif, but the image type mentioned in the Content-Type field is jpeg.
In such cases, you can rely on the file extension to confirm that everything is functioning properly and ignore the image type shown in your browser’s response headers.
8.5.6 Next-Gen Integrations
Link to chapter 5Note that if the Amazon S3 Integration is active in Smush Pro > Integrations below, images that are offloaded to AWS will not be served in next-gen formats with this module. Only locally stored images will be served in next-gen formats.
8.6 Integrations
Copy chapter anchor to clipboardGutenberg Support
Click the slider to add Smush Stats to Gutenberg blocks. When enabled, a Smush Stats category is added to the page and post editors and appears in the Blocks tab of any post or page containing an image. Click any image on the page to see sizes available for that image, allowing you to choose the smallest file that meets your needs on that page.

Gravity Forms
If you are using Gravity Forms plugin on your site, enable this integration to ensure that all images uploaded via your forms are also optimized.

WPBakery Page Builder
When you add images at custom sizes using the WPBakery Page builder’s editor interface, it does not actually save a thumbnail copy of that image at that custom size. Rather, it creates those image sizes on-the-fly as the image is requested in the browser.

Enable this feature to ensure all such custom-sized images added via the page builder are also optimized when they are served to the user’s browser.

Amazon S3 (Smush Pro only)
This feature cannot be enabled unless you have an Amazon S3 account and the WP Offload Media plugin installed.
If you are using S3 to store images and WP Offload Media to manage the uploads, then enable this feature and Smush will compress any images contained in your S3 buckets, significantly reducing your cloud storage usage. This feature works together with Bulk Smush Automatic Compression, so be sure to have that feature enabled in the Bulk Smush settings.
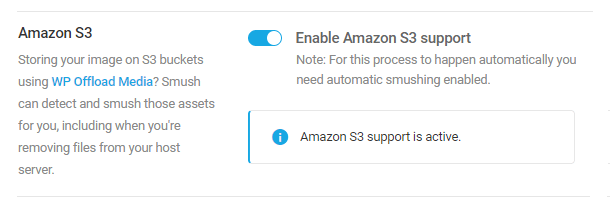
If you wish to offload your existing media library content to your Amazon S3 bucket using the WP-Offload Media plugin, note that you will need their Pro version for that feature; the free version can only offload media uploaded after that plugin is installed on your site. If you need help setting up the integration, there is an excellent walkthrough available on the WP-Offload site here: https://deliciousbrains.com/wp-offload-media/doc/amazon-s3-quick-start-guide/
NextGen Gallery (Smush Pro only)
If you’re using NextGen Gallery to manage your image galleries, then enable this feature to add Smush Pro commands and stats to the NextGen interface.

When enabled, a column is added to the Gallery Manager showing the filesize reduction Smush was able to achieve with each image. The NextGen integration also adds a Smush button to the manager so unSmushed gallery images can be compressed and a Restore button so users can return compressed images to their original states.
8.7 Settings
Copy chapter anchor to clipboardThe Settings module allows you to change the default Smush settings for translation, plugin data, accessibility, and more.
8.7.1 General
Link to chapter 7Image Resize Detection
The Image Resize Detection tool conveniently highlights any images that are either too large or too small for their containers. This is especially helpful to ensure that you are consistently delivering high-quality images in your galleries, and lowers the risk of you unknowingly serving blurry undersized images. Learn more in the video below.
Click on the Detect and show incorrectly sized images toggle to enable this feature and click Update Settings to save your changes.

If this is enabled, when you view your site on the front end, you will notice an Image Issues section in your right sidebar.

NOTE: Only site administrators will see this information and the front end will remain unchanged for any visitors.
Both oversized and undersized images will be listed with the actual size of the image in a yellow bubble and the recommended image dimensions in a green bubble. Hover over each numbered block for a note recommending the ideal image size for that container, or click on it to be redirected to the image in question. The image that is associated with the numbered block you just clicked will flash once with a gray cast to indicate that it is the image you have selected.
If all the images on the page are the correct size or there are no images on the page, you will see a note stating that All images are properly sized under the same Image Issues section.

If you see image sizes in the Image Issues sidebar showing as 0x0px or 1x1px, it is likely due to Lazy Loading being enabled. Simply scroll down to the bottom of your page to ensure all images have loaded, then check the Image Issues again and you should see the correct sizes.
Translations
Smush will automatically use the language set in your WordPress Admin Settings as the Active Translation language, provided there is a matching translation available.

In order for the Active Translation language to reflect in Smush, please ensure that the Smush translation file for the relevant language has been added to your site. Read our WPMU DEV Translations document for a detailed guide to exporting and using translations. Translation files for Smush can be found here.
Once the Smush translation file has been added to your site and you have changed your site language in your WordPress Admin Settings, Smush should fully reflect the new Active Translation language.
Hub Connector
Connecting your site to a WPMU DEV Hub account (free or pro) unlocks features that depend on it, such as Bulk Smush.
If your site is not connected, you’ll see a Connect Site button. Once the site is connected, the button changes to Disconnect Site, allowing you to remove the connection if needed. When the site is already connected to a Hub account and the WPMU DEV Dashboard plugin is installed, this section will no longer appear.

Usage Tracking
Usage tracking is incredibly useful for our designers, and enables us to learn more about what features you use and don’t use. It is a completely anonymous feature, and helps us deliver more relevant features in the future. See our Privacy documentation for more information about the data we collect.
To enable usage tracking, toggle on Allow usage tracking and click Save Changes.
![]()
8.7.2 Configs
Link to chapter 7The Configs module allows you to save your Smush configurations so that they can be applied to another site in just a few clicks.
To help you get started, we provide a Default config denoted with a blue checkmark. It includes the recommended settings that are ideal for fresh installations.
Save a Configuration
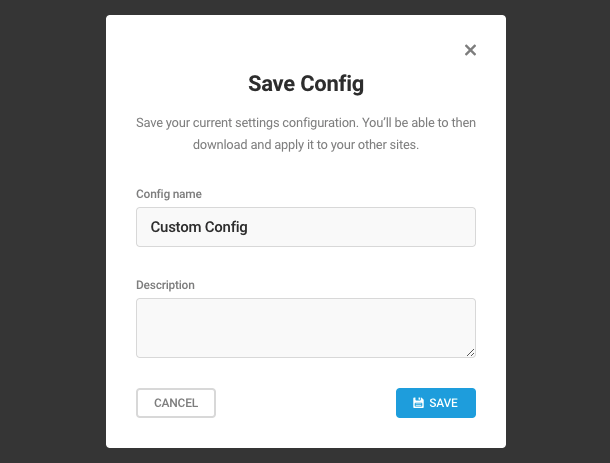
To save your current configuration, click Save Config.

Then, enter a name and optional description for the configuration and click Save.
Saved configurations are listed alphabetically. To view details about a saved configuration, click the configuration in the list.

To make changes to a saved configuration, click the gear icon. The available actions are:
- Apply – Apply the saved configuration to this Smush installation.
- Download – Download the saved configuration as a .json file.
- Name & Description – Edit the name and description for the saved configuration.
- Delete – Permanently delete the saved configuration.

Upload a Configuration
To upload a configuration that you’ve downloaded from another site, click Upload, and select the relevant .json file from your computer.

Smush will import the uploaded configuration and add it to the Preset Configs list.
Apply a Configuration
To apply a saved configuration to your Smush installation, click Apply.
You will be asked to confirm that you would like to replace your current settings with the saved configuration. Click Apply to proceed.

Sync with the Hub
Smush configurations will automatically be synced with the Hub. Synced configs can be accessed and applied directly from the Config or Security modules in the Hub, or from the Smush installation of any of your sites.
If a new config created in the Hub doesn’t appear immediately in the Smush Settings module, click Check again to refresh your data.

This feature is only available to users with the WPMU DEV Dashboard plugin and an active WPMU DEV subscription.
Settings and Options Stored in Configs
In the list below, you’ll find a breakdown of all settings and their available options included in the config file:
Bulk Smush
- Smush Mode: Basic | Super | Ultra (Single value is stored)
- Image Sizes: All | Custom (Single value is stored)
- Automatic compression: Active/Inactive
- Metadata: Active/Inactive
- Image Resizing – Resize original images: Active/Inactive
- Image Resizing – Disable scaled images: Active/Inactive
- Original Images – Optimize original images: Active/Inactive
- Original Images – Backup original images: Active/Inactive
- PNG to JPEG Conversion: Active/Inactive
- Email Notification: Active/Inactive
Lazy Load
- Media Types: .jpeg | .png | .webp | .gif | .svg (Multiple values can be stored)
- Embedded Content: Active/Inactive
- Output Locations: Contents | Widgets | Post Thumbnails | Gravatars (Multiple values can be stored)
- Auto Resizing: Active/Inactive
- Add Missing Image Dimensions: Active/Inactive
- Display & Animation: Fade in | Spinner | Placeholder | None (Single value is stored)
- Include/Exclude Post Types: Frontpage | Blog | Pages | Posts | Archives | Categories | Tags (Multiple values can be stored)
- Scripts: Header | Footer (Single value is stored)
- Native lazy load: Active/Inactive
- Noscript Tag: Active/Inactive
Preload
- Preload Critical Images: Active/Inactive
CDN
- Supported Media Types: JPG | PNG | WEBP | GIF (Multiple values are stored)
- Background Images: Active/Inactive
- Dynamic Image Sizing: Active/Inactive
- Next-Gen Conversion: WebP | AVIF | None (Single value is stored)
- REST API: Active/Inactive
Next-Gen Formats
- Next-Gen Formats: WebP | AVIF (Single value is stored)
Integrations
- Gutenberg Support: Active/Inactive
- Gravity Forms: Active/Inactive
- WPBakery Page Builder: Active/Inactive
- Amazon S3: Active/Inactive
- NextGen Gallery: Active/Inactive
Settings
- Image Resize Detection: Active/Inactive
- Usage Tracking: Active/Inactive
- Keep Data on Uninstall: Active/Inactive
- Color Accessibility: Active/Inactive
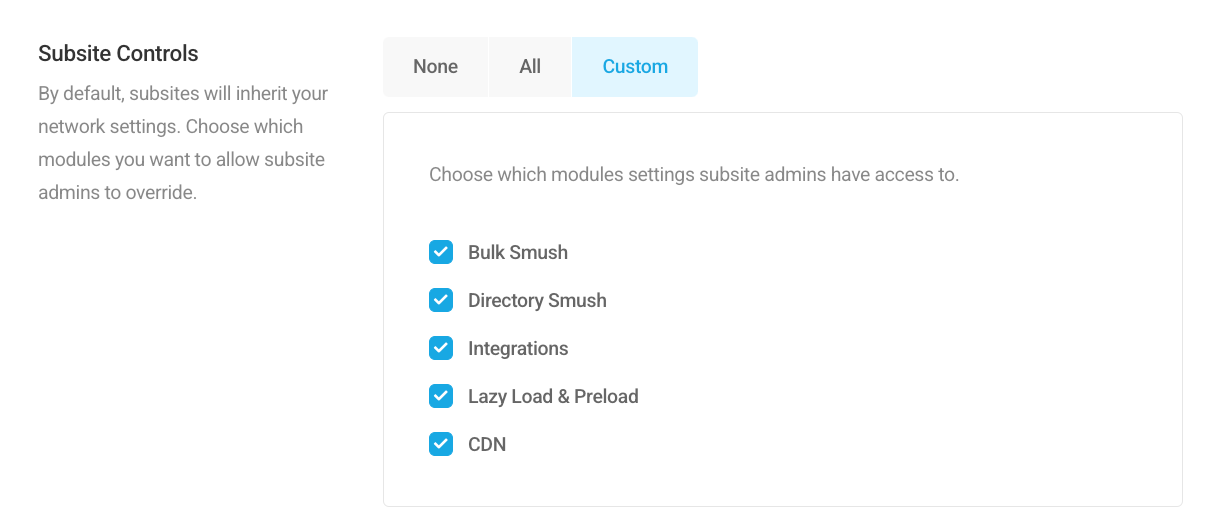
8.7.3 Permissions
Link to chapter 7This setting applies only to WordPress multisite installations.
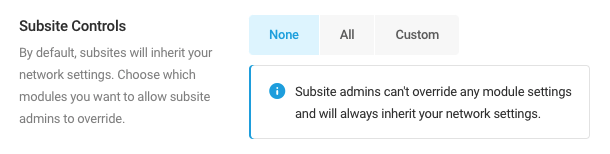
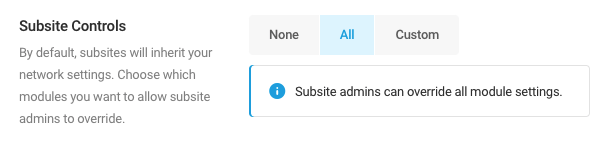
Subsites will inherit network settings by default, but the Subsite Controls feature allows you to grant subsite administrators the ability to override modules. You can choose to give subsite administrators any of the following permissions:
- None
- All
- Custom
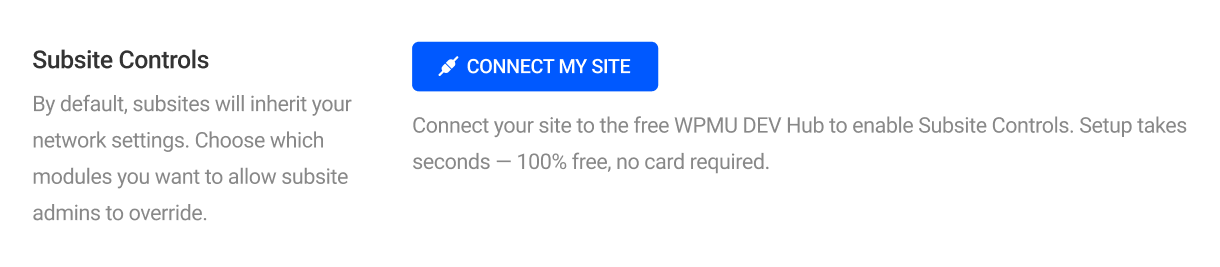
If your site is not connected to the Hub, you’ll be prompted to connect before you can use Subsite Controls.
None
Select None to force subsites to inherit all network settings. Subsite administrators will not have access to any of the Smush module settings.
All
Select All to to give subsite administrators the ability to override all Smush module settings.
Custom
Select Custom to give subsite administrators the ability to override settings for select Smush modules.
8.7.4 Data & Settings
Link to chapter 7Uninstallation
Choose how your data should be handled if Smush is uninstalled. Select Keep to save your settings upon uninstallation, which will allow them to be restored if Smush is reinstalled. Alternatively, you can select Delete, which will wipe your current settings upon uninstallation.
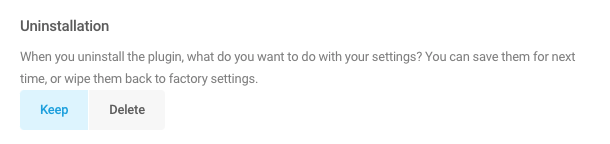
Click Save Changes to save your changes.
Reset Factory Settings
To immediately restore Smush to its default settings, click Reset Settings.

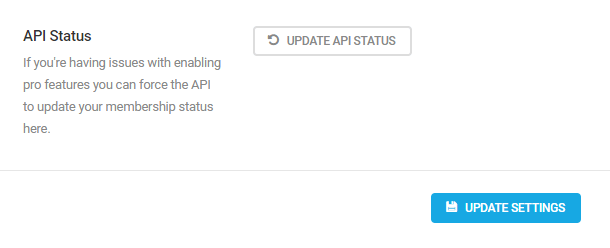
API Status
Your API key is linked to your WPMU DEV membership account and is important for granting you access to many of the features offered. If you are having issues with accessing pro features, you can force update your API key to update your membership status. Click Update API Status to action this update.
8.7.5 Accessibility
Link to chapter 7Color Accessibility
Color accessibility will improve the visibility of elements as per the Web Content Accessibility Guide requirements, up to level AAA which is the highest level of compliance. Toggle on Enable high contrast mode and click Update Settings to activate this mode.

8.8 Optimization Guide
Copy chapter anchor to clipboardAbout Your Google PageSpeed Insights Score
This chapter guides you through the configuration options for optimizing images with Smush Pro to improve performance based on the image recommendations from the Google PageSpeed Insights scan.
Looking to optimize your file and code assets? See our Hummingbird Optimization Guide.
There are many variables when running a PageSpeed test on a real-world website, and it’s important to understand that not every site can expect a score of 100.
Ads, scripts, and network conditions will cause results to vary for each visit. It is important to note that some very valid tools, such as anti-virus scanners, complex extensions, programs that impact page load or inconsistent ad behavior, can all impact PageSpeed scores. In fact, we recommend that anti-virus scanners and any program known to interfere with pagespeed be disabled during PageSpeed tests.

The following are some general guidelines regarding Google PageSpeed scores:
- 0 to 49 is considered slow
- 50 to 89 is good or average
- 90 to 100 is fast
For context, a website with a score of 100 is in the 98th percentile of the million top-performing sites. A site with a score of 50 is in the 75th percentile, which is still quite good relative to the vast majority of websites.
So what should your performance success metric be? A realistic PageSpeed score expectation for your website must take into account your host’s servers, content location, the number scripts or third-party calls your page is making, and the plugins and theme you are running.
8.8.1 Properly size images
Link to chapter 8This recommendation occurs when one or more of the images on the page is incorrectly sized for the container in which it appears.
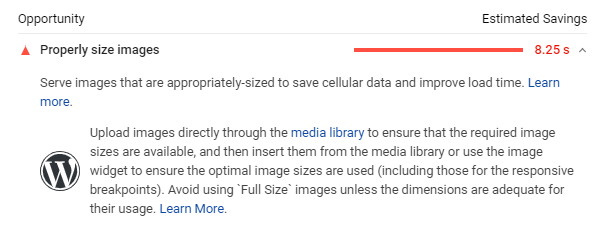
The Google PageSpeed test compares the size of the rendered image– that is, the image as it appears on users’ screens– against the size of the actual image– that is, the size of the image being served. If the rendered image is 25KB or more smaller than the actual image, it fails the audit.
To properly size images with Smush, activate the Smush Pro CDN and enable the Automatic Resizing option.

Automatic Resizing creates additional size variations on your CDN based on common screen sizes, filling in the gaps left by the default WordPress-generated thumbnails and uses the srcset attribute to serve the image closest in size to the size of its container.
This method will successfully resolve the Properly resize images audit on any theme that is properly utilizing the image sizes feature.
Page builder considerations
In an attempt to give users more freedom, page builders use various methods to size and resize images. This freedom comes at the cost of resources, and images may have to be manually resized to fit their containers.
If you are using a page builder or have activated the image CDN and consistently still fail the “Properly size images” audit, you can locate the images with Wrong Size Detection and choose the appropriate thumbnail if it is included in the list of generated images.
If the size you need is not available, you will need to provide a new image in the correct size in order to pass the audit.
To enable the Wrong Size Detection feature in Smush Pro, go to plugin settings, and in the image Resizing section, enable Detect and show incorrectly sized images. Then save your settings.
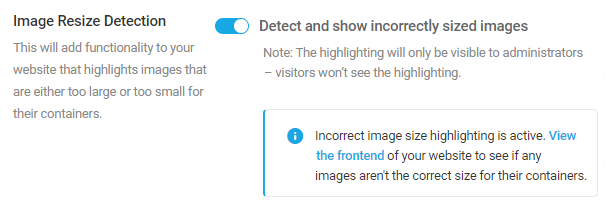
This setting will highlight incorrectly sized images for the admin. Use the information tab (yellow “i” icon) to see what size to scale the image.
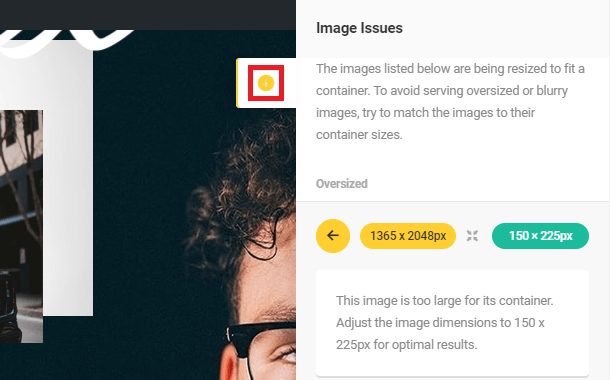
Watch our instructional video to see how the Smush wrong size detection feature works.
If you need to scale your images manually, we have written an in-depth tutorial for properly resizing and serving scaled images with WordPress.
Automated image scaling with the CDN may not work well for images on themes or page builders that do not use the srcset attribute to define images.
8.8.2 Defer offscreen images
Link to chapter 8This audit lists all offscreen or hidden images on your page along with the potential savings in kilobytes. Use the Smush Lazy Load feature to defer your offscreen images from loading until they are needed.
To activate lazy loading with Smush Pro, click the Lazy Loading option in the Smush dashboard and click the Activate button.
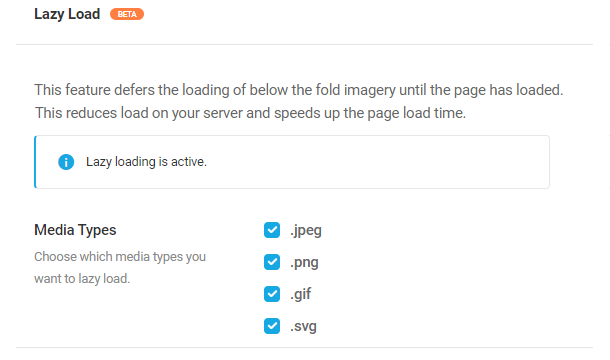
Watch our instructional video to see how the Smush lazy loading feature works.
This feature stops offscreen images from loading until a visitor scrolls to them, making your pages load faster, uses less bandwidth, and fixes the failed “defer offscreen images” audit.
The default settings work well for most sites. But keep in mind the audit is only for images located offscreen so it is a good idea to exclude any images in the viewport. Smush Pro Lazy Loading gives you controls for excluding file types, output locations, animation speed, and pages you may want to exclude.
Do not use the Smush Pro Lazy Load feature if you have lazy loading active with another plugin or it is built-in to your theme or page builder. Having the same function active in multiple plugins can cause a conflict that makes your images appear broken.
If you are looking for more information about manually implementing Lazy Load on your site, visit the How to Defer Offscreen Images guide on our blog.
8.8.3 Efficiently encode images
Link to chapter 8This is a list of all unoptimized images, with potential savings in kilobytes. To check if your images are correctly encoded, Google’s PageSpeed test collects all the JPEG or BMP images on the page, sets each image’s compression level to 85, and compares the original version with the compressed version. If the potential savings are 4KB or higher, the images will fail the audit.
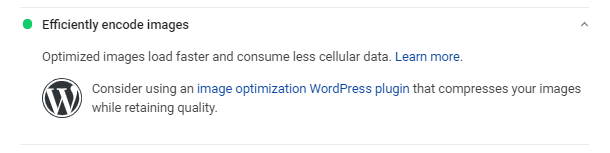
To resolve this with Smush Pro, use the Bulk Smush Automatic Compression setting to automatically web optimize your images on upload.
If you already have images in your media library when installing Smush, use Bulk Smush to optimize any existing images.

Remember to click Save whenever making changes to Smush settings. Run Bulk Smush to apply changes to any existing image files.
8.8.4 Serve images in next-gen formats
Link to chapter 8Next-gen image formats are modern image formats with superior compression capabilities. WebP typically achieves 26-30% smaller file sizes than JPEG or PNG, and AVIF images are up to 60% smaller than comparable JPEG or PNG images
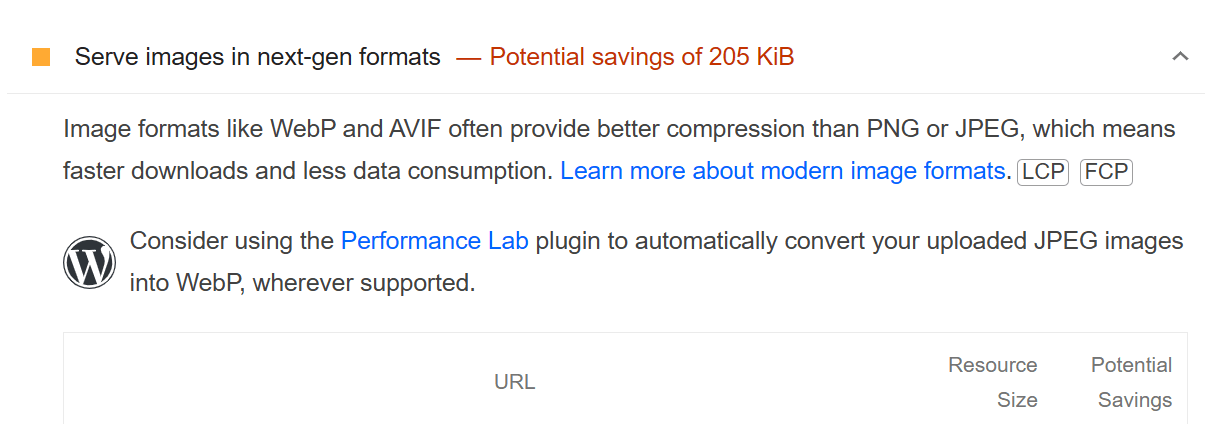
Smush Pro can be used to serve images in WebP or AVIF next-gen formats for supported browsers. If the browser does not support the selected format, Smush will use the original image as a fallback.
There are 2 options for serving next-gen images with Smush Pro. See the linked chapters for more information on each option:
- Using the Next-Gen Conversion feature built into the Smush CDN
- Using the local Next-Gen Formats feature
8.9 Troubleshooting Guide
Copy chapter anchor to clipboardThe steps outlined in this chapter will help you troubleshoot issues you may be having.
8.9.1 Stuck / Failed Bulk Smush or Scan
Link to chapter 9- Check for any loopback issues.
- Review the Site Health page in your wp-admin to see if there are any critical issues related to media or HTTP requests.
- Enable debug mode and check the debug.log file in the wp-content directory for any errors while running the scan or bulk smush.
- Perform a plugin conflict test.
- Check if WP Cron is disabled; it should be enabled for Bulk Smush or scan to work correctly.
- Check the wp-config.php file in your site’s root directory and remove this line if it’s there:
define( 'DISABLE_WP_CRON', true ); - Check that the wp-cron.php file actually exists and is accessible. It should be in the root directory of your website on your server. Ensure it has the correct file permissions; it should be 644 for Smush to be able to access it.
- If the cron issue persists, try to set up a server cron or use a 3rd party cron service.
- Check the wp-config.php file in your site’s root directory and remove this line if it’s there:
- Low Server Resources
- Memory Limit: Increase PHP memory limit if it’s under 128M.
- You can do so by adding these in your wp-config.php file:
define( 'WP_MAX_MEMORY_LIMIT', '512M');

define( 'WP_MEMORY_LIMIT', '512M'); - On some servers, the above defines may not work as expected. In such a case, you can try to increase it by adding this to your php.ini or .user.ini file:
memory_limit = 512M - If both of the above fail, you could do this via your hosting panel, or get support from your hosting provider.
- You can do so by adding these in your wp-config.php file:
- Process Timeout: Increase PHP max execution time limit if it is under 120.
- You can do so by adding this to your php.ini or .user.ini file:
max_execution_time = 300 - If the above fails, you could do this via your hosting panel, or get support from your hosting provider.
- You can do so by adding this to your php.ini or .user.ini file:
- Memory Limit: Increase PHP memory limit if it’s under 128M.
- Missing Libraries
- Images may fail to smush if GD or Imagick PHP extensions are missing on your server. To verify, please check if you can edit an image on your site. If not, please ask your hosting provider to activate GD or Imagick PHP extension in order to resolve this.
Scan Issues
- Reduce Scan Slice Size: For stuck scans, you can add this to your wp-config.php file to see if reducing the slice size helps:
define('WP_SMUSH_SCAN_SLICE_SIZE', 250 ); - Increase Scan Retry Limit: For failed scans, we limit the automated cron retries to 5 times. You can adjust the limit by adding this define to your wp-config.php file to see if it helps:
define('WP_SMUSH_BACKGROUND_MAX_RETRIES', 20 );
Bulk Smush Issues
- Disable Parallel Processing: Bulk Smush optimizes all the default WordPress image sizes for a media item in parallel, which makes the image optimization process much faster. But, it also requires more resources to do so. If you get stuck on Bulk Smush, try disabling Parallel Processing by adding this define in your wp-config.php file to see if it helps:
define( 'WP_SMUSH_PARALLEL', false ); - Increase Bulk Smush Retry Limit: We limit the automated cron retries for Bulk Smush to 5 times per 1000 images. You can adjust the limit by adding this define to your wp-config.php file to see if it helps:
define('WP_SMUSH_BULK_REVIVAL_LIMIT', 20 ); - Change Smush Mode: If one or more images are not being properly optimized and are returning API errors, it may be due to the compression mode being used. Thumbnail images generated by WordPress can usually be effectively compressed using the Basic mode. However, images can occasionally not compress successfully in Basic mode due to being already heavily optimized or too large for the method employed at this level. This can be especially true if you have also opted to optimize your original images. Try switching to Super or Ultra compression modes which utilize a lossy technique that is more aggressive and suitable for larger or original images.
8.9.2 Broken Images
Link to chapter 9- Use the Bulk Restore option to regenerate thumbnails. To make sure this works effectively, ensure that the Backup Original Images option is enabled.
- Consider using any authentic third-party WordPress plugins to regenerate your thumbnails.
- Disable lazy loading or switch to the native lazy load feature. Please let us know if this resolves any underlying conflicts, as we want to address any issues that arise.
- If a CDN is currently enabled, try turning it off and let us know if this resolves any problems, so we can take steps to prevent similar issues in the future.
Note: Keep in mind that regenerating thumbnails may undo any previous optimizations.
8.9.3 Loopback Request Issue
Link to chapter 9Bulk Smush’s background processing feature requires Loopback Requests to work. Various factors can cause issues with loopback requests. If your site has such an issue, you’ll see the following error message on the Site Health screen.
Here is a list of the recommended solutions to fix this issue:
- Edit Server Host File – If your domain is not hosted with WPMU DEV, then add the following line “127.0.0.1 yourdomain.com” to your server host file “/etc/hosts”. If it doesn’t work, check with your hosting provider or review the access logs to find the server’s private IP address and use that IP in place of 127.0.0.1. Note that “yourdomain.com” has to be replaced with your domain name with TLD.
- Perform a Plugin Conflict Test – Certain plugins/themes can conflict with loopback requests causing this issue. Deactivate the themes/plugins on your site one by one and try to identify if deactivating any plugin/theme fixes the issue.
- Temporarily Disable the Firewall – If you have a firewall enabled on your site, temporarily disable it to find out if it solves the issue. If so, then ask your hosting provider to add WPMU DEV IP addresses to the firewall’s allowlist.
- HTTP Authentication – If your site is protected with basic HTTP authentication, then remove the authentication to see if it fixes the issue.
- SSL Configuration issues – Poorly configured SSL certificates can also cause problems with loopback requests. Try to reinstall and reconfigure the SSL certificate as a fix.
- DNS Update – If you have recently updated your nameservers or DNS records, wait for at least 48 hours for the issue to disappear.
- Outdated Software – Verify all the Software on your system is up to date. Outdated software and libraries including PHP, cURL, or OpenSSL can also cause this issue. To verify that your system has the latest versions of the software, click on the Info tab under the Site Health screen of the Tools menu to reveal information about the software installed on your system.
- Misconfigured DNS – Poorly configured or misconfigured DNS can raise cURL issues. Contact your hosting provider to troubleshoot any DNS and hosting-related issues.
- Limited Resources – Limited Server Resources including the PHP memory limit and Maximum upload space can cause cURL request issues. Increase your server resources, as a fix.
- Cloudflare Configuration – If your website is using Cloudflare make sure it is configured for WordPress by following this guide.
- Contact Our Support – After trying out all the recommended solutions, if you still can’t troubleshoot the issue, don’t hesitate to start a live chat with our support Superheroes or submit a support ticket using the Support tab of your WPMU DEV Dashboard.
8.9.4 429 Rate Limit Issues
Link to chapter 9When the Smush CDN can’t access a domain, or when some image URLs on the site can’t be fetched or compressed, one or more 429 rate limit errors may occur on the site. Usually, rate limits clear in 6 to 12 hours, but you may wish to investigate the cause of such issues to help prevent them from happening again right away.
The easiest way to do that is to check the response headers for any rate limited image.
Check Response Headers
Pop open your browser’s developer console and navigate to the Network tab, then reload a page of your site where you’ve noticed the issue. Locate the troublesome image in the left-hand pane and click on it (you can filter the list to show only image data by clicking on the Img filter button).
Under the Headers tab in the right-hand pane, scroll down until you find x-rate-limit-reason.
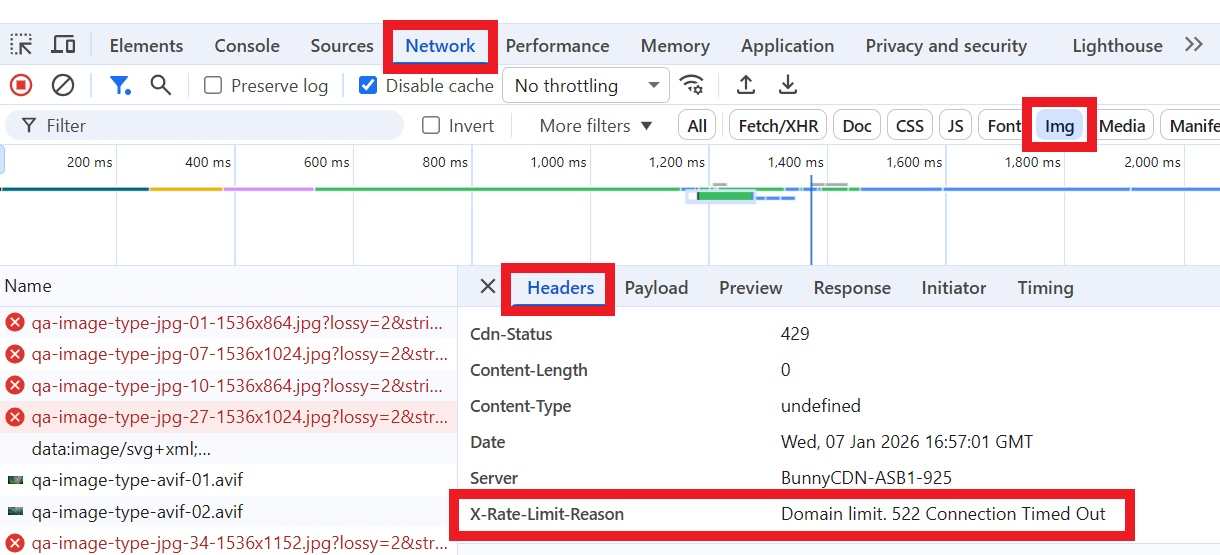
Images that are corrupted or not found should be replaced. Timeout errors could indicate that something is blocking the CDN from accessing the site.
However, if the image does not load from the CDN but loads correctly at its original URL, you may wish to contact support to have the rate limit cleared and the cause investigated more deeply.
Allow Smush CDN in Firewall
The Smush CDN operates from a cluster of IP addresses with no proxy, and to prevent man-in-the-middle attacks, those IPs are not publicly exposed. So if the Smush CDN is being blocked from accessing your site or domain, it is not possible to allowlist a series of IP addresses.
However, you can create a custom rule in your firewall settings to allow the CDN access. You would want your rule to contain the following directives:
- Request method: HEAD or GET
- Path contains /wp-content/uploads/
- ASN AS14061 DIGITALOCEAN-ASN
For example, if you are routing your domain through Cloudflare, you could create a custom rule like below:
(http.request.uri.path contains "/wp-content/uploads/" and ip.src.asnum eq 14061 and http.request.method eq "HEAD") or (http.request.uri.path contains "/wp-content/uploads/" and ip.src.asnum eq 14061 and http.request.method eq "GET")
In your Cloudflare account, go to Security > Security rules > Custom rules > New custom rule, and enter the directives as shown in the image below:
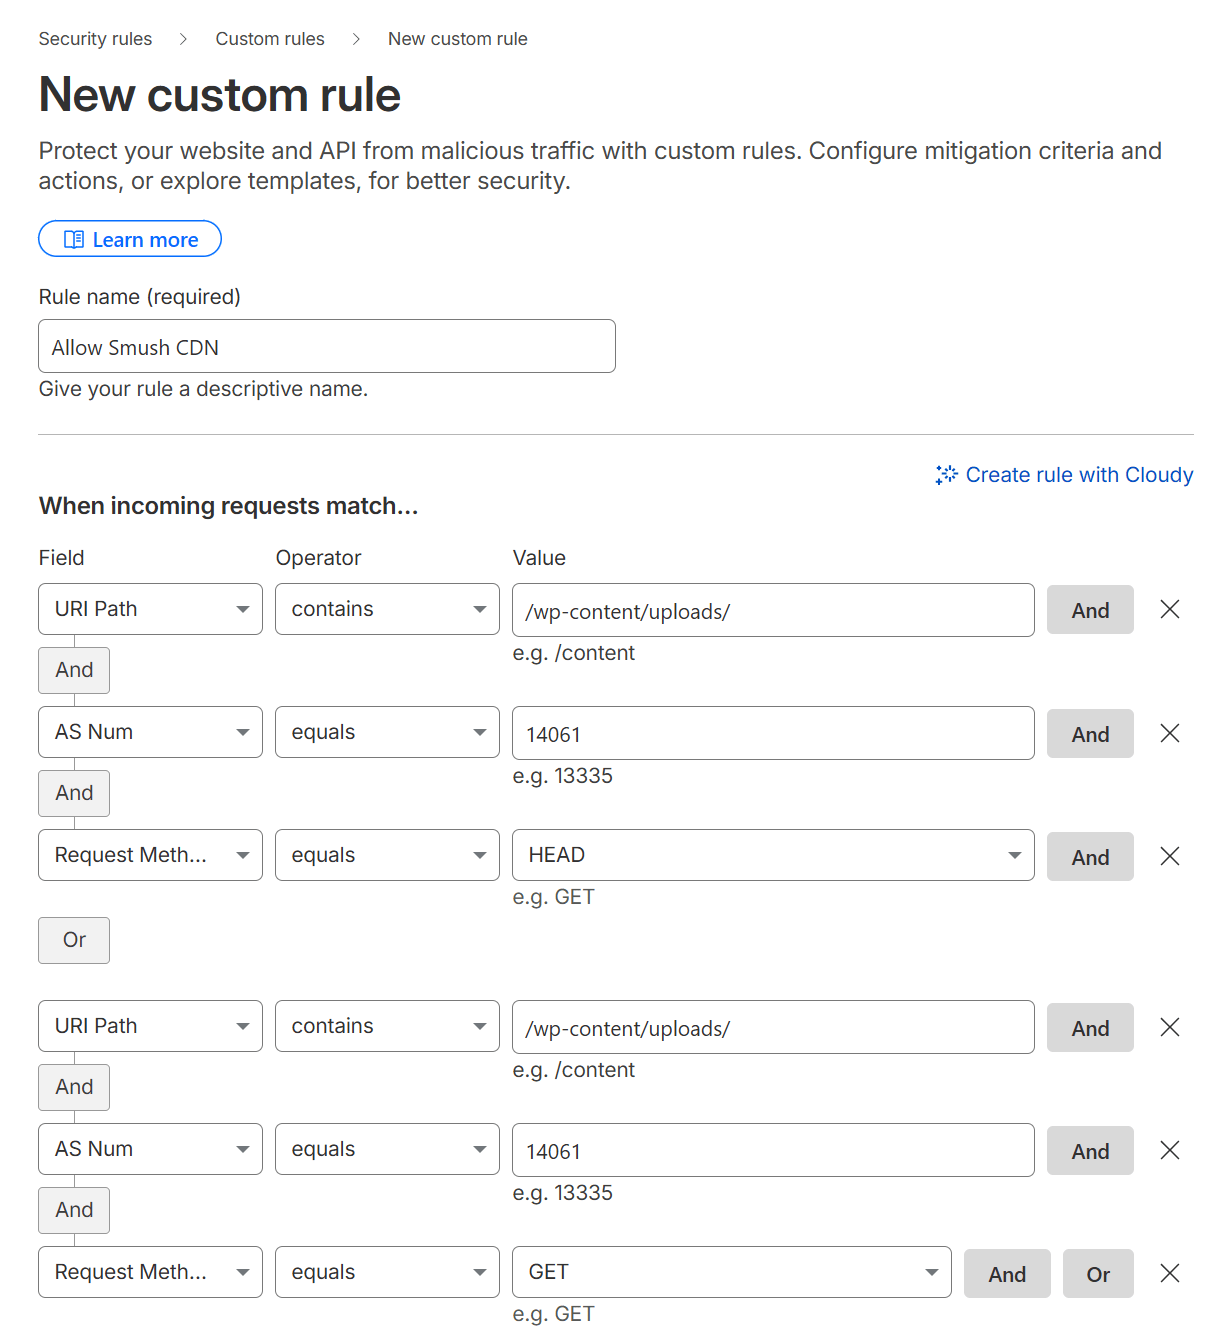
Next, select Skip as the Action, and enable all components including those under the More toggle. Finally, set the Order to First, and click the Deploy button to save the rule.
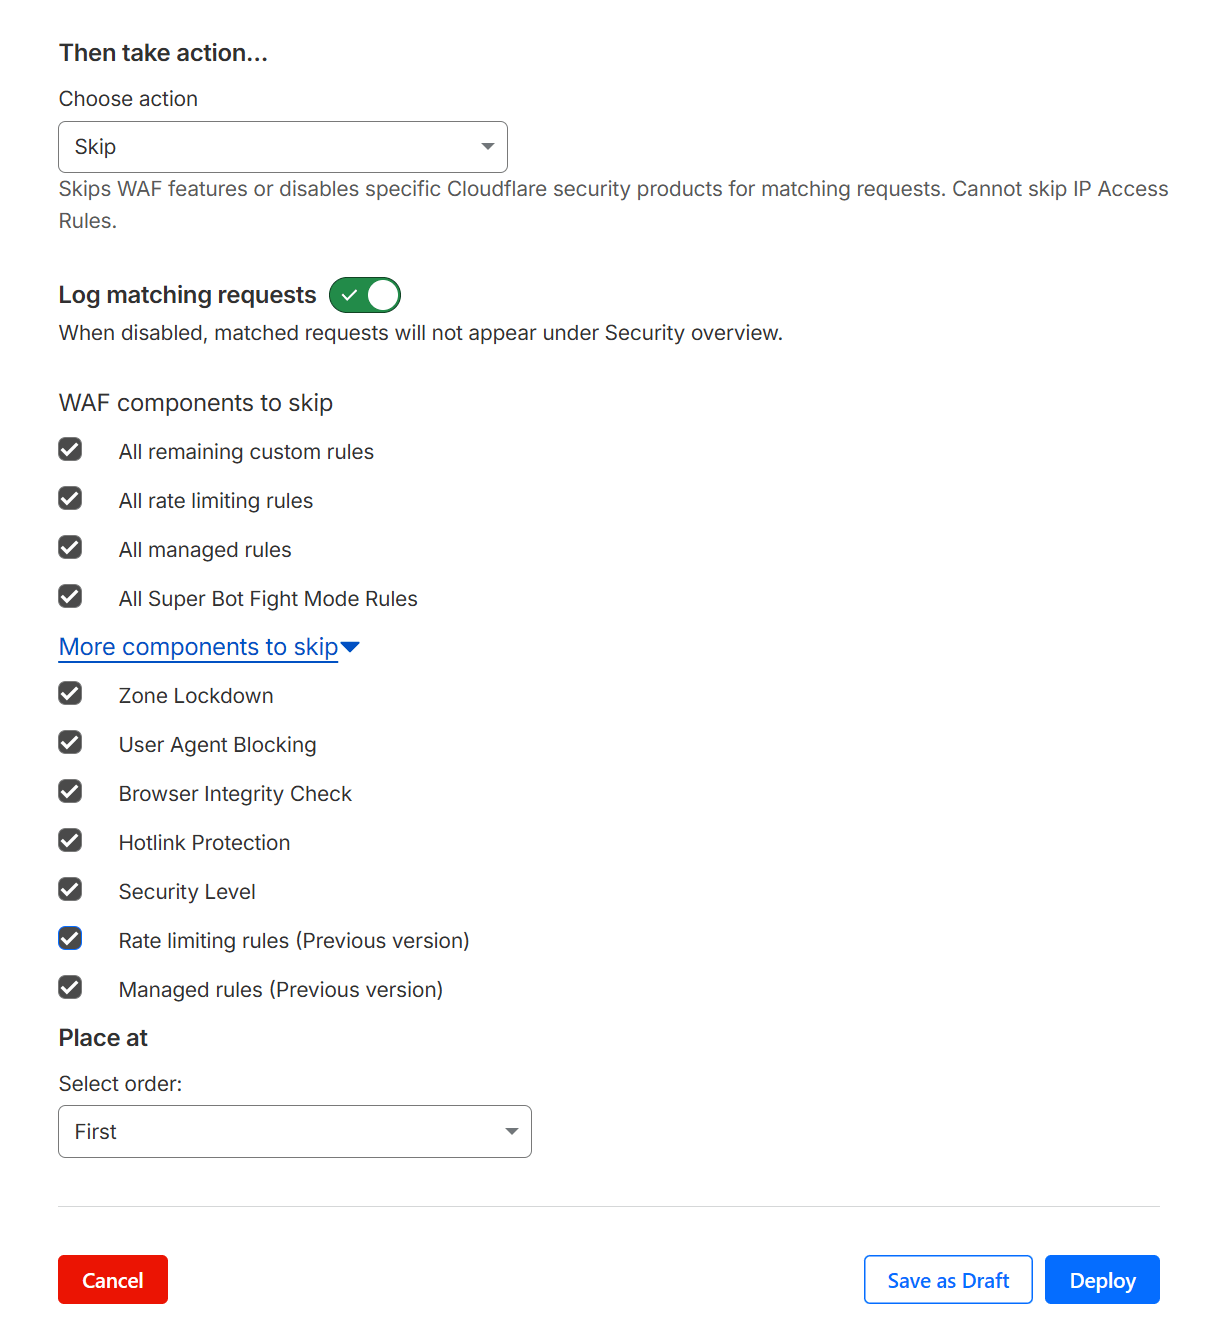
8.10 Get Support
Copy chapter anchor to clipboardIf you still have questions or need assistance after reading this document, please don’t hesitate to contact our support superheroes using the available options under the Support tab in your Hub or via the Support tab in your WPMU DEV Dashboard.
