2. WPMU DEV Unlimited Hosting
WPMU DEV’s managed Unlimited Hosting service – available only to Premium members – enables you to spin up your own virtual private servers (VPS), and create as many WordPress or EmDash sites on each one as they can handle. You only pay for the servers themselves, not any sites that you create on them.
Each server is deployed on our high-frequency architecture and comes with its own dedicated IP, memory and storage space. All of that is of course shared with all sites hosted on the same server, but nothing is shared with any of your other servers, or with any other member’s servers or sites.
Each site can have as many staging sites as you need linked to it, and each staging site has the same resource allotment as its connected production site. You can even brand your staging sites with custom domains to keep your business identity front & center when working on client presentations. And once your client is ready to take their site live, you can migrate it to its own dedicated site if needed.
If you prefer having dedicated resources for each site from the get-go, consider our dedicated hosting service instead. See our Getting Started with WPMU DEV Hosting document for more information.
Many of the features and options in our unlimited hosting service function exactly as they do in our dedicated hosting service. To facilitate discovery and avoid duplication of documentation, only those features that are unique to our unlimited hosting are detailed here. Where needed or applicable, links to corresponding dedicated hosting documents are provided.
2.1 Getting Started
Copy chapter anchor to clipboardIf you’re reading this chapter, this is likely your first time setting up your very own unlimited shared hosting environment with WPMU DEV.
Use this handy checklist to help you get up and running in no time!
- Create your first server
- Create your first site
- Create a staging site and link it to the production site
- Add custom domains to your sites
If you get stuck at any point in this process, just start a new chat any time with our support superheroes.
Step 1 – Create your first server
The first thing you’ll want to do is get a server set up. As noted above, unlimited hosting servers are created on our high frequency architecture, and have been specifically developed and optimized to house multiple websites.
Click the Unlimited Hosting item in the Hub > Hosting dropdown, and click the View Plans button to select the hosting plan you want for your new server.

You can create as many servers as you need, and create as many websites on each one as they can handle.
Step 2 – Create your first site
Next, get your first website created on your new unlimited server. There are several places from which you can create a new site, but let’s just look at one for now. You can always check out the other locations later when reviewing the Sites chapter.
Go to the Server Overview screen of your server, and click the + Create Site button to launch the site creation wizard.

You can create as many sites on your server as the storage allows. Once at least one website is created on a server, you can monitor the overall storage used from the Server Overview screen, and get a detailed breakdown of storage used by each website on the Analytics screen for the server.
Step 3 – Create a staging site and link it to the production site
Please note that staging sites can be created for WordPress sites only at this time.
Like when creating a production site, there are a few places from which you can create a new staging site, but let’s just look at one for now. You can always check out the other locations later when reviewing the Sites chapter.
Go to the Server Overview screen of your server, and click the + Create Staging button at top-right, or click Create Staging Site under the kebab icon of any production site’s row in the site list. That will launch the Create new staging site wizard where you’ll be prompted to select the production site you want to mirror.

Once your new staging site is created, it will be highlighted with a Staging badge next to its name on the server overview screen. Hovering your cursor over that badge will reveal the production site you linked the staging site to.

Note that staging sites consume the same resources on your unlimited servers as your live production sites. So we recommend creating staging sites only if you require separate environments for development and testing.
Step 4 – Add custom domains to your sites
Once you have a new site all set up the way you want it and are ready to take it live, you’ll want to add a custom domain so it can be accessed at something other than the tempurl.host domain.
The process for this on our unlimited hosting is identical to that of our dedicated hosting. See this Go Live Checklist for details.
2.2 Servers
Copy chapter anchor to clipboardThis chapter covers everything you need to know about creating and managing your own unlimited hosting servers. See the Sites chapter for details about creating sites on your servers.
2.2.1 Creating a Server
Link to chapter 2To create your first unlimited hosting server, click on Unlimited Hosting in the Hub > Hosting menu. Then click the View Plans button on the welcome screen.
If you have already created one or more servers, click the + Create Server button on the Unlimited Hosting screen.

Clicking either button will launch the wizard where you’ll first be prompted to select the high frequency plan you want for your new server.
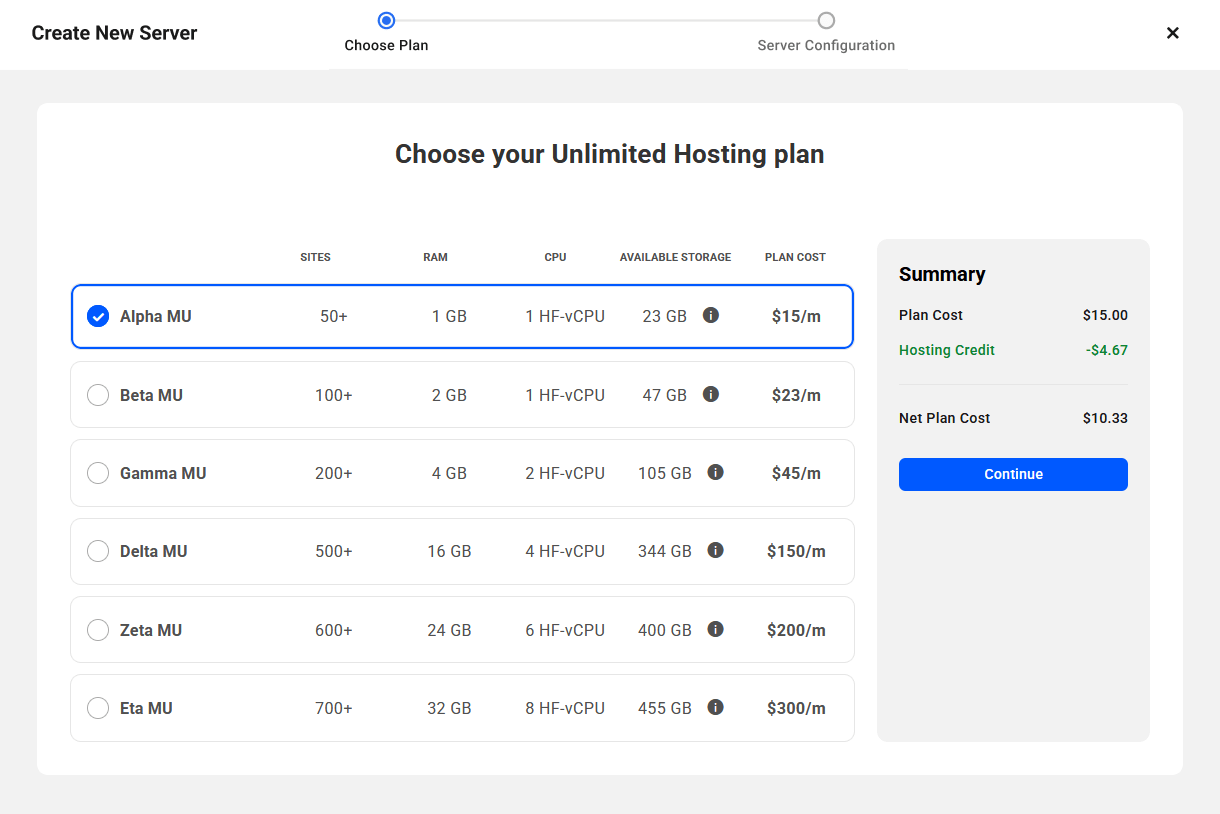
You’ll then enter the name you want to use as the Server ID, which is prepended to our tempurl.host domain name. The ID can be made up of only letters, numbers and dashes, and cannot be changed at a later time. Any sites you create on this server will have this ID in their temporary domain name so you can easily identify them.
Click Continue to move to the next step.

Please note that a server ID cannot be accessed directly in a browser. If you try, it will simply return a 403 Forbidden error.
Next, select the server location you want to use for your new server. For best performance, select a location closest to the majority of your visitors. Note that the region cannot be changed at a later time. The available regions are the same as for our dedicated hosting service. See Locations & Regions in the Getting Started documentation for more info.

Click Continue once you’re done.
A payment modal will pop open with a summary of your transaction. Once you confirm payment, which will be charged to the Payment Method you have set in your WPMU DEV account, you’ll see your new server being created on the Unlimited Hosting screen. Server creation can take a few minutes, so you can navigate away from this screen while it’s in progress, and we’ll send you an email when it’s complete.

2.2.2 Managing Servers
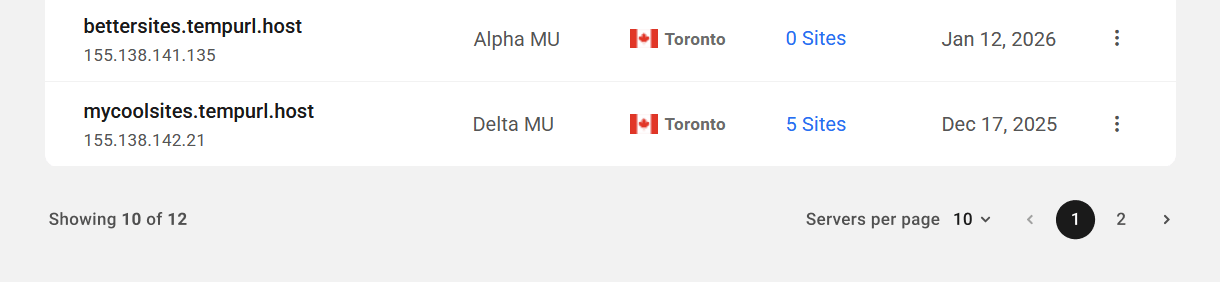
Link to chapter 2The Unlimited Hosting screen displays all your current servers, whether there are any sites hosted on them or not. Information about each server is displayed in columns as follows:
- Server – This indicates the Server ID you set when you created the server, as well as its dedicated IP address.
- Plan – The plan the server was created on.
- Server Location – The physical location you chose when you created the server.
- Sites – The number of sites hosted on the server. This includes both live production sites, and any staging sites associated with them.
- Created on – The date the server was created.

You can sort the list of servers by Recently Added, or in ascending or descending alphabetical order.

Hover your mouse cursor over the number in the Sites column of any server to pop open a list of all sites hosted on that server. Click any site name in that list to open that site’s homepage in a new tab.

If there are no sites yet created on the server, you’ll see a + Create Site option when hovering over the number in the Sites column.

Click the kebab icon on any server’s row to reveal additional management options for that server.
- Manage Server – Click to be directed to the Server Overview screen for that server.
- Add Site – Click to create a new site on that server. This will redirect you to the Create New Site wizard for that server. See Creating a Site in the Sites chapter for details about creating sites on your servers.
- Rename Server – Click to pop open a modal window where you can change the name of the server. This only changes the name that displays in your Hub, not the Server ID.
- Delete – Click to pop open a modal window where you’ll be prompted to confirm that you want to delete the server. Note that you cannot delete a server if sites are currently hosted on it. You would need to first delete those sites before you can delete the server. If you delete a server before its current billing period has ended, an amount pro-rated for the remaining time of the server and any active add-ons will be refunded to you in the form of account credits.

If you have created more than 10 servers, pagination will kick in at the bottom of the screen where you can select how many servers to show per page.
2.2.3 Server Overview
Link to chapter 2The Server Overview screen contains all the information about a server and the sites that are hosted on it.

Server Details
The Server Details section contains summary information as follows:
- Server ID – This is the ID you entered when you created the server, and it cannot be changed.
- IP Address – The dedicated IP address of your server.
- Region – The global region where the server is located.
- Production Sites – The number of live production sites hosted on the server.
- Staging Sites – The number of staging sites hosted on the server.
- Created on – The date the server was created.
Plan Details
The Plan Details section indicates the plan the server is currently on, and the amount of storage used by all sites hosted on it. Click the Detailed Usage link to be directed to the Storage tab in the Analytics section of your server.
If you need to upgrade to a better plan, click the Upgrade button to pop open a modal window where you’ll see the same available plans as shown on the Upgrade tab.

Upgrading to a higher plan requires a server resize, which can take some time, and no action can be performed on the server while that’s in progress. A notice will appear at the top of the Overview screen during the resize, and we’ll send you an email once it’s complete.

WordPress / EmDash Site Lists
Once you have created one or more sites on your server, this section will list all the sites hosted on it, with your WordPress and EmDash sites under their own respective tabs.
Note that if you only create WordPress sites on a server, the tabs will not appear; instead you’ll just see an All Sites label.

You can sort the list of sites by most Recently Added, or alphabetically in ascending or descending order.

Click Filters & Labels to filter and show only sites that meet your selected filters. You can filter by Type (Production or Staging) and/or by any custom Labels you may have given your sites. Labels here work exactly as they do in our dedicated hosting; see the Labels chapter in the My Sites Overview document for details.

Each site in the list of WordPress sites includes shortcuts to access specific features of that site. See EmDash Sites below for more information about managing and accessing sites you build on that platform.
- Click the cloud & gear icon to be directed to the Hosting Overview screen of that site.
- Click the database icon to open phpMyAdmin for that site in a new tab. This works in the same way as the database tool on our dedicated hosting.
- Click the file icon to open the file manager for that site in a new tab. This works in the same way as the files tool on our dedicated hosting.
- Click the WordPress icon to open the wp-admin of that site in a new tab.

All other Hub services – Security, Performance, SEO, etc. – are accessible for your WordPress sites on the My Sites screen in your Hub. Note that Hub services are not available for EmDash sites.
You’ll see a reminder about this under the lists of WordPress sites on all your server overview screens, with a Go to Sites button you can click to be redirected to the main Sites list in your Hub. If you dismiss the reminder, it won’t appear again.

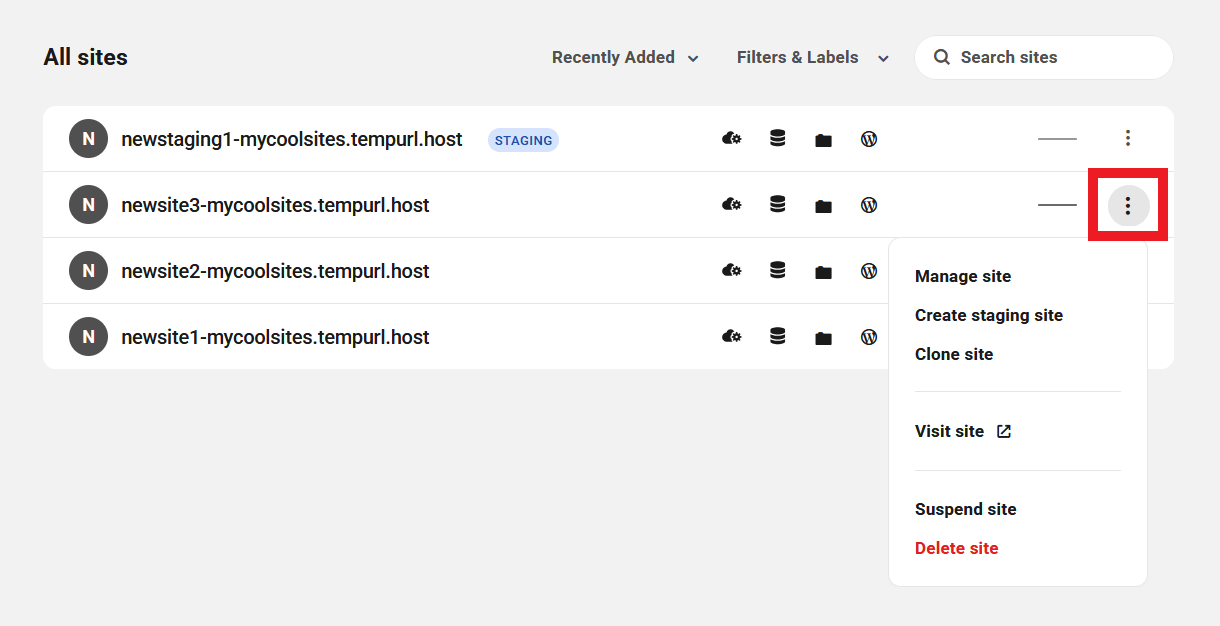
Click the kebab icon in any site’s row to reveal additional management options for that site.
- Manage site – Click to be directed to the Hosting Overview screen of the site.
- Create staging site – Appears only for production sites. Click to Launch the Create new staging site wizard. See Creating a Staging Site in the Sites chapter for more information.
- Clone site – Appears only for production sites. Click to Launch the Clone site wizard. See Cloning a Site in the Sites chapter for more information.
- Visit site – Click to open the homepage of the site in a new tab.
- Suspend/Unsuspend site – This enables you to suspend or unsuspend access to the site for any reason; for example, if a client does not pay you for services rendered. This works in the same way as the suspend site tool on our dedicated hosting.
- Delete site – Click if you need to delete the site from your server. You will be prompted to confirm the action. IMPORTANT: if this is a production site, deleting it will also delete all staging sites linked to it. Also see Restoring a Deleted Site for some important information.

At the top of the screen, you’ll see a + Create Site button that launches the wizard to create a new site on the server. If you have already created at least one site on the server, you’ll also see a + Create Staging button that you can click to create a new staging site, and link it to any existing production site.

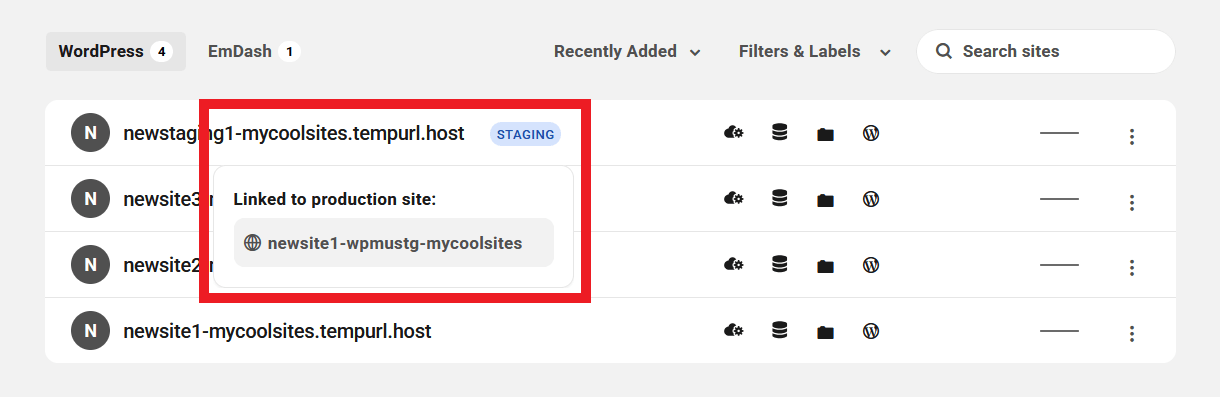
If you have created any staging sites on the server, they will be highlighted with a Staging badge next to their name. Hovering your mouse over that badge will reveal the name of the production site it is linked to. See Creating a Staging Site in the Sites chapter for more information.
Under the kebab icon at top-right, you’ll find shortcut options to Rename or to Delete the server. These options work just like they do on the main Unlimited Hosting screen:
- Rename Server – Click to pop open a modal window where you can change the name of the server. This only changes the name that displays in your Hub, not the Server ID itself.
- Delete – Click to pop open a modal window where you’ll be prompted to confirm that you want to delete the server. Note that you cannot delete a server if sites are currently hosted on it. You would need to first delete those sites before you can delete the server. If you delete a server before its current billing period has ended, an amount pro-rated for the remaining time of the server and any active add-ons will be refunded to you in the form of account credits.

If any server hits 90% of its storage capacity, a notice will appear at the top of the Overview screen, and we’ll send you an email to inform you of the situation.

Similarly, if a server has reached 100% of its capacity, a bright red notice will appear to inform you that you can’t add more sites to the server, or add any more content to any existing sites.

2.3 Sites
Copy chapter anchor to clipboardThis chapter covers everything you need to know about creating and managing WordPress websites on your own unlimited hosting servers.
See the EmDash Sites chapter for details about creating and managing sites on that platform. See the Servers chapter for details about setting up your servers.
All WordPress and/or EmDash sites that you create on a server will be listed under their respective tabs in the sites section of that server’s Overview screen.
If you have more than 10 sites on a server, pagination will kick in at the bottom of the screen where you can select how many sites to show per page.

2.3.1 Creating a Site
Link to chapter 3There are several ways to create a new site on a server.
If you’re currently on the main Unlimited Hosting screen, click the kebab icon in a server’s row and select the Add Site option.
If you’re currently viewing a Server Overview screen, click the + Create Site button at top-right of the screen, or the one in the middle of the welcome screen if this is the first site being created on the server.
If you’re on the My Sites screen in your Hub, click the + Add Site button, then click Create a New Site.

In the modal window that pops open, select the Unlimited Hosting option.

Then select the server where you want to create the site. If you don’t yet have an unlimited hosting server available, click the Create one now link. See the Servers chapter for more information.

Using any of the above options will launch the Create New Site wizard where you’ll first be prompted to select whether you want to create a WordPress site or an EmDash site.

Then create your temporary website URL. The URL will include the Server ID of the selected server.

Note that the following cannot be used for your website URL since they are default database names and would conflict with internal services:
- test
- sys
- mysql
Next, create the admin user you want for the new site.

Note that when creating an EmDash site, you won’t set a password at this step since EmDash sites use passkeys instead. See EmDash Sites below for more information.
Finally, click the Create site button. Site creation takes less than a minute, but you can navigate away from this screen and we’ll send you an email when it’s done. You can also view the site creation progress on the corresponding server overview screen.

Please note that Site Templates are not available for selection when creating a site on an unlimited server. A future update to this service may remove this limitation.
2.3.2 Creating a Staging Site
Link to chapter 3You can create as many staging sites as you need on any server. Each one must be linked to an existing production site on the same server. You can have multiple staging sites linked to the same production site.
Please note that staging sites can be created for WordPress sites only at this time.
If you’re currently on a Server Overview screen, click the + Create Staging button at top-right, or click Create Staging Site under the kebab icon of any production site’s row in the site list.
If you’re on the My Sites screen in your Hub, click the kebab icon in the site’s row and select Create staging site.

If you’re currently viewing the Hosting > Staging tab of an unlimited hosting production site, click the Create Staging Site button at top-right.

Clicking any of the above options will launch the Create new staging site wizard where you’ll be prompted to select the production site you want to mirror. If you launch the wizard from a specific site, that site will be pre-selected for you. Then enter the Temporary URL you want to use for your staging site. The URL will include the Server ID of the selected server.

Note the following cannot be used for your staging site URL since they are default database names and would conflict with internal services:
- test
- sys
- mysql
Click the Create Staging Site button in the wizard, and you’ll see the staging site creation in progress on the server overview screen.

Staging sites will be highlighted with a Staging badge next to their name on both the server overview screen and the My Sites screen in your Hub. Hovering your cursor over that badge will reveal the production site your staging site is linked to. See also Hosting Overview below for more information.
Just like with our dedicated hosting service, unlimited hosting staging sites will have password protection enabled by default. You can edit the username & password or turn it off if needed, under the Hosting > Tools tab of the staging site.
2.3.3 Cloning a Site
Link to chapter 3You can only clone an existing production site to a new site on the same server. It is not possible to clone staging sites, nor to clone a production site to a different server.
Please note that cloning is only available for WordPress sites at this time.
On a Server Overview screen, click Clone Site under the kebab icon of any production site’s row in the site list.

Or click the Clone site option from the My Sites screen in your Hub.
Either option will launch the Clone site wizard where you’ll be prompted to select the production site you want to clone. Then enter the Temporary URL you want to use for your new cloned site. The URL will include the Server ID of the selected server.

Click the Clone Site button in the wizard, and you’ll see the new site creation in progress on the server overview screen.

You can navigate away from this screen while the site is being created, and we’ll send you an email when it’s done.
2.3.4 Deleting a Site
Link to chapter 3Deleting a WordPress site on an unlimited hosting server works in exactly the same way as on our dedicated hosting. See EmDash Sites below for more information on deleting sites created on that platform.
If you delete a production site that has one or more staging sites linked to it, those staging sites will also be automatically deleted.
In addition to a Delete option that you’ll find in the Site Options dropdown on the main My Sites screen and the Hosting Overview screen, you’ll find that same option for each site on the Server Overview screen.
2.3.5 Hosting Overview
Link to chapter 3The information and options on this screen are identical to what you see for a site on our dedicated hosting, with the exceptions noted below. See Hosting > Overview in the dedicated hosting documentation for additional information.
Please note that the Hosting Overview screen is only available for WordPress sites.
Overview
When you visit the Hosting Overview screen for any site hosted on an unlimited hosting server, you’ll see the Server ID indicated in the Overview widget at the top, and the server Type will show Unlimited Hosting.

Since production and staging sites are separate sites on unlimited hosting servers, staging sites will be highlighted with a Staging badge next to the site name at top-left, and a link at top-right to open the associated Production site in a new tab.

Analytics
The Analytics widget will indicate the number of Visits and server Requests for the last 30 days, and the Storage Used by this site on the server where it’s hosted. Click the Detailed View link to be directed to the Analytics section for that site.

SFTP/SSH Accounts
Unlike our dedicated hosting where SFTP and SSH accounts can be created separately, such accounts created on an unlimited hosting site have both SFTP and SSH access to all files & allowed processes for that site. This widget will simply indicate the total number of SFTP/SSH accounts enabled on the site. Click to be directed to the SFTP/SSH section for that site.

Backups
Unlike our dedicated hosting, hourly backups are not available on unlimited hosting servers, so you won’t see that option here. Instead, you’ll see only the total number of daily backups along with the date & time of the most recent one.

Quick Actions
Since production and staging sites are separate sites on unlimited hosting servers, the Quick Actions widget will only have links to manage the files and database for that specific site, whether it’s a production or a staging site.

2.4 EmDash Sites
Copy chapter anchor to clipboardCreated and maintained by the same people behind Cloudflare, EmDash is a new lightweight content management system (CMS) built on Astro and TypeScript. Read the introductory article here.
While EmDash sites can be created and deployed directly in your Cloudflare account, they can also work as standalone Node.js apps. That makes it possible for us to offer our Premium members this new WordPress alternative, available exclusively on unlimited hosting servers.
EmDash is very developer-friendly, but you don’t have to be a developer to use it out of the box, especially not on our platform. We make it easy to create an EmDash site with just a few clicks, exactly like creating a WordPress site on an unlimited hosting server.
The first time you create an EmDash site, you’ll discover a very familiar feeling admin panel where many features mirror those of WordPress installs. You can even export content from a WordPress site and import it into an EmDash site with very little fuss.

This chapter will not focus on details of getting around an EmDash site and creating content on it (the full EmDash documentation has tons of info for developers and users alike, and you’ll find all you need to get familiar with how things work in this CMS).
Rather, we’ll cover everything you need to know about creating, accessing & managing EmDash sites on your unlimited hosting servers, and which WPMU DEV features are available for them at this time.
2.4.1 Creating & Managing EmDash Sites
Link to chapter 4Creating an EmDash site on an unlimited hosting server works exactly the same as when creating a WordPress site, with one exception: EmDash sites use passkeys instead of passwords for a secure login experience, so you’ll only enter your name and email address in the wizard.

Once created, you’ll see your new site appear under the EmDash tab on the server’s overview page.

This is the only location where you can access & manage your EmDash sites. They do not appear on the main Sites screen in your Hub since none of the Hub services like Security, Performance & Uptime are integrated with them.
The first thing you may notice is that, unlike your WordPress sites, there are no icons with shortcuts to options like database & file managers or a hosting overview screen. See SFTP/SSH Access below to learn how to access your EmDash site files.
Instead, you’ll only see a Login link that securely logs you into your EmDash site via SSO.

Click the kebab icon at the far right to reveal available management options for your EmDash site.

- Visit site – Opens the homepage of the site in a new tab.
- Site domains – Redirects to the Domains screen specific to this site.
- Site backups – Redirects to the Backups screen specific to this site.
- Rebuild site – This option reinstalls dependencies and rebuilds the project. Required when plugins or configuration files change (e.g. astro.config.mjs) and also automatically triggers a Restart on completion. You’ll be prompted to confirm the action.
- Restart – This restarts the site and is similar to clearing cache on a WordPress site. You’ll be prompted to confirm the action.
- Reset – This wipes the database, deletes all existing content and resets the site to a default configuration. You’ll be prompted to confirm the action.
- Delete – Click if you need to delete the EmDash site from your server. You’ll be prompted to confirm the action.
2.4.2 Logging Into EmDash Sites
Link to chapter 4EmDash sites use passkeys instead of passwords for a more streamlined and secure login experience.
Passkeys are device-specific, which means that if you intend to access the admin of your EmDash site from various devices without using the SSO login link in your Hub, you’ll need to set up a passkey for each device.
Using SSO in The Hub
Logging into your EmDash site from The Hub couldn’t be easier. Simply click the Login link for your site when viewing it in the sites list of your server’s Overview screen.
The SSO login works from any device as long as you can access your Hub from it, whether you’ve set up any passkeys or not.
Using a Passkey
If you’ll be accessing your EmDash site admin directly, without using the SSO login in your Hub, you’ll want to set up passkeys for each device you’ll be using.
To set up a passkey, first access your site’s admin using the SSO login from your Hub. Then go to Settings > Security.

Click the + Add Passkey button.

Give your passkey a name so you can identify it later if needed, and click Register Passkey.

You’ll see a prompt to save the passkey to your browser’s password manager, or to a 3rd-party password manager if you have one installed.

If you wish to create a passkey for that device using a different method, or create a passkey for a mobile device, close that prompt. Then, if you’re on a Windows device, click Change in the alert that pops up (Apple devices should work similarly).

You’ll then be able to select a different way to save the passkey.

Creating a Passkey for a Mobile Device
As an example, to create a passkey for a mobile device, select the iPhone, iPad or Android device option as seen above. That triggers a QR code that you’ll scan with your mobile device.

Your mobile device will connect and you’ll then follow the prompts on your mobile device to secure the passkey with your device’s biometrics.

Once completed, you’ll see your new passkey in your site admin.

Note that once created, you can only edit the name of the passkey in your EmDash site admin.
Using a Passkey from a Mobile Device
To log into your site with your mobile passkey, access your site’s login page at https://yoursite.tld/_emdash/admin/login (be sure to change yoursite.tld to your actual site domain), and click the Sign in with Passkey button.

Follow the prompts in the alert that pops up and again select the iPhone, iPad or Android device option. Scan the QR code with your mobile device and follow the prompts on your device to authenticate your login with your device’s biometrics.

2.4.3 Managing Domains
Link to chapter 4Adding and managing custom domains for your EmDash sites works in the same way as it does for your WordPress sites.
Click the kebab icon on the server overview screen for the EmDash site you want, and select the Site domains option.

That will redirect you to the Domains screen for this site in your Hub where you can add an existing domain, or click the Register New Domain button if you wish to purchase a new one for this site.

Once the domain has been added, follow the instructions in our Hosting > Domains documentation to update the DNS records and set the domain as the Primary domain for the site.

As noted above, EmDash sites can only be accessed & managed from the Unlimited Hosting server where they were created. So the Domains screen for EmDash sites has no sidebars with quick navigation elements to other site management areas or other sites.
2.4.4 Managing Backups
Link to chapter 4Creating and managing backups for your EmDash sites works in the same way as it does for your WordPress sites.
Click the kebab icon on the server overview screen for the EmDash site you want, and select the Site backups option.

That will redirect you to the Backups screen for this site in your Hub where you can view, download or restore the existing daily backups, and create manual backups if needed.

See our Hosting > Backups documentation for more information.
As noted above, EmDash sites can only be accessed & managed from the Unlimited Hosting server where they were created. So the Backups screen for EmDash sites has no sidebars with quick navigation elements to other site management areas or other sites.
2.4.5 SFTP/SSH Access
Link to chapter 4The file system for an EmDash site can only be accessed via SFTP or SSH. So any SFTP/SSH user created on your server can access all your WordPress and EmDash sites.
See SFTP/SSH > Server-Level Users in our Unlimited Hosting documentation for more information.
Note that, since EmDash sites run on Node.js apps which use SQLite3 databases, there is no direct access to the database for these sites.
2.4.6 Adding Users
Link to chapter 4There are two ways you can add users to your EmDash sites:
Manually invite users via email
In your site’s dashboard, go to Users and click the Invite User button.

Enter the email address of the user you want to invite and select the role they should be assigned in the site. Then click the Send Invite button.

An email will be sent to the email address as entered, and will contain a button that the user must click within 7 days to accept the invite.

The new user would then create a login passkey in much the same fashion as when you create one from your EmDash site admin.

Allowlist specific email domains to enable self-signup
With this feature, users with email addresses using any domains you allowlist here will be able to register accounts on your site.
In your site’s dashboard, go to Settings > Self-Signup Domains and click the + Add Domain button.

Enter the email domain you wish to allow, select to role to be assigned to users who signup from this domain. then click Add Domain.
Now, any user with a valid email address from your allowlisted domain(s) can register an account on your site by visiting https://yoursite.tld/_emdash/admin/signup
2.4.7 EmDash Plugins
Link to chapter 4EmDash doesn’t have a one-click plugin installer like WordPress yet, and there’s no official plugin marketplace either. So we’ve built a few plugins for you that come pre-installed on all new EmDash sites, and you can retrofit them to any older existing sites as needed.
- Contact Form Plugin: this plugin gives you a basic contact form that you can drop on any page, with submissions managed in your EmDash admin.
- Email Plugin: this plugin ensures secure delivery for all your transactional EmDash emails like user invites and login recovery.
Contact Form Plugin
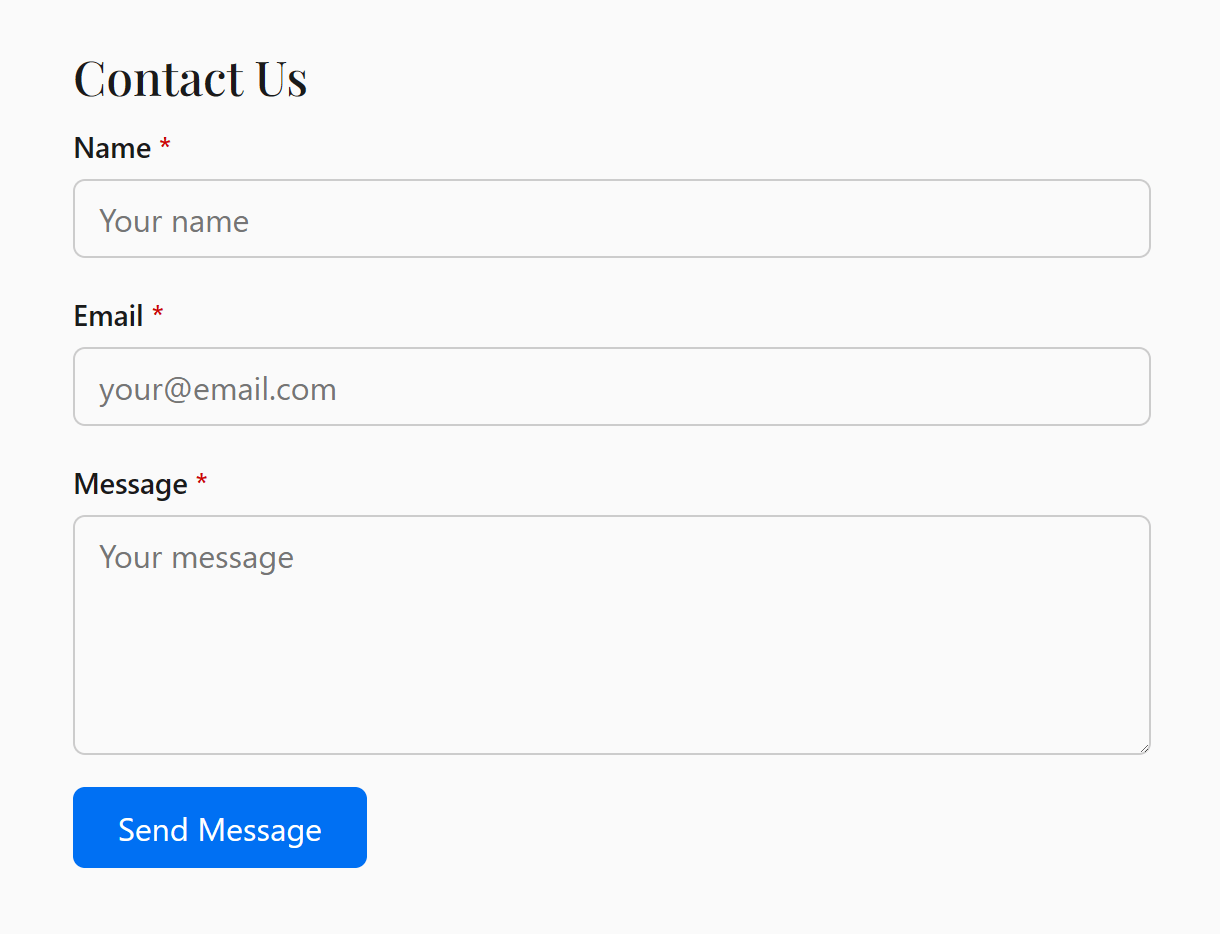
This is a very basic contact form plugin with 3 built-in fields: Name, Email & Message. You can customize a few settings like the success message, privacy info and max message length. Managing submissions is done entirely in your site admin; there are no notifications sent via email at this time.
See below for instructions on manually installing the plugin on any existing EmDash site where you’d like to use it, or if you remove it for any reason and need to reinstall.
Add the form to a page
To add the contact form to a page on your EmDash site, open the editor for the page by clicking the pencil icon for it on the Pages screen.

In the editor, type a slash ( / ) to pop open the list of blocks that can be added, and start typing contact until you see the option to Insert your contact form.
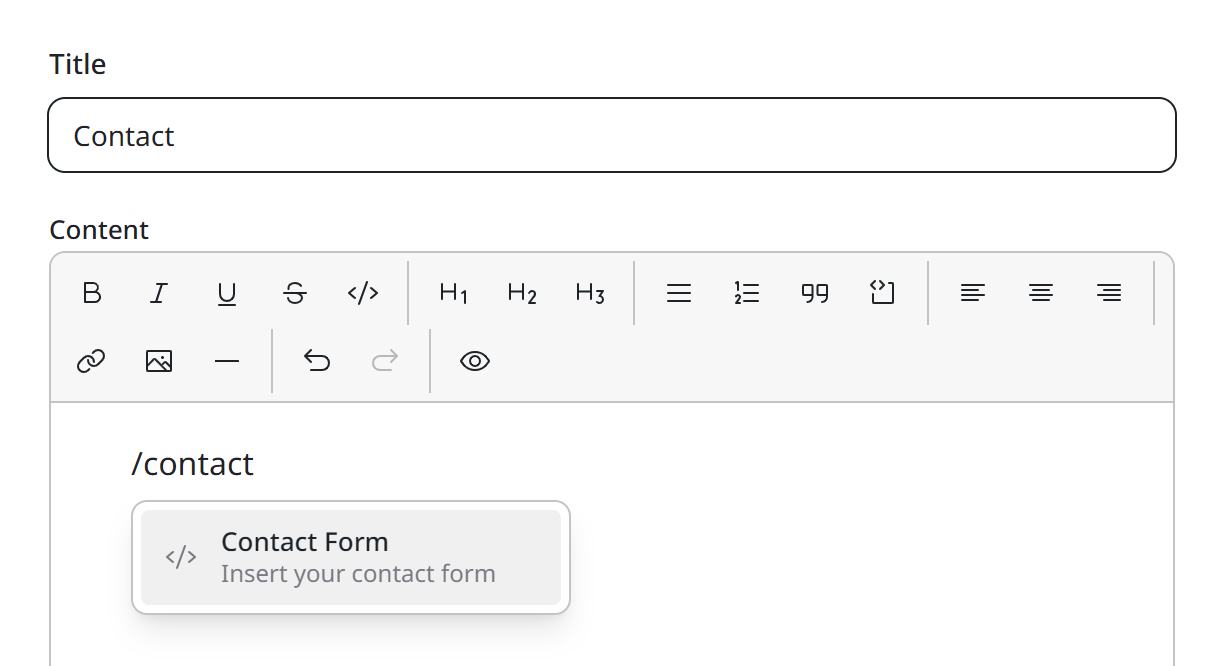
Click on that to open the list of forms where you’ll see there’s only one. Click Insert to add the form to your page.

Customizing form settings
To customize any available form settings, navigate to Form Settings in your EmDash admin. Make any adjustments needed and click Save settings when you’re done.

Managing form submissions
Navigate to Form Submissions in your EmDash admin, and you’ll find all the form submssions from your site visitors.
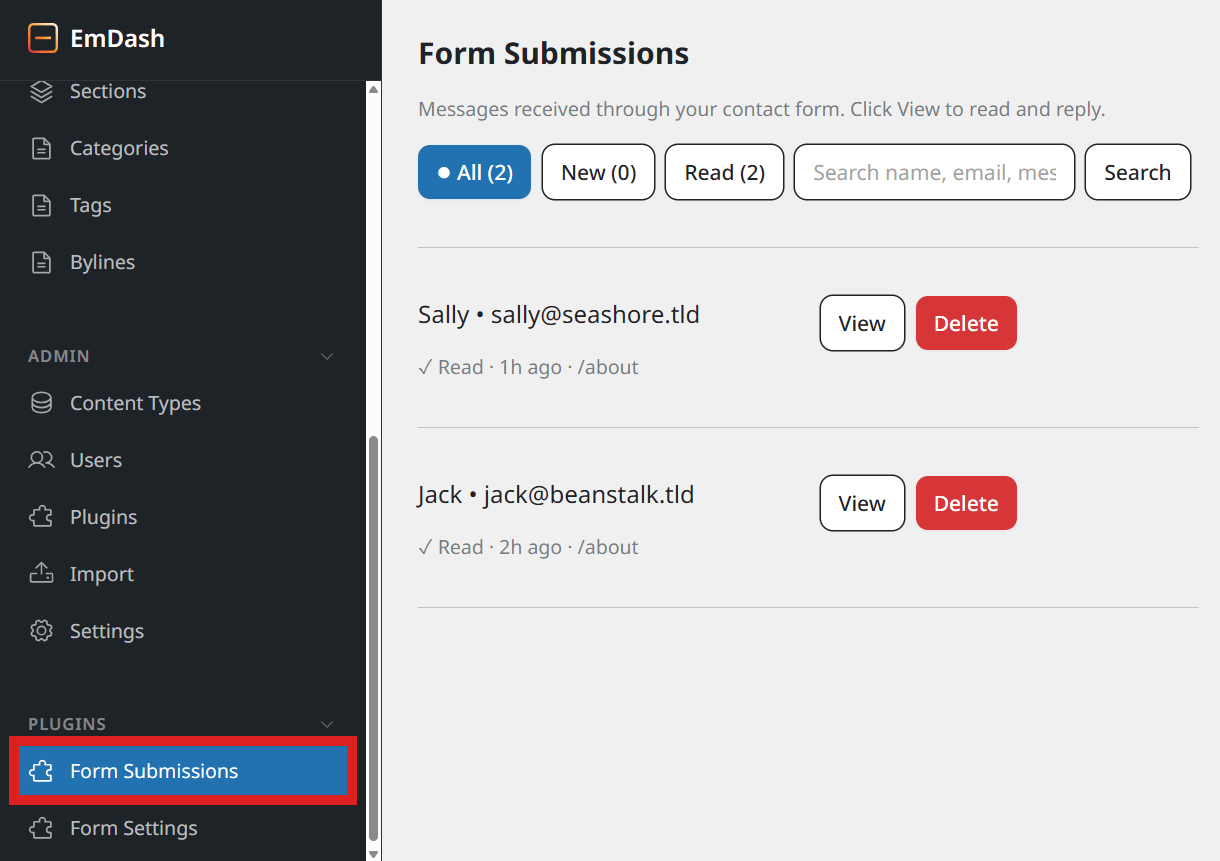
Use the buttons in the top row to filter the submissions to show All, or only New ones, or those you’ve already Read. Click the View button next to any submission to view its contents, or Delete to remove it.
Manual install
Follow the steps below to manually install the plugin on any existing site where you’d like to use it, or if you remove it for any reason and need to reinstall. If you get stuck, just contact support and we’ll give you a hand.
You’ll need to have an EmDash site already created of course, and a server-level SFTP/SSH user so you can edit two files.
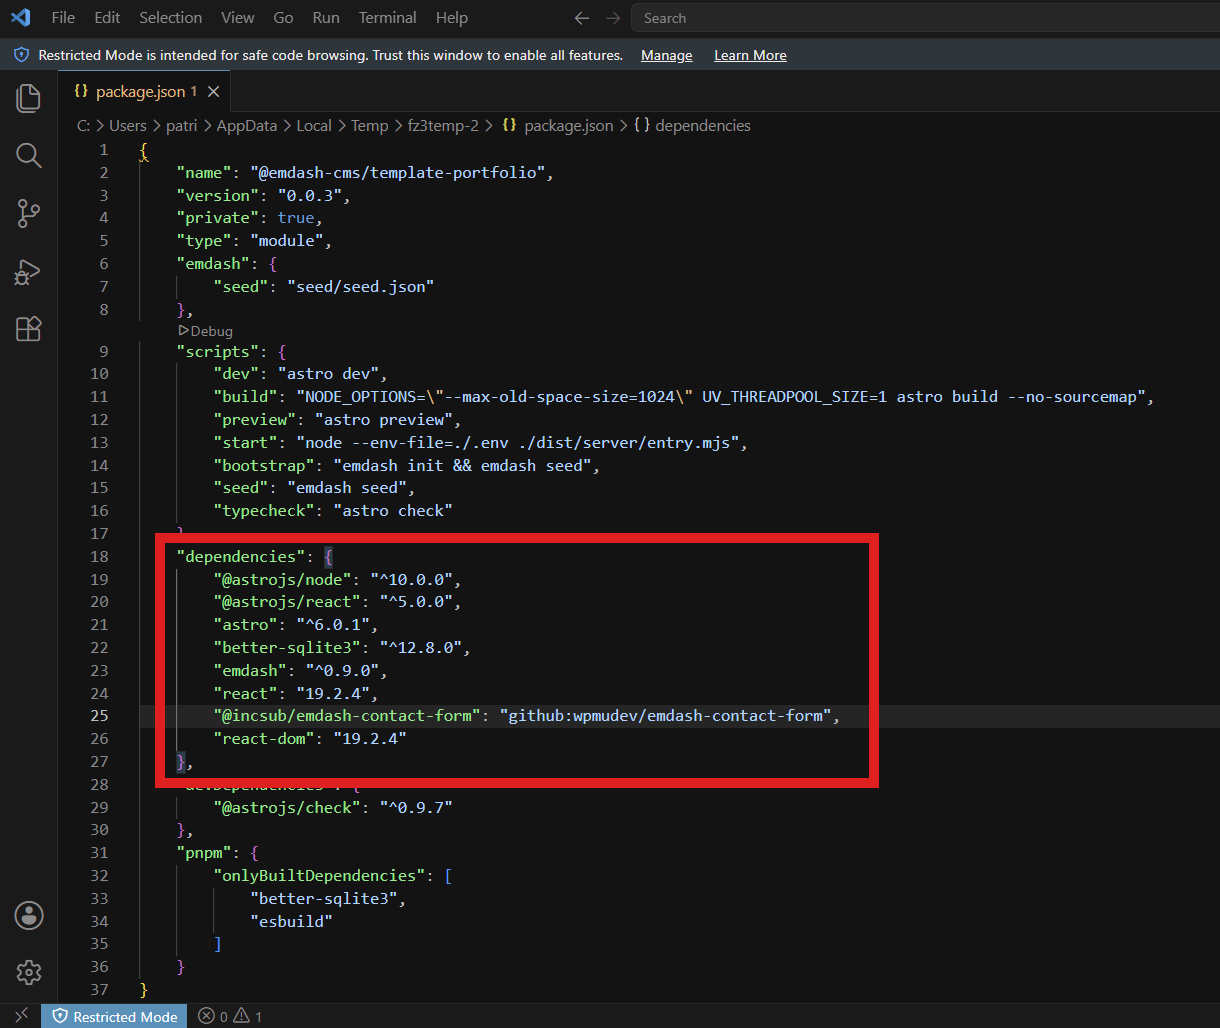
Step 1: Add the plugin to package.json
Open package.json (in your site’s public_html folder) and add this single line under “dependencies“:
"@incsub/emdash-contact-form": "github:wpmudev/emdash-contact-form",
It can go anywhere inside the “dependencies” block. Once done, save the file and upload it back to public_html.
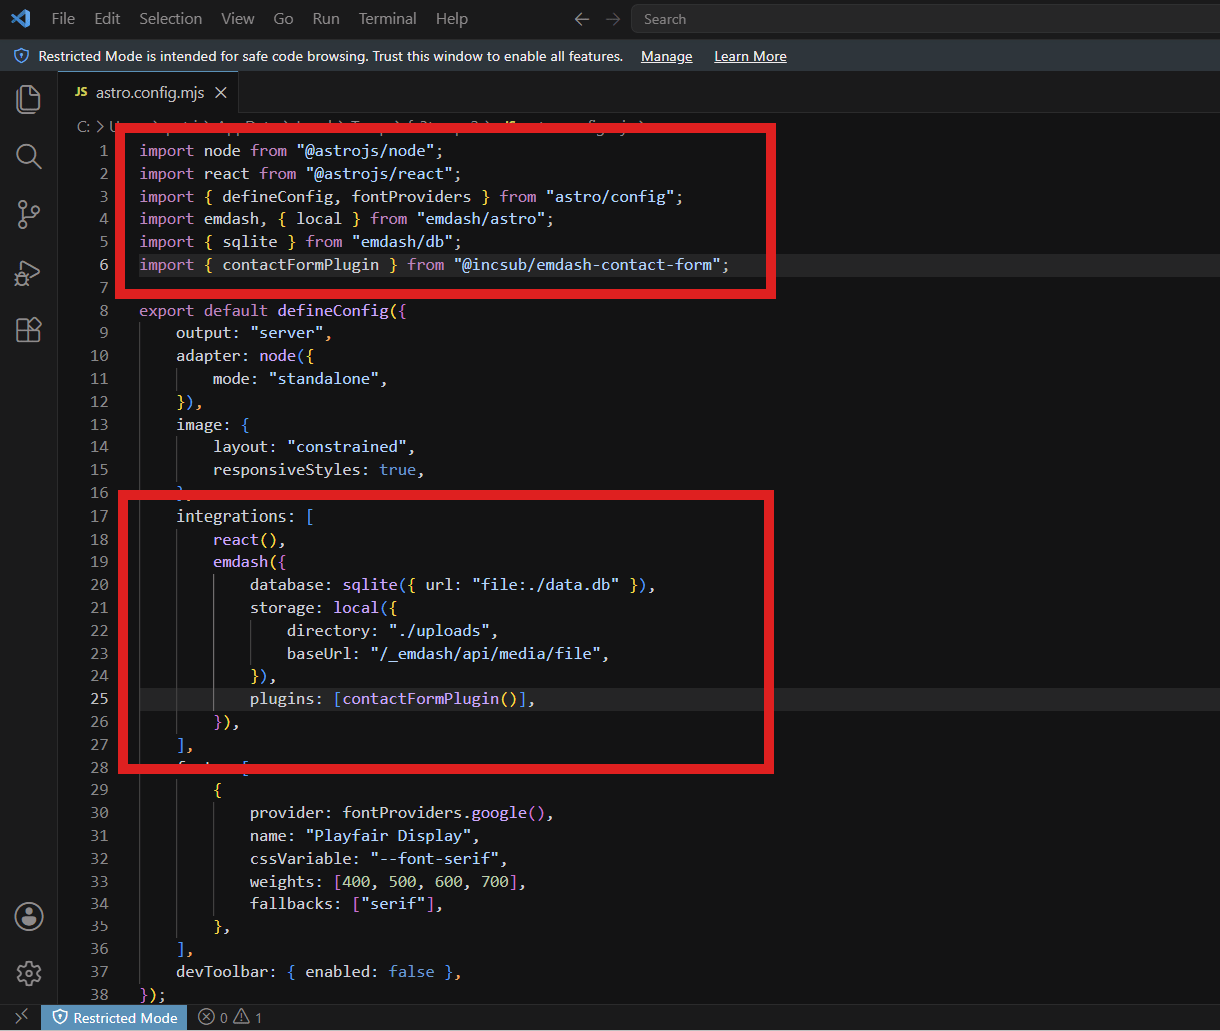
Step 2: Wire it into astro.config.mjs
Open astro.config.mjs (also in public_html). You’re adding two lines:
Line one, at the top with the other import statements:
import { contactFormPlugin } from "@incsub/emdash-contact-form";
Line two, inside the emdash({...}) block. Look for database: and storage: already in there. Add the following line:
plugins: [contactFormPlugin()],
Note that if you have also installed the Email Plugin, you’ll want to concatenate the 2 plugin calls into a single line, like this:
plugins: [contactFormPlugin(), sendmailPlugin()],
Save the file and upload it back to public_html.
Step 3: Rebuild your site in your Hub
The hardest part is already done.
On your server’s Overview screeen, click Rebuild Site from the management options and give it a minute to finish. The host installs the plugin and bundles it for you, and you don’t need to run any commands.
The contact form plugin is now live
Open your EmDash admin. You’ll see two new entries in the sidebar under Plugins:
- Form Submissions – where messages land
- Form Settings – where you customize the success message, spam protection, and retention options.
That’s the whole install.
If the plugin doesn’t show in the sidebar after the site rebuild, double-check Step 2 above. The plugins: line must be inside emdash({…}), not outside it.
Email Plugin
This plugin has no configuration options and simply works to ensure that transactional emails from your EmDash site are reliably and securely delivered.
You can verify that the plugin is installed correctly by going to Settings > Email in your EmDash admin.
Enter your email address in the field provided and click Send Test.

Manual Install
Follow the steps below to manually install the plugin on any existing site where you’d like to use it, or if you remove it for any reason and need to reinstall. If you get stuck, just contact support and we’ll give you a hand.
You’ll need to have an EmDash site already created of course, and a server-level SFTP/SSH user so you can edit two files.
Step 1: Add the plugin to package.json
Open package.json (in your site’s public_html folder) and add this single line under “dependencies“:
"@incsub/emdash-sendmail": "github:wpmudev/emdash-sendmail#v1.0.2",
It can go anywhere inside the “dependencies” block. Once done, save the file and upload it back to public_html.

Step 2: Wire it into astro.config.mjs
Open astro.config.mjs (also in public_html). You’re adding two lines:
Line one, at the top with the other import statements:
import { sendmailPlugin } from "@incsub/emdash-sendmail";
Line two, inside the emdash({...}) block. Look for database: and storage: already in there. Add the following line:
plugins: [sendmailPlugin()],
Note that if you have also installed the Contact Form Plugin, you’ll want to concatenate the 2 plugin calls into a single line, like this:
plugins: [contactFormPlugin(), sendmailPlugin()],
Save the file and upload it back to public_html.

Step 3: Rebuild your site in your Hub
The hardest part is already done.
On your server’s Overview screeen, click Rebuild Site from the management options and give it a minute to finish. The host installs the plugin and bundles it for you, and you don’t need to run any commands.
The email plugin is now live
That’s the whole install.
If the plugin doesn’t show in your site Settings after the site rebuild, double-check Step 2 above. The plugins: line must be inside emdash({…}), not outside it.
2.4.8 EmDash FAQ
Link to chapter 4Do I need a Cloudflare account to use EmDash on Unlimited Hosting?
No. EmDash sites can be created on your unlimited hosting servers just like WordPress sites. See Creating & Managing EmDash Sites above.
Can I migrate my existing WordPress site content?
EmDash supports WordPress imports through WXR exports, the WordPress REST API, and WordPress.com. Posts, pages, media, and taxonomies are the easiest to migrate. See Migrate from WordPress in the official EmDash documentation for more information.
Can I install WordPress plugins on an EmDash site?
No. EmDash has its own plugin system, and WordPress plugins are not drop-in compatible with EmDash.
Can I use WordPress themes on an EmDash site?
No. EmDash themes are Astro site templates, not WordPress themes, so a WordPress theme does not install into EmDash the same way it would in wp-admin.
Can I create custom post types or custom fields?
The process is similar to WordPress, but the terminology is a bit different. Whereas WordPress uses post types, EmDash uses Collections that include both content and field types. There is a visual UI for creating your own custom content types & associated fields.

2.5 Domains
Copy chapter anchor to clipboardAdding a custom domain to a WordPress site hosted on an unlimited hosting server works in exactly the same way as for a site on our dedicated hosting, with one major difference: you can add custom domains to staging sites as well as production sites.
See Domains in our dedicated hosting documentation for more information on adding custom domains to your WordPress sites.
See EmDash Sites above for details about adding custom domains to sites created on that platform.

2.6 SFTP/SSH
Copy chapter anchor to clipboardCreating and managing SFTP/SSH users works a bit differently on unlimited hosting servers & sites compared to our dedicated hosting service: you can create users at both the server level and the site level.
However, only server-level users can access EmDash sites; it is not possible to create site-level users for EmDash sites.
Additionally, whereas SFTP and SSH users are created separately on our dedicated hosting, any such users created on our unlimited hosting service have both SFTP and SSH access.
This chapter only contains information about the features that differ from SFTP/SSH users created in our dedicated hosting service. For more information about SFTP sync, SSH tunneling, etc, please refer to our dedicated hosting SFTP/SSH documentation.
2.6.1 Server-Level Users
Link to chapter 6SFTP/SSH users created at the server level have unrestricted SFTP and SSH access to all files and directories on all sites on the same server where they are created.
Creating a server-level user
To create a SFTP/SSH user at the server level, start by accessing the Server Overview for the server you want. Click the Manage Server option under the kebab icon in the server’s row on the Unlimited Hosting screen.
Under the SFTP/SSH tab, click the Add User button in the middle of the screen.

In the modal window that pops open, enter the username you want for the user, select your preferred authentication method, and click the Add User button to create the user.

Password
For a password, you can either click the Generate password link to automatically create a strong password, or enter a custom password with a minimum of 10 characters.
Public key
If you want to use a public key instead and need help setting that up, see Creating SSH Keys in our dedicated hosting SFTP/SSH documentation.
Managing server-level users
Once you have created at least one user, the SFTP/SSH screen will display your server’s Connection Details at the top, and a list of all users beneath that. You can create additional users by clicking the Add User button at the top-right of the Users list.

Click the View Connection Info button in any user’s row to reveal quick connect information for that user. The quick link, when copied into an FTP client or terminal application, identifies the server and the user to be connected. The server’s port and SFTP/SSH user password (or public key) are still required when using the quick link.

Click the pencil icon in any user’s row to edit the user account if needed. Or click the trash icon in any user’s row to delete that user. You will be prompted to confirm the action.

2.6.2 Site-Level Users
Link to chapter 6SFTP/SSH users created at the site level only have SFTP and SSH access to files and directories on the site where they are created. Unlike such users at the server level, their access can be restricted to specific folders within the WordPress file structure of the site.
You can create SFTP/SSH users on both production and staging sites, but they must be created separately for each site.
Creating a site-level user
To create a SFTP/SSH user at the site level, start by accessing the SFTP/SSH tab in the Hosting section of that site. Then click the Add User button in the middle of the screen.

In the modal window that pops open, enter the username you want for the user, select your preferred authentication method, and optionally set the path restriction for the user.

Password
For a password, you can either click the Generate password link to automatically create a strong password, or enter a custom password.
Public key
If you want to use a public key instead and need help setting that up, see Creating SSH Keys in our dedicated hosting SFTP/SSH documentation.
Path Restriction
Site-level SFTP/SSH users can be restricted to specific folders within the WordPress file structure. This might allow, for example, a graphic designer to access the Uploads folder where images are stored, while preventing that person from accessing files elsewhere.
Use the Path Restrictions drop-down menu to determine the scope of a new user’s access as follows:
- None – No restrictions. User can access all site files
- wp-content – Grants access to the wp-content folder, which contains all uploaded files, plugin files, theme files, the site index, and language files
- Plugins – Grants access to the Plugins folder only
- Themes – Grants access to the Themes folder only
- Uploads – Grants access to the Uploads folder only
- Custom – Grants access only to a custom directory inside the public_html directory that you specify in an additional field that appears when you select this option.
When you’re done, click Add User and the new SFTP/SSH user will be created.
Managing site-level users
Once you have created at least one user, the SFTP/SSH screen will display your site’s Connection Details at the top, and a list of all users beneath that. The list at the site level indicates the path restriction you have set for each user, if any. You can create additional users by clicking the Add User button at the top-right of the Users list.

Click the Connection Info button in any user’s row to reveal quick connect information for that user. The quick link, when copied into an FTP client or terminal application, identifies the site and the user to be connected. The site’s port and SFTP/SSH user password (or public key) are still required when using the quick link.
Click the pencil icon in any user’s row to edit the user account if needed. Or click the trash icon in any user’s row to delete that user. You will be prompted to confirm the action.

2.7 Tools
Copy chapter anchor to clipboardThe hosting tools work a bit differently on unlimited hosting servers & sites compared to our dedicated hosting service.
Some tools must be configured at the server level and some can only be enabled or disabled at the site level.
Additionally, our dedicated hosting service includes Object Cache and an integration with New Relic Monitoring. These tools are not available on unlimited hosting servers or sites.
See the Tools document in our dedicated hosting documentation for more information about tools not described here.
2.7.1 Server-Level Tools
Link to chapter 7To access server level tools, go to the server overview for the server you want.
Then click on the Tools tab.

Web Application Firewall
The Web Application Firewall can only be configured at the server level, and it secures all sites on the server if enabled on them.
However, its configuration is identical to that of our dedicated hosting service. See the Web Application Firewall (WAF) chapter in our dedicated hosting Tools documentation for more information.
Brute Force Attack Protection
Brute Force Attack Protection can only be enabled at the server level and it applies to all sites on the server; there is no option to disable it at the site level.
However, its configuration is identical to that of our dedicated hosting service. See the Brute Force Attack Protection chapter in our dedicated hosting Tools documentation for more information.
AntiBot
The AntiBot Global Firewall can only be enabled at the server level, and it secures all sites on the server; there is no option to disable it at the site level.
However, its configuration is identical to that of our dedicated hosting service where you can select to enable it on dedicated sites and/or unlimited servers. See the AntiBot Global Firewall chapter in our dedicated hosting My Sites Overview documentation for more information.
Custom IP List
The Custom IP List can only be enabled at the server level, and it secures all sites on the server; there is no option to disable it at the site level.
However, its configuration is identical to that of our dedicated hosting service where you can select to enable it on dedicated sites and/or unlimited servers. See the Custom IP List chapter in our dedicated hosting My Sites Overview documentation for more information.
HTTP/3 (with QUIC)
HTTP/3 (with QUIC) can only be enabled at the server level and it applies to all sites on the server; there is no option to disable it at the site level.
See the HTTP/3 (with QUIC) chapter in our dedicated hosting Tools documentation for more information.
ionCube Loader
The ionCude Loader tool can only be enabled at the server level and it applies to all sites on the server; there is no option to disable it at the site level.
See the ionCube Loader chapter in our dedicated hosting Tools documentation for more information.
2.7.2 Site-Level Tools
Link to chapter 7Site-level tools are available for both production and staging sites. To access the site level tools, go to the Hosting section of your site and click on the Tools tab.

All available tools function in exactly the same way on sites on our unlimited hosting service as they do on our dedicated hosting service, with two exceptions.
Web Application Firewall
The Web Application Firewall must be configured at the server level and can only be enabled or disabled at the site level on WordPress sites. There is no option to disable the WAF on EmDash sites once it’s enabled on the server.

Migrate Existing Website
The Migrate Existing Website tool on unlimited hosting sites can only be used to migrate 3rd-party hosted sites that are connected to your Hub. It cannot be used to migrate an existing site hosted on either service, or to migrate a site from one shared server to another.
However, if you are using an unlimited hosting server to build out client sites and wish to migrate them to their own dedicated environments before taking them live, you can do that using the Migrate Existing Site tool from the dedicated hosting site.

Migration of a site can take some time, and we’ll send you an email once it’s complete, or if any issues prevent the migration from completing.
2.8 Backups
Copy chapter anchor to clipboardBackups of a site hosted on an unlimited hosting server work in exactly the same way as for a site on our dedicated hosting, with a few exceptions.
Unlike our dedicated hosting, hourly backups are not available on unlimited hosting servers, so you won’t see that option on the Backups tab of a site. Instead, you’ll see only the total number of daily backups along with the date & time of the most recent one.

Additionally, since staging sites on unlimited hosting servers are separate sites, backups are automatically created daily on staging sites as well as production sites.
Finally, restoring a backup on the production site does not automatically delete any staging sites linked to it.
You’ll find all the backups data for a site under the Backups tab in the Hosting section of that site.
See the Backups document in our dedicated hosting documentation for more information.
Also see EmDash Sites above for information about backups for sites created on that platform.
2.9 Analytics
Copy chapter anchor to clipboardThe Analytics tab displays data a bit differently on unlimited hosting servers & sites compared to our dedicated hosting service. The great majority of the analytics data is only available at the server level.
This chapter only details aspects of analytics that differ from our dedicated hosting service. Please refer to our dedicated hosting Analytics documentation for more information about features not covered here.
2.9.1 Server-Level Analytics
Link to chapter 9To access server level analytics, go to the server overview for the server you want.
Then click the Analytics tab.

Storage
Under the Storage tab, you’ll find a breakdown of the SSD storage used by all sites hosted on your unlimited hosting server.
The main difference here as compared to our dedicated hosting is the Site Files, Database, and Logs section where you’ll see the storage used (for files, databases, and logs combined) for up to 5 of the largest sites hosted on your server. This will include both your WordPress and EmDash sites, if any. Note that EmDash sites will only appear under the Storage tab. See EmDash Sites above for more information.

If you have more than 5 sites on a server, a View all link will appear in that section. Click that link to pop open a modal window where you’ll see a list of all sites on the server with storage data for each one.

You can filter the list of sites in the modal to show only Production or Staging sites, and/or only sites with selected Labels that you have assigned to them.

Or start typing in the smart search box to locate any site(s) that match what you enter.

Another difference is the Logs & Temp portion of reserved System Storage. That is replaced with Database Configuration Files section, for which there is no reserved storage allotment. This is simply the directory where all your database configuration files are stored.
Live Stats
The Live Stats display is identical to what you’d see for a site on our dedicated hosting service, but it applies to the server, not to any specific site hosted on it.
Traffic
Traffic analytics is very similar to what you’d see for a site on our dedicated hosting service. The main difference here is that you’ll see Visits and Requests data for the 5 most frequented sites on the server in addition to Bandwidth used by all sites.
Visits

Requests

Bandwidth

Click the View all link in either the Visits or Requests sections to pop open modal windows where you’ll see data for all sites on the server.

Just like with the detailed lists under the Storage tab above, you can filter them to show only Production or Staging sites, and/or only sites with selected Labels that you have assigned to them. You can also start typing in the smart search box to locate any site(s) that match what you enter.
Click the graph icon next to any site to be redirected to the Analytics screen for that site.
This section displays the total number of transactional emails sent by WordPress for each site on your server. Only the 5 most active sites are shown in the list, but you can click the View all link to pop open a modal window to view email stats for all sites on the server.

Just like with the detailed lists under the Storage tab above, you can filter them to show only Production or Staging sites, and/or only sites with selected Labels that you have assigned to them. You can also start typing in the smart search box to locate any site(s) that match what you enter.
If you use another email service provider with a created address, including using SMTP with Branda, those emails cannot be logged and you will not see any stats here. See Understanding Your Email Solutions for additional information about transactional emails.
2.9.2 Site-Level Analytics
Link to chapter 9To access Analytics for either a production or a staging site, go to the Analytics tab in the Hosting section of that site.
Traffic
Traffic analytics at the site level only display Visits and Requests data for that one site.
Visits

Requests

This section displays the total number of transactional emails sent by the site.

If you use another email service provider with a created address, including using SMTP with Branda, those emails cannot be logged and you will not see any stats here. See Understanding Your Email Solutions for additional information about transactional emails.
2.10 Staging
Copy chapter anchor to clipboardUnlike staging sites on our dedicated hosting service where staging resources are limited, staging sites created on your unlimited hosting servers are separate sites and they use the same shared resources as a production site on that same server.
You can create as many staging sites as you need, link each one to the same or different production sites on the same server, even add your own custom domains.
The content of any Production site can be copied to any linked Staging site with a single click, and vice-versa. Note that staging sites are not available for EmDash sites at this time.
Team members or clients will only be able to push/pull to/from production/staging sites to which they have been granted access. For example, if a production site has multiple staging sites linked to it, but the team member or client has been given access to only one of those staging sites, they will not be able to access or select any of the other staging sites for any operation. Conversely, if a team member or client has been given access to a staging site, but not to the production site linked to it, push/pull operations on the staging tab of that staging site would be disabled. See the Sites Module chapter in our Team & Client Role Customization document, and the Websites section in our Client Tools – Clients document for more information about granting site access.
2.10.1 Production Sites
Link to chapter 10Access the Staging tab of your production site by going to Staging in the Hosting section of that site.

Push to Staging
On a production site, this option enables you to overwrite the contents of any staging site that is linked to it with the contents of the production site you’re currently viewing.
First, select the staging site you want to use from the dropdown. Then click the Push button to pop open a modal window where you’ll be prompted to confirm the action.

Pull from Staging
On a production site, this option enables you to overwrite the contents of the production site you’re currently viewing with the contents of any staging site that is linked to it.
First, select the staging site you want to use from the dropdown.

Then click the Pull button to pop open a modal window where you can select whether to copy only staging Files to the production site, or both Files and Database.

Just like with sites on our dedicated hosting service, backups of your production site are automatically created before and after the push from staging, so you can restore the production site to either state in the unlikely event that something goes wrong. You’ll find these backups under the Backups tab of your production site, labeled pre-staging-push and post-staging-push.

2.10.2 Staging Sites
Link to chapter 10Access the Staging tab of your staging site by going to Staging in the Hosting section of that site.

Push to Production
On a staging site, this option enables you to overwrite the contents of the production site that is linked to the staging site you’re currently viewing.
Click the Push button to pop open a modal window where you can select whether to copy only staging Files to the production site, or both Files and Database.
Just like with sites on our dedicated hosting service, backups of your production site are automatically created before and after the push from staging, so you can restore the production site to either state in the unlikely event that something goes wrong. You’ll find these backups under the Backups tab of your production site, labeled pre-staging-push and post-staging-push.
Pull from Production
On a staging site, this option enables you to overwrite its contents with that of the production site that is linked to it. Click the Pull button to pop open a modal window where you’ll be prompted to confirm the action.

2.11 Logs
Copy chapter anchor to clipboardLogs are displayed a bit differently on unlimited hosting servers compared to our dedicated hosting service. The great majority of the data is only available at the site level.
This chapter only details aspects of logs that differ from our dedicated hosting service. Please refer to our dedicated hosting Logs documentation for more information about features not covered here.
2.11.1 Server Audit Log
Link to chapter 11The only log available at the server level is the Audit Log. To access the server level Audit Log, go to the server overview for the server you want.
Then click the Audit Log tab.

The server Audit Log is a list of every action or change made on your unlimited hosting server. Each entry includes a note with the date, the action and the user that performed the action.

2.11.2 Site Logs
Link to chapter 11Site-specific logs function in exactly the same way on sites on our unlimited hosting service as they do on our dedicated hosting service, with one exception: there is no option to switch between Production and Staging on Unlimited Hosting since they are each individually-hosted sites.
Note that there are no site-specific logs for EmDash sites.
2.12 Basic Email
Copy chapter anchor to clipboardBasic Email for a WordPress production site hosted on an unlimited hosting server works in exactly the same way as for a site on our dedicated hosting.
See Basic Email in our dedicated hosting documentation for more information.
Note however that Basic Email is not available on WordPress staging sites or on EmDash sites on unlimited hosting servers.
2.13 Upgrade
Copy chapter anchor to clipboardWhen viewing details of any of your unlimited servers, you’ll see an Upgrade tab in the sidebar menu that lists all the plans available for selection if you need to upgrade your server.

This is the same information you’d see when clicking the Upgrade button on a Server Overview screen.
Note that downgrading a server is not possible on our high-frequency hosting architecture.
2.14 Unlimited Hosting FAQ
Copy chapter anchor to clipboardWhat happens if I downgrade my WPMU DEV membership to anything other than Premium?
The ability to create unlimited hosting servers is available exclusively to WPMU DEV Premium members. So if you downgrade your membership to any plan other than Premium, you would not be able to create any new servers. However, any servers you had created before downgrading would not be affected, and you could continue creating & managing sites on them since you have already paid for them.
Can I migrate a site from dedicated hosting to one of my unlimited hosting servers?
There is currently no automated way to migrate a site from dedicated to unlimited hosting. So you would need to use a migration plugin like Shipper.
2.15 Get Support
Copy chapter anchor to clipboardIf you still have questions or need assistance after reading this document, please don’t hesitate to contact our support superheroes using the available options under the Support tab in your Hub or via the Support tab in your WPMU DEV Dashboard.
